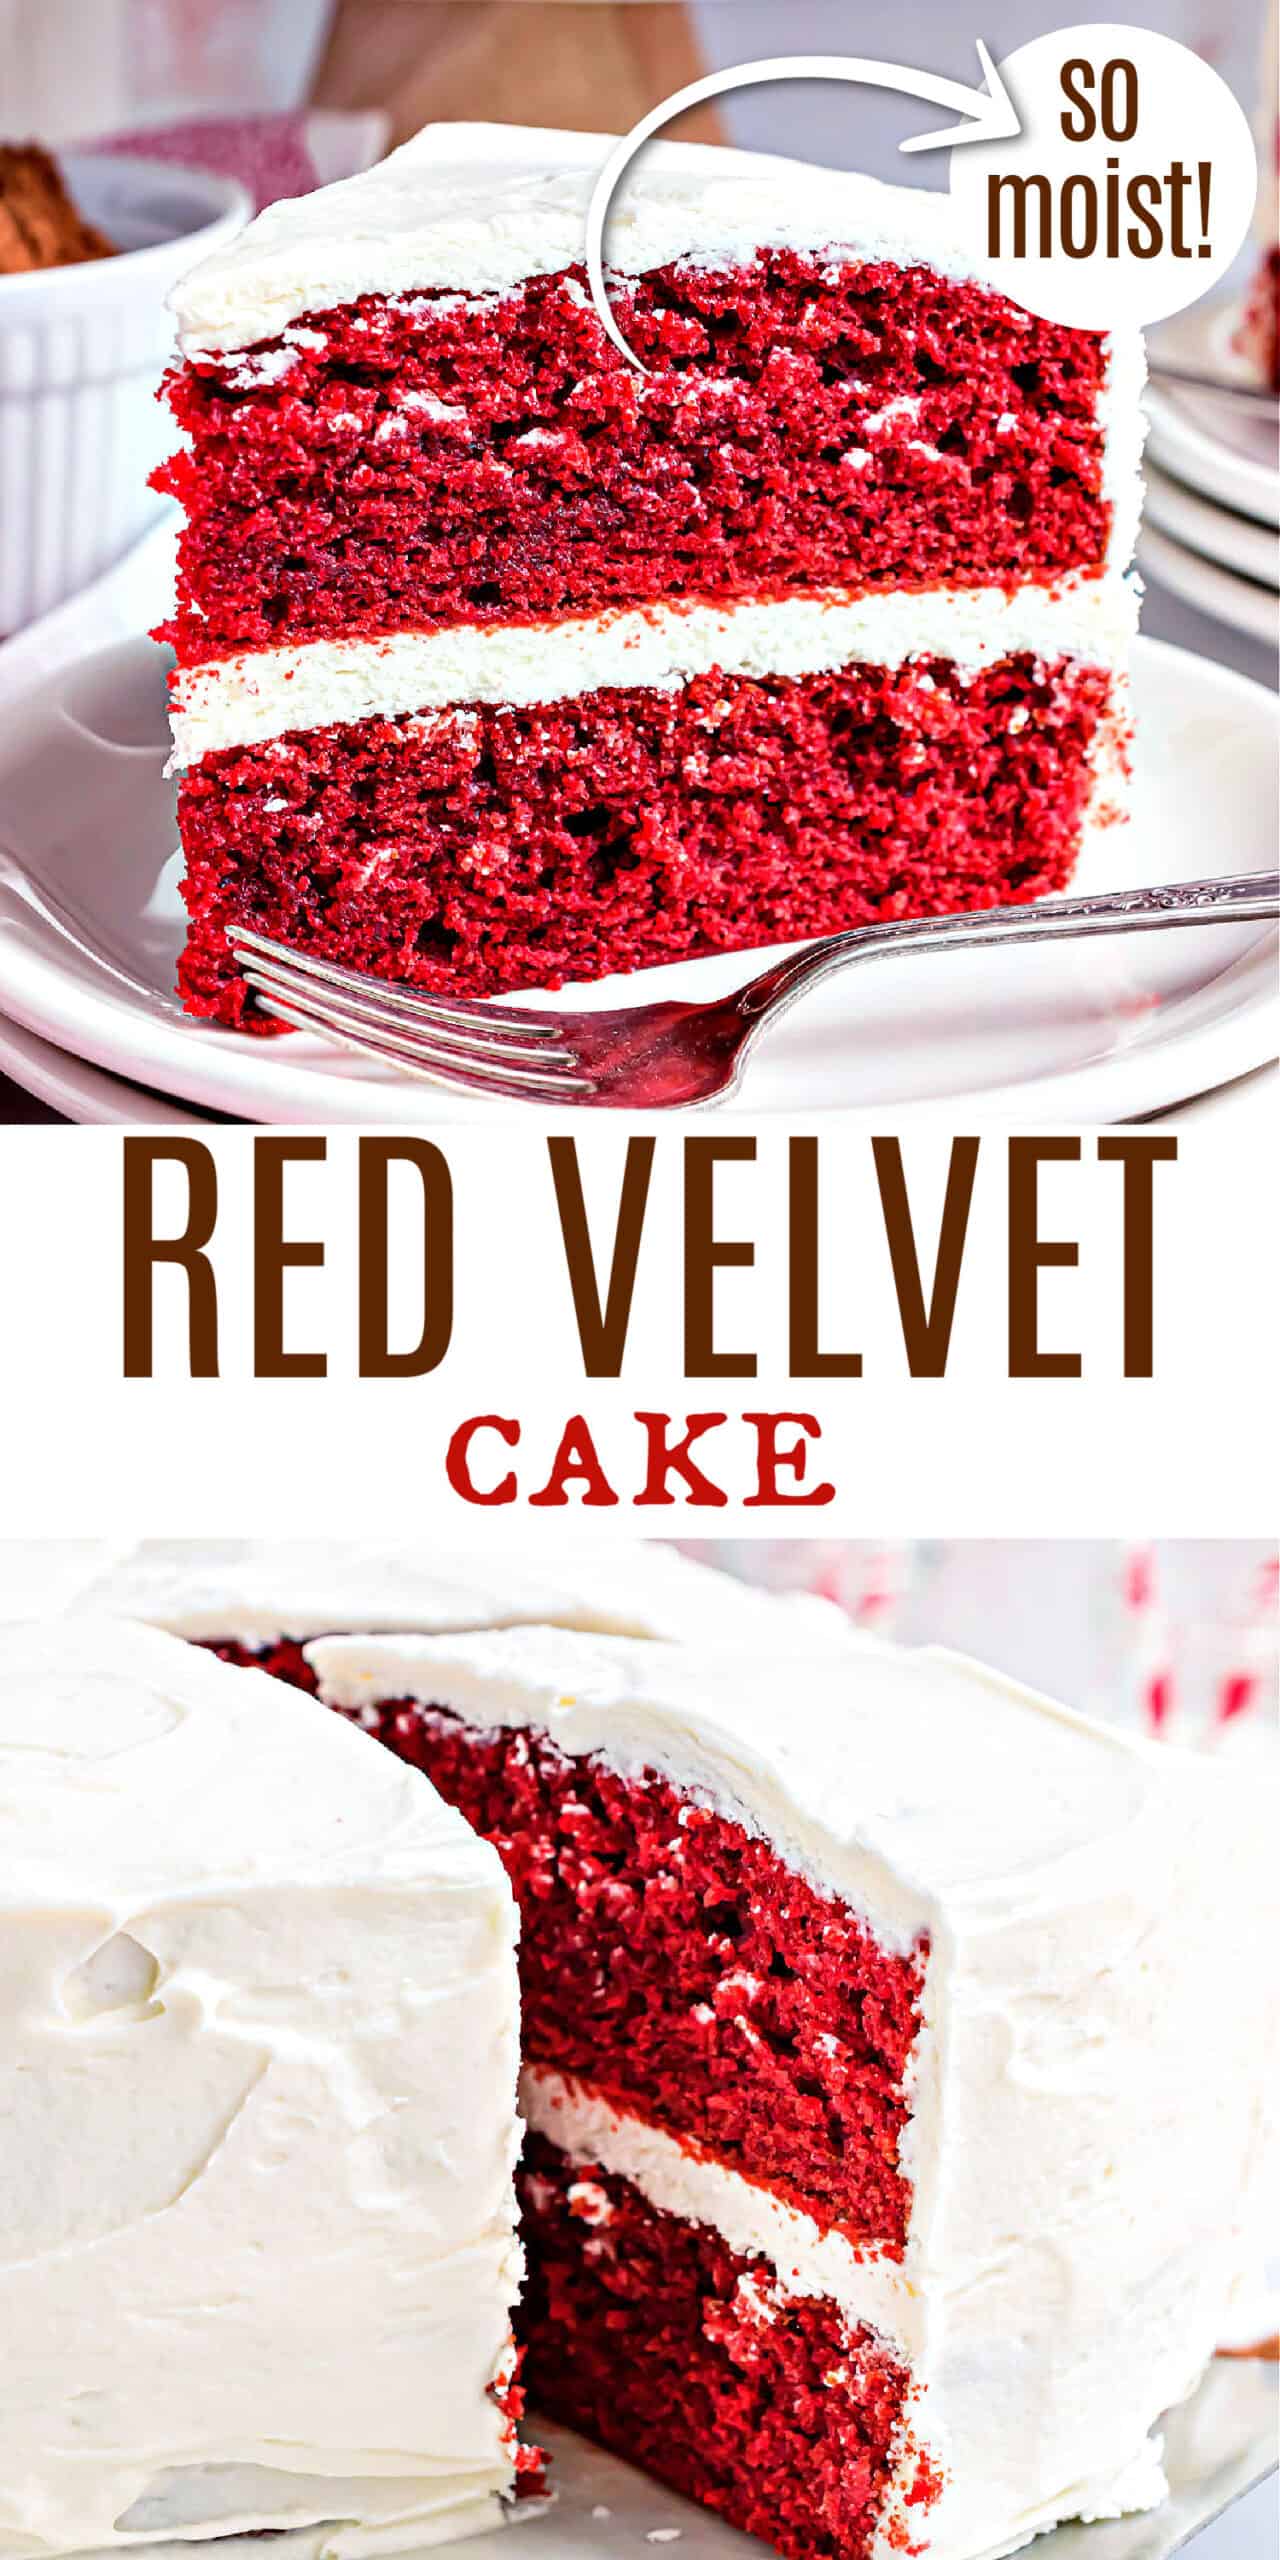
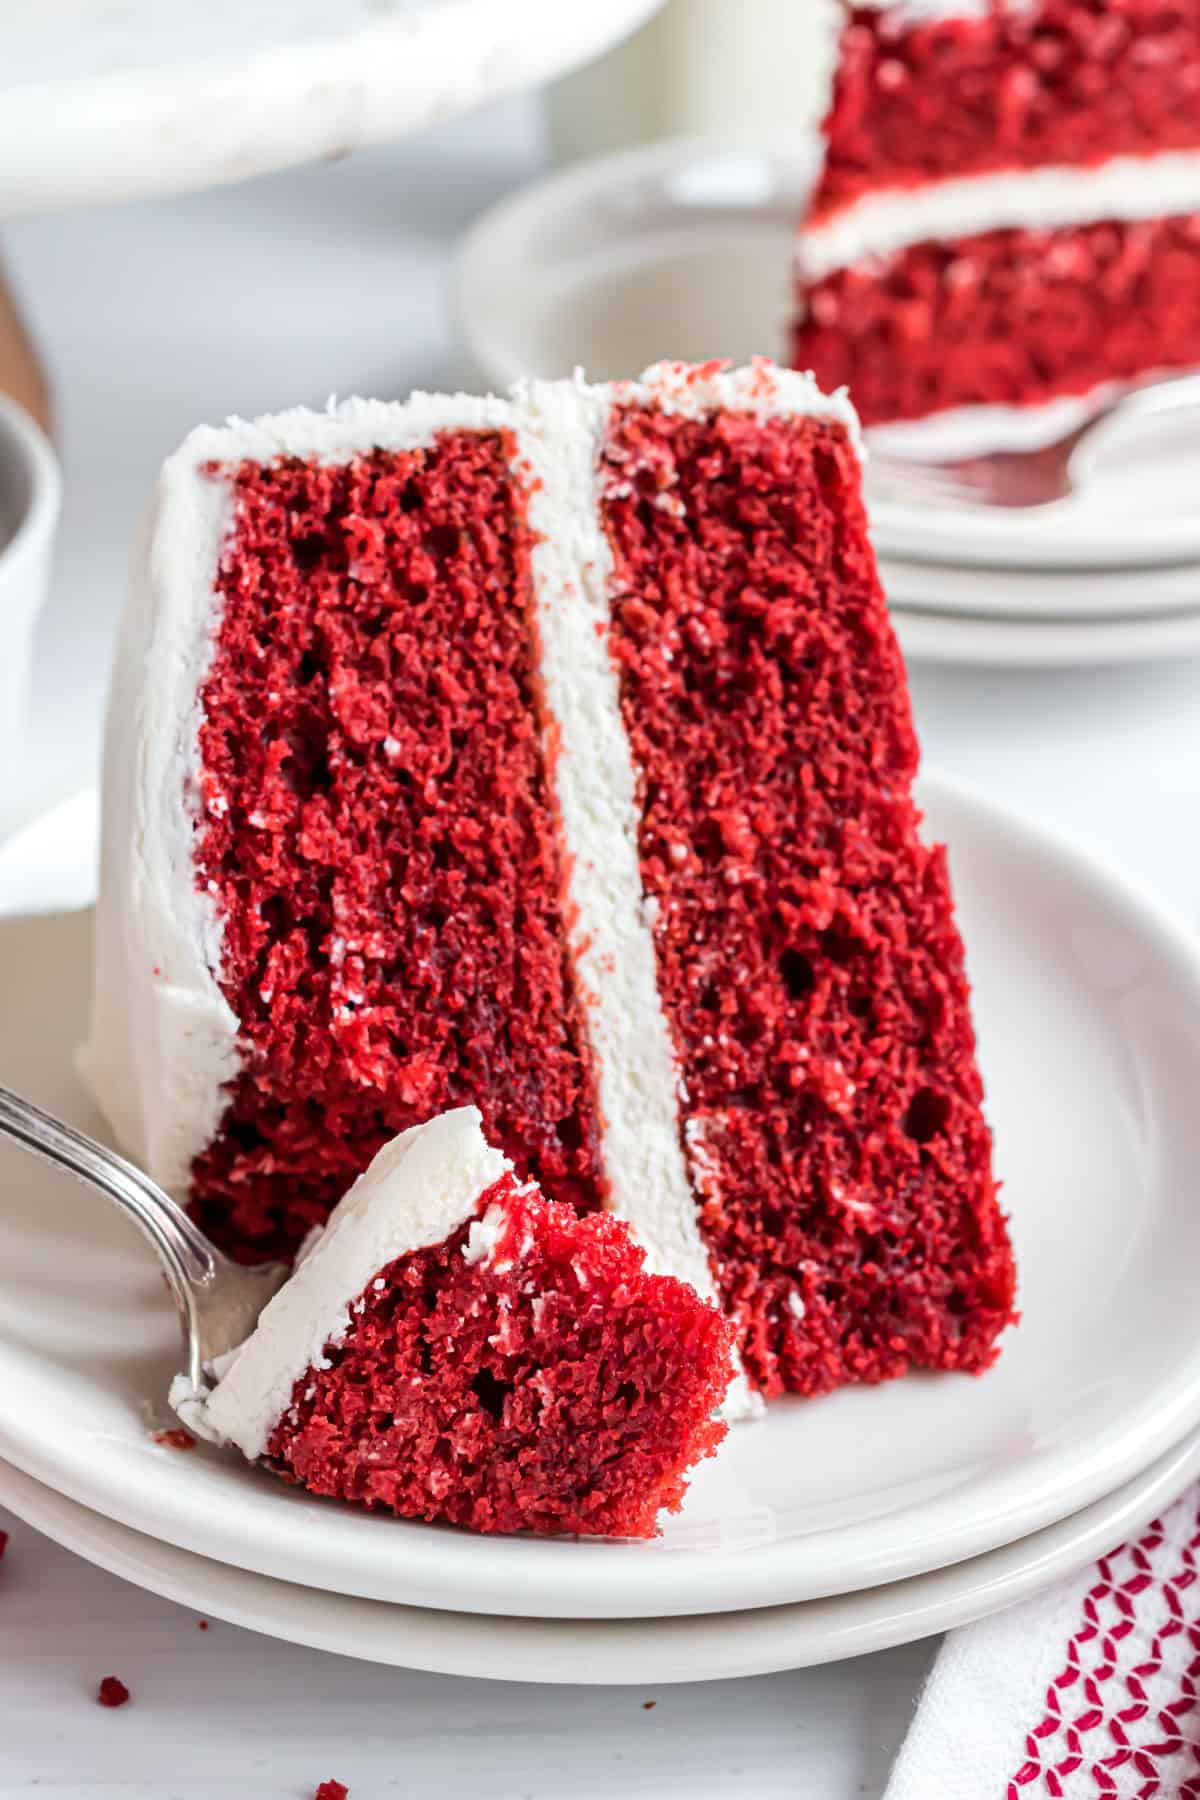
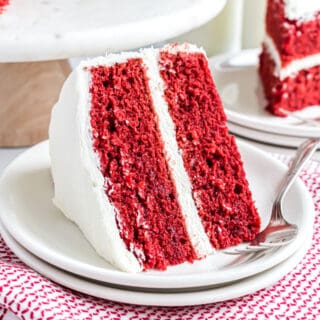
Red Velvet Cake is a beautiful two-layer cake that’s soft and moist and topped with a delectable, rich cream cheese frosting. It makes for a stunning and delicious dessert!
If you love layer cakes, our lemon cake is just perfect. Iced with our lemon buttercream frosting, you don’t want to miss this one. Or give our delicious coconut cake recipe a try soon.

Why This Recipe Works
Red velvet is a classic chocolate cake that gets its flavor and vibrant red color from cocoa powder and a few drops of food coloring. There’s a really silky smooth texture to the cake.
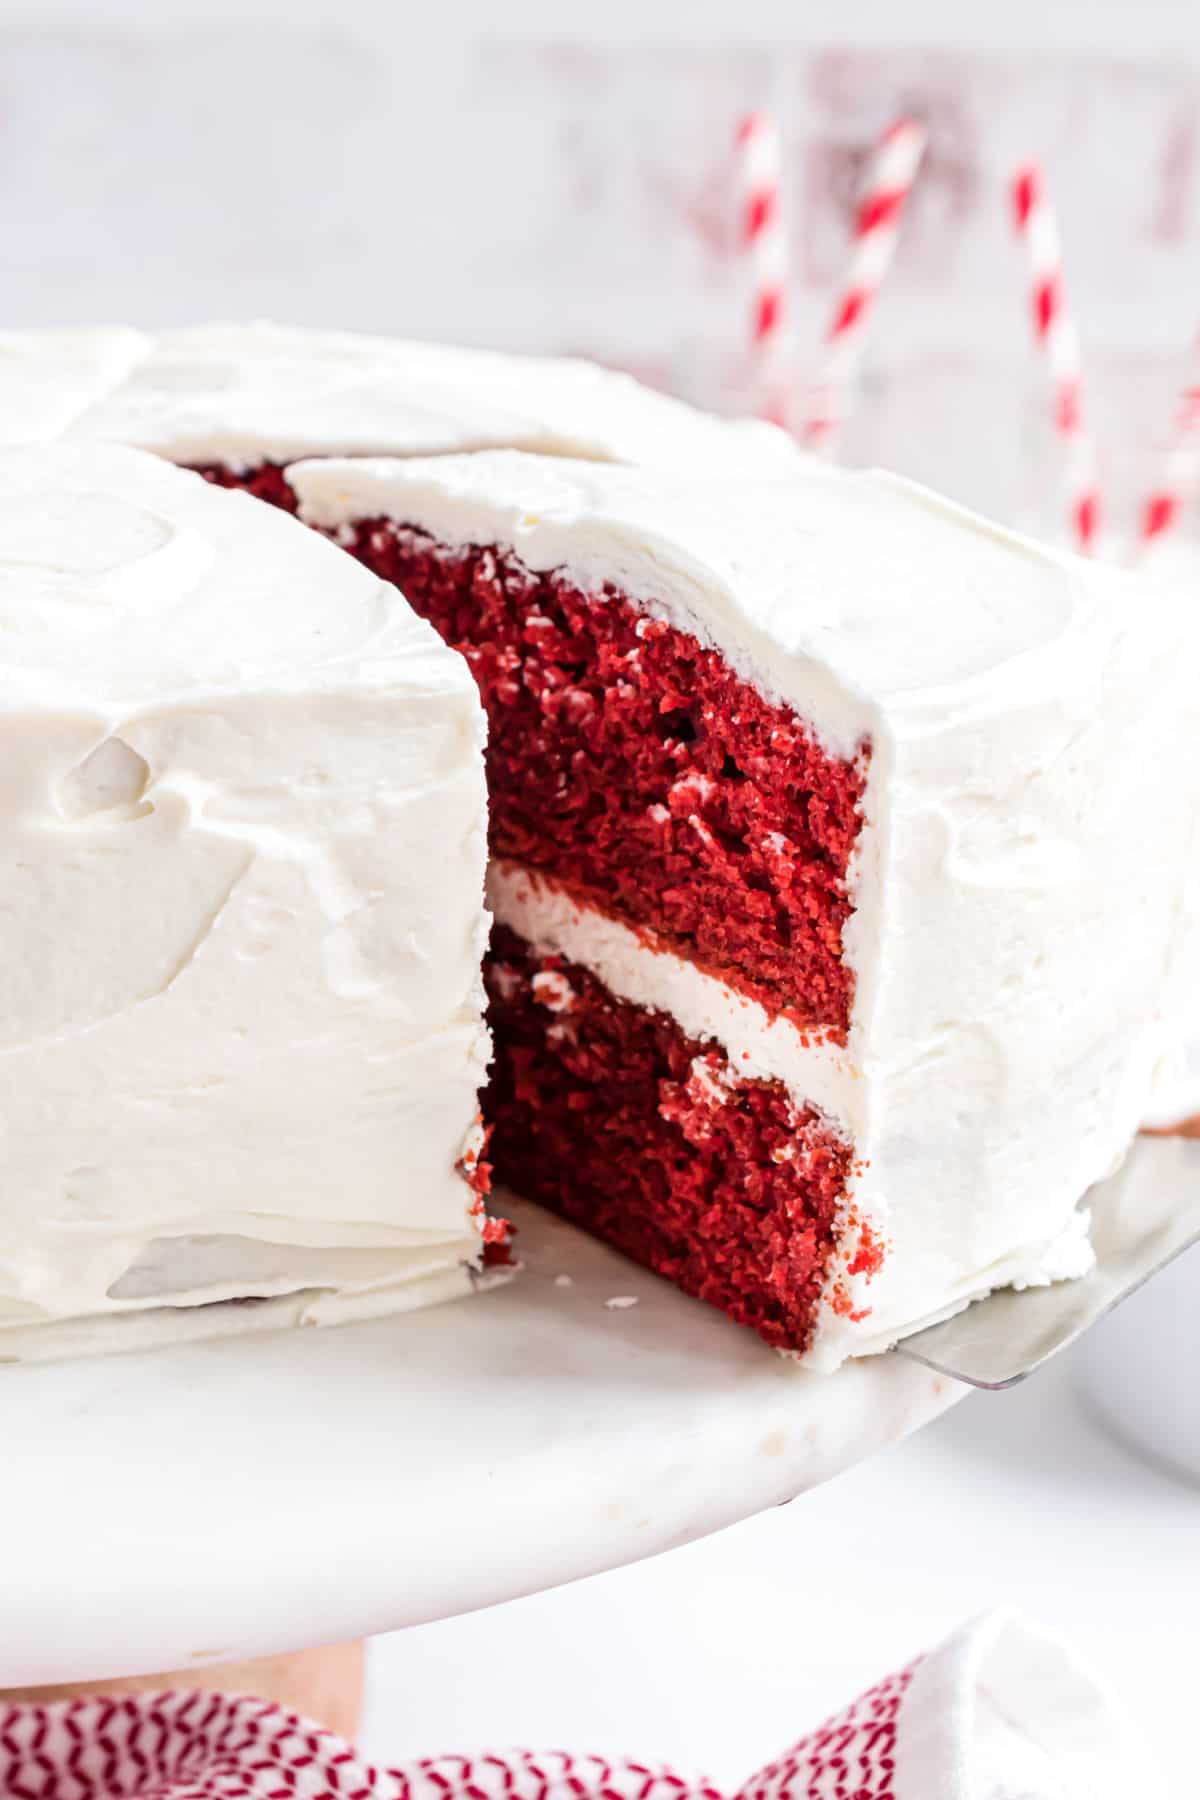
And it’s covered in a fluffy, decadent cream cheese frosting that makes a gorgeous contrast to the red cake.
- While it may sound or look fancy, this cake is super simple to put together. The batter takes only about 10 minutes to mix up.
- The cake has two layers, which adds instant pizazz, and that stunning color will be a hit for your family and friends.
- The homemade cream cheese frosting is smooth, fluffy and irresistible. Plus, it’s easy to make and worlds beyond anything from a can.
Love red velvet? Our red velvet crinkle cookies are as easy as they are delicious!
Ingredient Notes
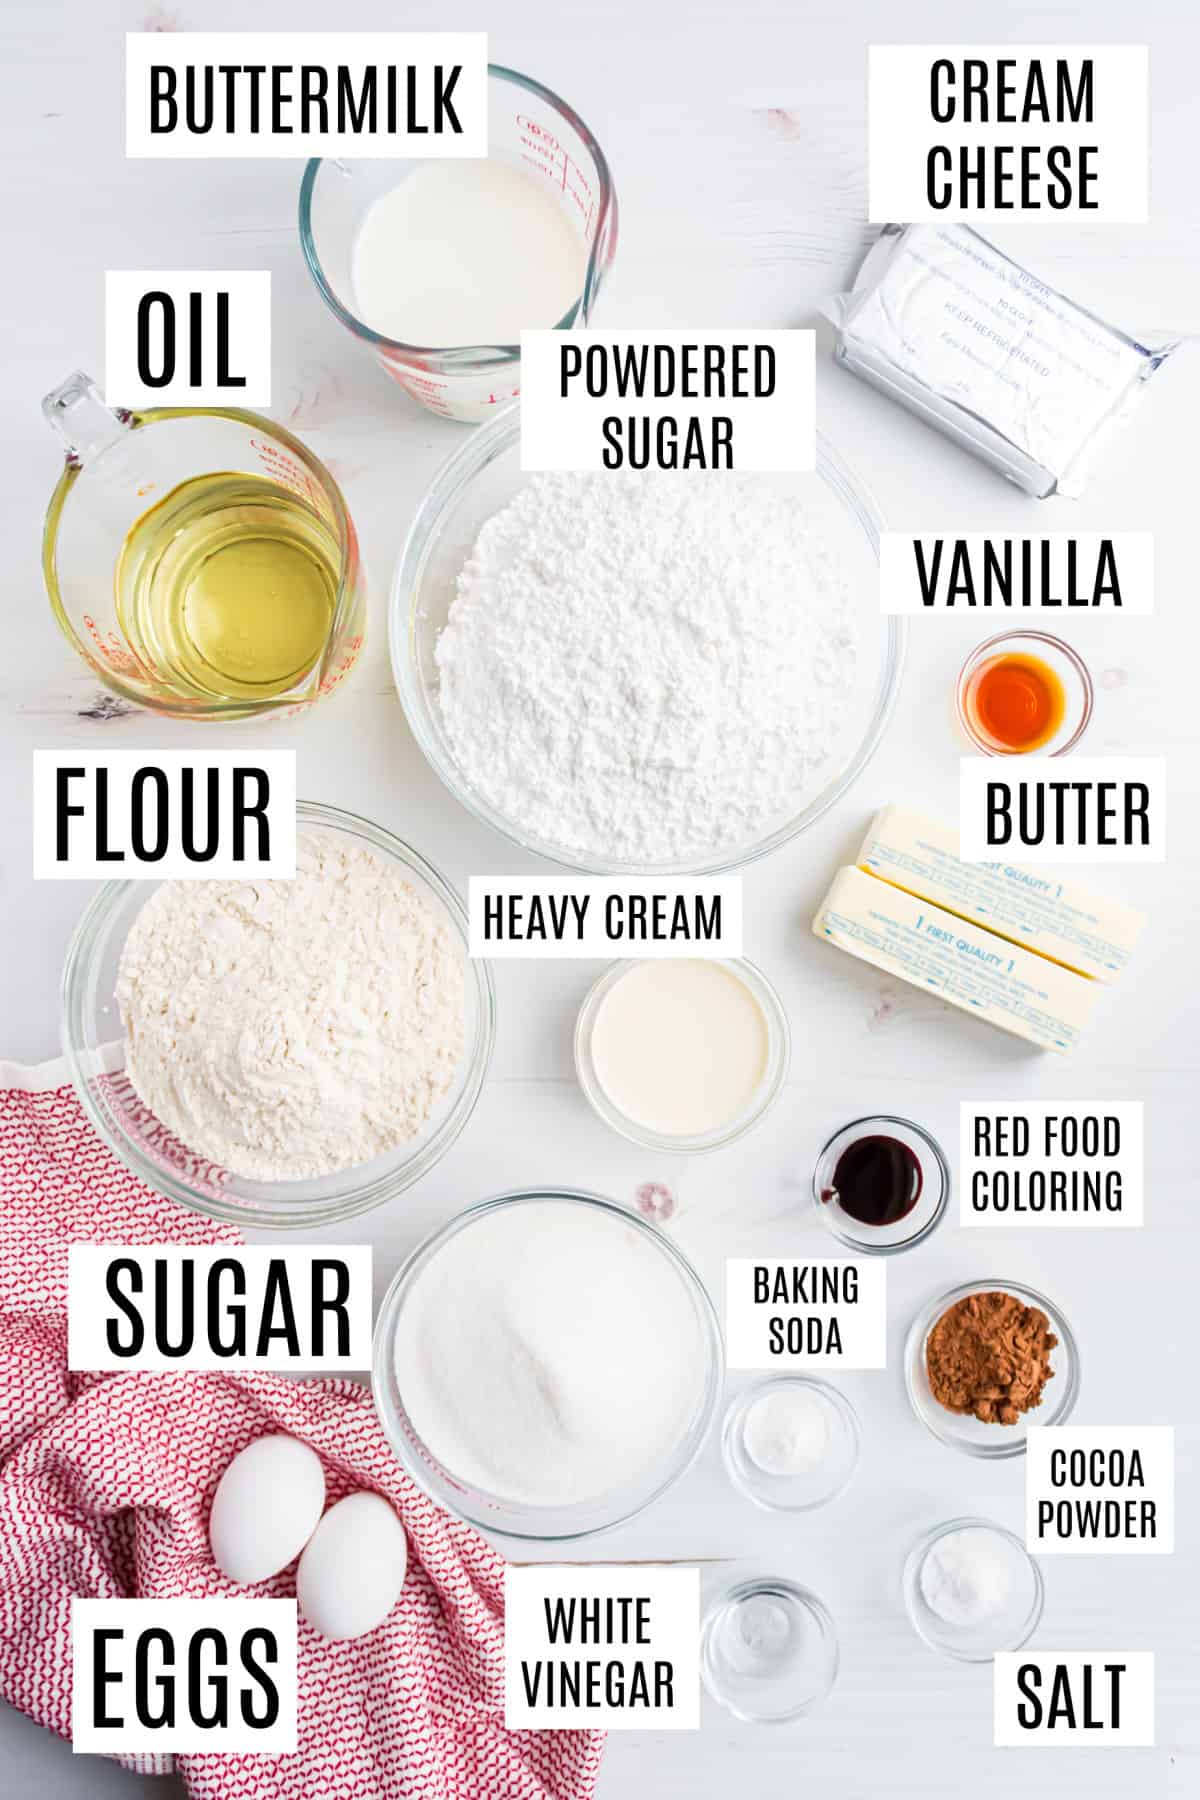
- Buttermilk and oil – These add the moisture to this cake. We use vegetable oil and if we’ve got it, real buttermilk. Otherwise, this buttermilk substitute is perfection.
- Vanilla – Be sure to use PURE vanilla extract. Try our homemade vanilla extract for best flavor.
- Vinegar – Don’t skip this! The white vinegar is needed to activate and enhance the red color of the cake.
- Red food coloring – I use and recommend gel food coloring because a little goes a long way and ensures the vibrant color.
- Cream cheese frosting – Our homemade frosting is simple to make and crazy delicious. Of course, you can substitute canned frosting as well.
Easy Instructions
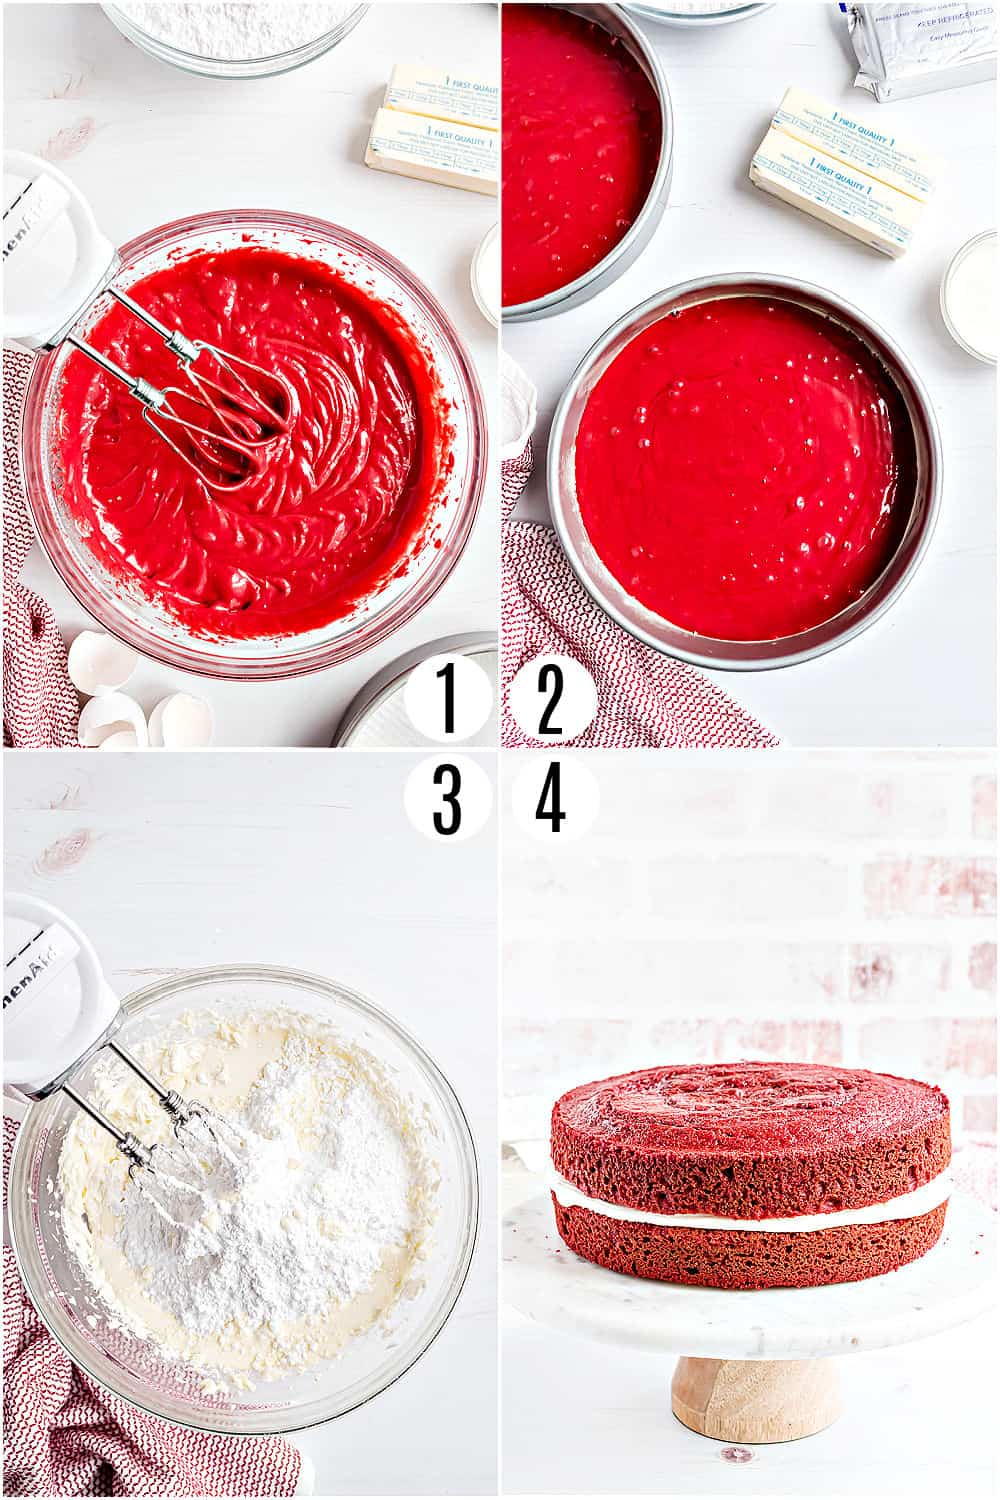
STEP 1. Make the cake batter. Blend the oil, buttermilk, eggs, vanilla, vinegar and food coloring until well combined. Slowly add in the dry ingredients and stir until just combined.
STEP 2. Bake and cool the cake. Pour the batter into two 9-inch round cake pans lined with parchment paper circles and sprayed with baking spray. Bake at 350 for 32-34 minutes, until a toothpick comes out clean.
STEP 3. Make the frosting. Beat the butter and cream cheese together for several minutes. Add in the vanilla, powdered sugar and heavy cream and beat for 3-4 minutes more, until nice and fluffy.
STEP 4. Frost the cake. Spread about 1/3 of the frosting over the first layer of the cake. Top with the second layer of the cake and use the remaining frosting for the top and sides of the cake. Voila!
Tips and Tricks
- Use gel food coloring. It is more concentrated than the liquid versions so you get that deep red color without needing to dump a whole bottle of food coloring into your cake. Bonus: It’s more cost effective too! Americolor Super Red Gel Food Coloring is one I love.
- Add the dry ingredients very slowly. If you add the dry ingredients to the mixed wet ingredients too quickly, you’ll have to mix the batter more. Over mixing the batter results in a tougher cake.
- Line the cake pans with parchment paper (cut into a circle to fit the bottom of the pan) AND spray the pans with non-stick baking spray. This will ensure your cake layers will release easily.
- Let the butter and cream cheese soften. Be sure to pull your butter and cream cheese out of the fridge before you go to make the frosting, so they can soften a bit. use our tips and tricks on how to soften butter quickly.
- Make sure you let the cake layers cool completely before you try to stack and frost them. Otherwise, the frosting will get runny.
- Frosting: Change up the frosting and try our vanilla sour cream frosting. Pairs wonderfully with today’s cake. Or enhance the chocolate flavor and whip up some chocolate cream cheese frosting to ice the cake.
Recipe FAQs
Yes! You can wrap baked cake layers, once cooled, in a few layers of cling wrap and freeze them for up to 3 months.
Yes, you can substitute a can of cream cheese frosting for the homemade if needed. (But the homemade version is really easy to make and tastes amazing!)
You can store the frosted cake, covered, at room temperature for up to 5 days. You can also freeze slices in plastic wrap (then slide into a ziploc or airtight container) for up to 3 months.
More Red Velvet Recipes
- Red Velvet Cupcakes
- Red Velvet Cheesecake Brownies
- Red Velvet Cake Mix Cookies
- Red Velvet Biscotti
- Red Velvet Cookies
Easy Cake Recipes
See all Cake recipes

Red Velvet Cake
Ingredients
For the cake
- 1 ¼ cup vegetable oil
- 1 ¼ cup buttermilk
- 2 large eggs
- 1 teaspoon vanilla extract
- 1 teaspoon white vinegar
- ½ teaspoon red gel food coloring
- 2 ½ cups all-purpose flour
- 1 ½ cup granulated sugar
- 1 teaspoon baking soda
- 1 teaspoon kosher salt
- 2 Tablespoons unsweetened cocoa powder
For the frosting
- 1 cup unsalted butter softened
- 8 ounce cream cheese softened
- 1 teaspoon vanilla extract
- 4 cups powdered sugar
- ¼ cup heavy whipping cream
Instructions
- Preheat oven to 350 degrees F. Line two 9-inch round cake pans with parchment paper circles. Spray pans with non-stick baking spray. Set aside.
- In a mixing bowl, blend oil, buttermilk, eggs, vanilla, vinegar and food coloring until combined. Slowly add in dry ingredients.
- Pour cake batter into prepared pans. Bake in a 350 degree oven for 32-34 minutes, until toothpick comes out clean.
- Remove cakes from pans and cool completely on wire rack until ready to frost.
- After the cakes have cooled, prepare the frosting. For the frosting, beat butter and cream cheese for several minutes. Add in vanilla, powdered sugar, and heavy cream. Beat for 3-4 minutes until fluffy.
- Place one cooled layer of cake on a cake plate. Spread 1/3 of the frosting on top of the layer of cake. Top with second layer of cake. Spread remaining frosting on top and sides of cake.
Notes
- Purchase this Americolor Super Red Gel Food Coloring. I use all gel food colorings because one drop goes a long way. I used only ½ teaspoon of red food coloring to get this bright red color, unlike many other red velvet cakes that need tablespoons of coloring!
- Add the dry ingredients very slowly. If you add the dry ingredients to the mixed wet ingredients too quickly, you’ll have to mix the batter more. Over mixing the batter results in a tougher cake.
- Line the cake pans with parchment paper (cut into a circle to fit the bottom of the pan) AND spray the pans with non-stick baking spray. This will ensure your cake layers will release easily.
- Let the butter and cream cheese soften. Be sure to pull your butter and cream cheese out of the fridge before you go to make the frosting, so they can soften a bit. use our tips and tricks on how to soften butter quickly.
- Make sure you let the cake layers cool completely before you try to stack and frost them. Otherwise, the frosting will get runny.
- Frosting: Change up the frosting and try our vanilla sour cream frosting. Pairs wonderfully with today’s cake. Or enhance the chocolate flavor and whip up some chocolate cream cheese frosting to ice the cake.

Can this also be put into a 13 X 9 pan??
I use a 9×13 pan when it calls for 2 9 in round pans
Could this cake be made in a bundt cake pan?