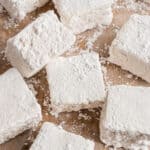
Homemade Marshmallows
These Homemade Marshmallows are soft, springy and taste so much better than store-bought. Best of all, they're surprisingly easy to make with our step by step recipe!
Servings: 48 marshmallows
Ingredients
- 1 cup cold water divided
- 3 packages unflavored gelatin
- 1 ½ cups granulated sugar
- 1 cup light corn syrup
- ¼ teaspoon kosher salt
- 1 Tablespoon vanilla extract
- ¼ cup powdered sugar divided
Instructions
- Grease a 9”x13” baking dish and dust with powdered sugar. Grease a spatula and handle. Set aside.
- In the bowl of a mixer, add unflavored gelatine and ½ cup of cold water. Stir to combine. Set aside.
- In a medium saucepan, add sugar, corn syrup, remaining 1/2 cup water, and kosher salt. Heat the mixture over medium heat, stirring until the sugar is dissolved.
- Increase the heat to high and bring the mixture to 240℉, using a digital or candy thermometer to monitor. This process will take about 10 minutes.
- Once the syrup reaches temperature, remove from heat.
- With the mixer on low speed, using the whisk attachment, slowly add the syrup to the gelatine and water mixture.
- Once all the syrup has been added, turn the mixer up to high speed and let it whisk the mixture until it’s light and fluffy. This process can take about 10-12 minutes.
- During the last minute of whisking, turn the mixer speed down to medium low, and add the vanilla. Then return the mixer speed to high.
- Pour the marshmallow mixture into the prepared dish. Using the greased spatula, scrape the sides of the mixing bowl to get all the marshmallow fluff. Use the spatula to spread the marshmallow fluff into an even layer.
- Using wet fingertips, smooth out the top layer of marshmallow.
- Sprinkle the top of the marshmallow with powdered sugar and let dry, uncovered, for 4 hours or up to overnight.
- With a knife dipped into water, cut into 1” squares.
- Place cut marshmallows in a bowl with powdered sugar. Toss to coat.
Notes
- I use Knox brand unflavored gelatin powder. The amount of gelatin needed is about 6 ½ - 7 teaspoons.
- Storage: Store marshmallows, with extra powdered sugar, in an airtight container. They will keep fresh for up to 3 weeks.
- When the syrup is ready, it will be clear and bubbly and have a golden color to it.
- When the marshmallow mixture is ready to pour into the pan, you will notice that it will be shiny (kind of like marshmallow fluff) and cool enough to touch when poured into the pan.
- Wet fingertips can help smooth out the top layer.
- Having a knife dipped in water can also aid when it’s time to cut. In our experience, spraying with cooking spray wasn’t the best option - it left an oily residue and discolored some of the marshmallows.
- When you are slicing them, use long, slow strokes and drag the knife through the marshmallow. You will notice each marshmallow release from the knife as you cut.
- The marshmallows are very forgiving. The cut lines will give enough guidance for the marshmallows to break away from each other. Even if they look a little misshapen at first, they will snap back into a square.
- Advantage of making your own is that you can flavor them (peppermint, other extracts) color them with food coloring, and cut them any size you’d like to (the perfect size for s’mores!).
- Make great gift-giving options as they can be packaged with some hot cocoa mix and a mug, dipped in chocolate and flavored.
Nutrition
Calories: 53kcal | Carbohydrates: 12g | Protein: 2g | Sodium: 15mg | Sugar: 12g