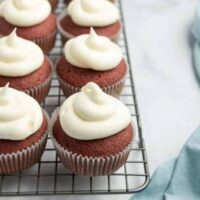
Red Velvet Cupcakes
As beautiful as they are delicious, Red Velvet Cupcakes are my favorite way to enjoy Red Velvet Cake. Make them for Valentine's Day, Fourth of July or anytime of year!
Servings: 24 cupcakes
Ingredients
For the Cupcakes:
- 1 ¼ cup vegetable oil
- 1 ¼ cup buttermilk
- 2 large eggs
- 1 teaspoon vanilla extract
- 1 teaspoon white vinegar
- red gel food coloring
- 2 ½ cups all-purpose flour
- 1 ½ cups granulated sugar
- 1 teaspoon baking soda
- 1 teaspoon kosher salt
- 2 Tablespoons unsweetened cocoa powder
For the Frosting:
- 8 ounce cream cheese softened
- ½ cup unsalted butter softened
- 1 teaspoon vanilla extract
- 3 cups powdered sugar
Instructions
- For the cupcakes, sift dry ingredients. I don’t usually follow that step in other recipes, but it’s important in this one!
- In mixer, blend oil, milk, eggs, vanilla, vinegar and food coloring until combined. Slowly add in dry ingredients. Add enough red food coloring to your desired color level!
- Pour 2/3rd full into cupcake liners. Bake in a 350 degree oven for 18 minutes (or 10 minutes for mini muffin, or 30 minutes for two-9inch cakes).
- For the frosting, beat butter and cream cheese until fluffy. Add in remaining ingredients and beat until creamy and desired consistency. Add in more milk if needed.
Notes
- Make sure to SIFT your dry ingredients first! I know, I know. I usually skip this step too. But I promise it makes a world of difference for these cupcakes. They’re supposed to be velvety--and getting rid of any lumps of flour or cocoa powder is essential to achieve that texture. Just trust me on this one and sift away. It only takes an extra minute or two!
- Use gel food coloring in this recipe. It is more concentrated than the liquid versions so you get that deep red color without needing to dump a ton of food dye into your cupcakes. Bonus: it’s way more cost effective! Always add a little more than you think, as they bake, the color fades slightly.
- After mixing the wet ingredients together, add the dry ingredients very slowly. If you add them too quickly you’ll be forced to mix the batter more. Over mixing the batter results in a tougher cupcake. Add more food coloring to reach desired color.
- Don’t overfill your muffin tins! You want to fill them just about ⅔ of the way to the top. I use a ladle or measuring cup for controlling how much batter goes into each cup. When in doubt, be modest with your pour. You can always add more if you under fill.
- Don’t have any buttermilk? It’s easy to make your own at home for this recipe: try my homemade buttermilk substitute.
Nutrition
Calories: 333kcal | Carbohydrates: 38g | Protein: 3g | Fat: 19g | Saturated Fat: 5g | Polyunsaturated Fat: 13g | Cholesterol: 36mg | Sodium: 240mg | Sugar: 27g