Yes, you CAN make your own vanilla extract! Learn how to use your Instant Pot to make this cooking and baking staple at home and you’ll never want to go back to the store bought stuff again. Or follow my directions to make homemade Vanilla Extract the classic way!
So many great reasons to make homemade extract, but adding it to the Perfect Chocolate Chip Cookie recipe tops the list. Or whip up this classic Coconut Cake with a splash of homemade vanilla bean extract.
Why Make Your Own Vanilla Extract
If you’ve been with me a while, you’ve noticed that I’m far from a snob when it comes to using certain shortcuts to make baking easier. I love refrigerated pie crusts, tubs of cool whip and totally support using boxed cake mixes from time to time!
So I’m not here to tell you that you HAVE to make your own vanilla extract to make excellent desserts. But I am going to tell you that you should give it a try!
Why would you go to the trouble of making your own extract when you can buy a perfectly decent bottle of vanilla at any local market?
First, this recipe produces an extract that is far superior than what you can purchase at the store. It has a richer flavor and you can control how strong the finished extract is, so you can create one with a deeper or milder vanilla flavor depending on your preference.
It’s super cost-effective to make vanilla extract too! When I compared the price of the vanilla extract I buy at the store vs. my homemade one, apples-to-apples, I was blown away by the difference.
To make a cup of vanilla extract with this recipe, I spent about $5.29. A cup of high quality vanilla extract purchased at the supermarket would have cost me $37.96!
You can’t beat that savings. Since the shelf life of this extract is so long, it will never go to waste, even if you don’t bake and cook with vanilla as much as I do. (And let’s be honest, few people do!)
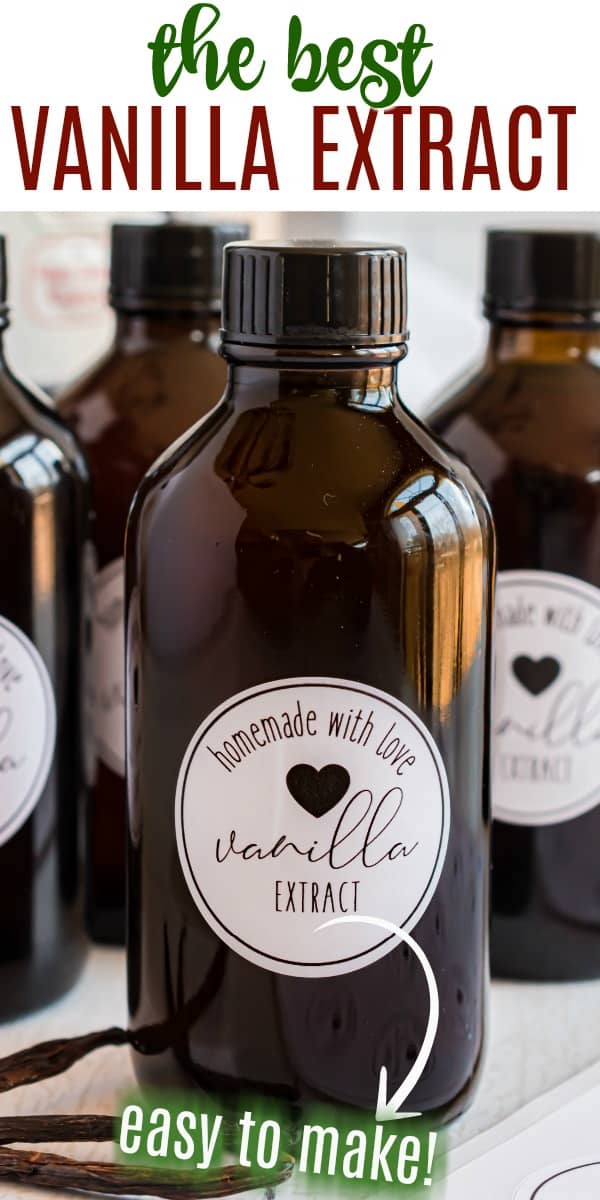
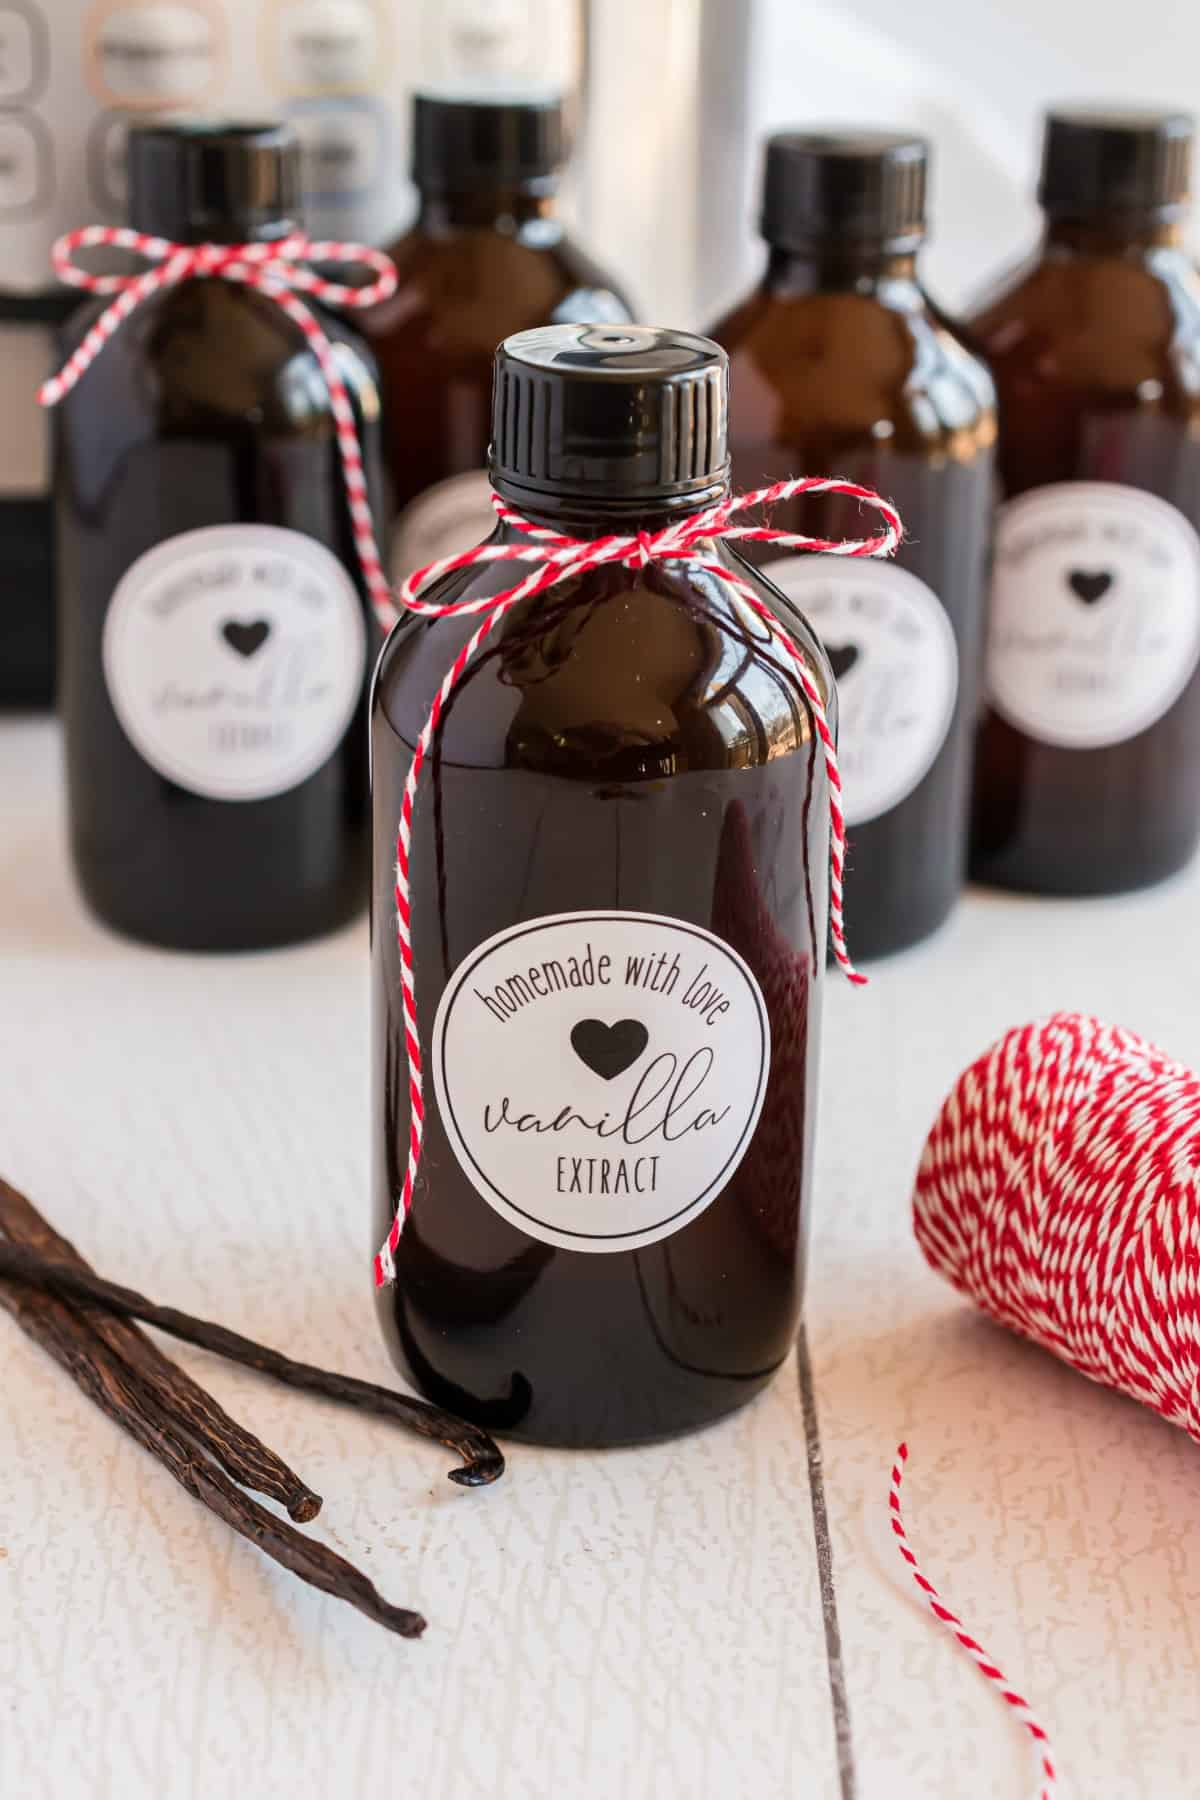
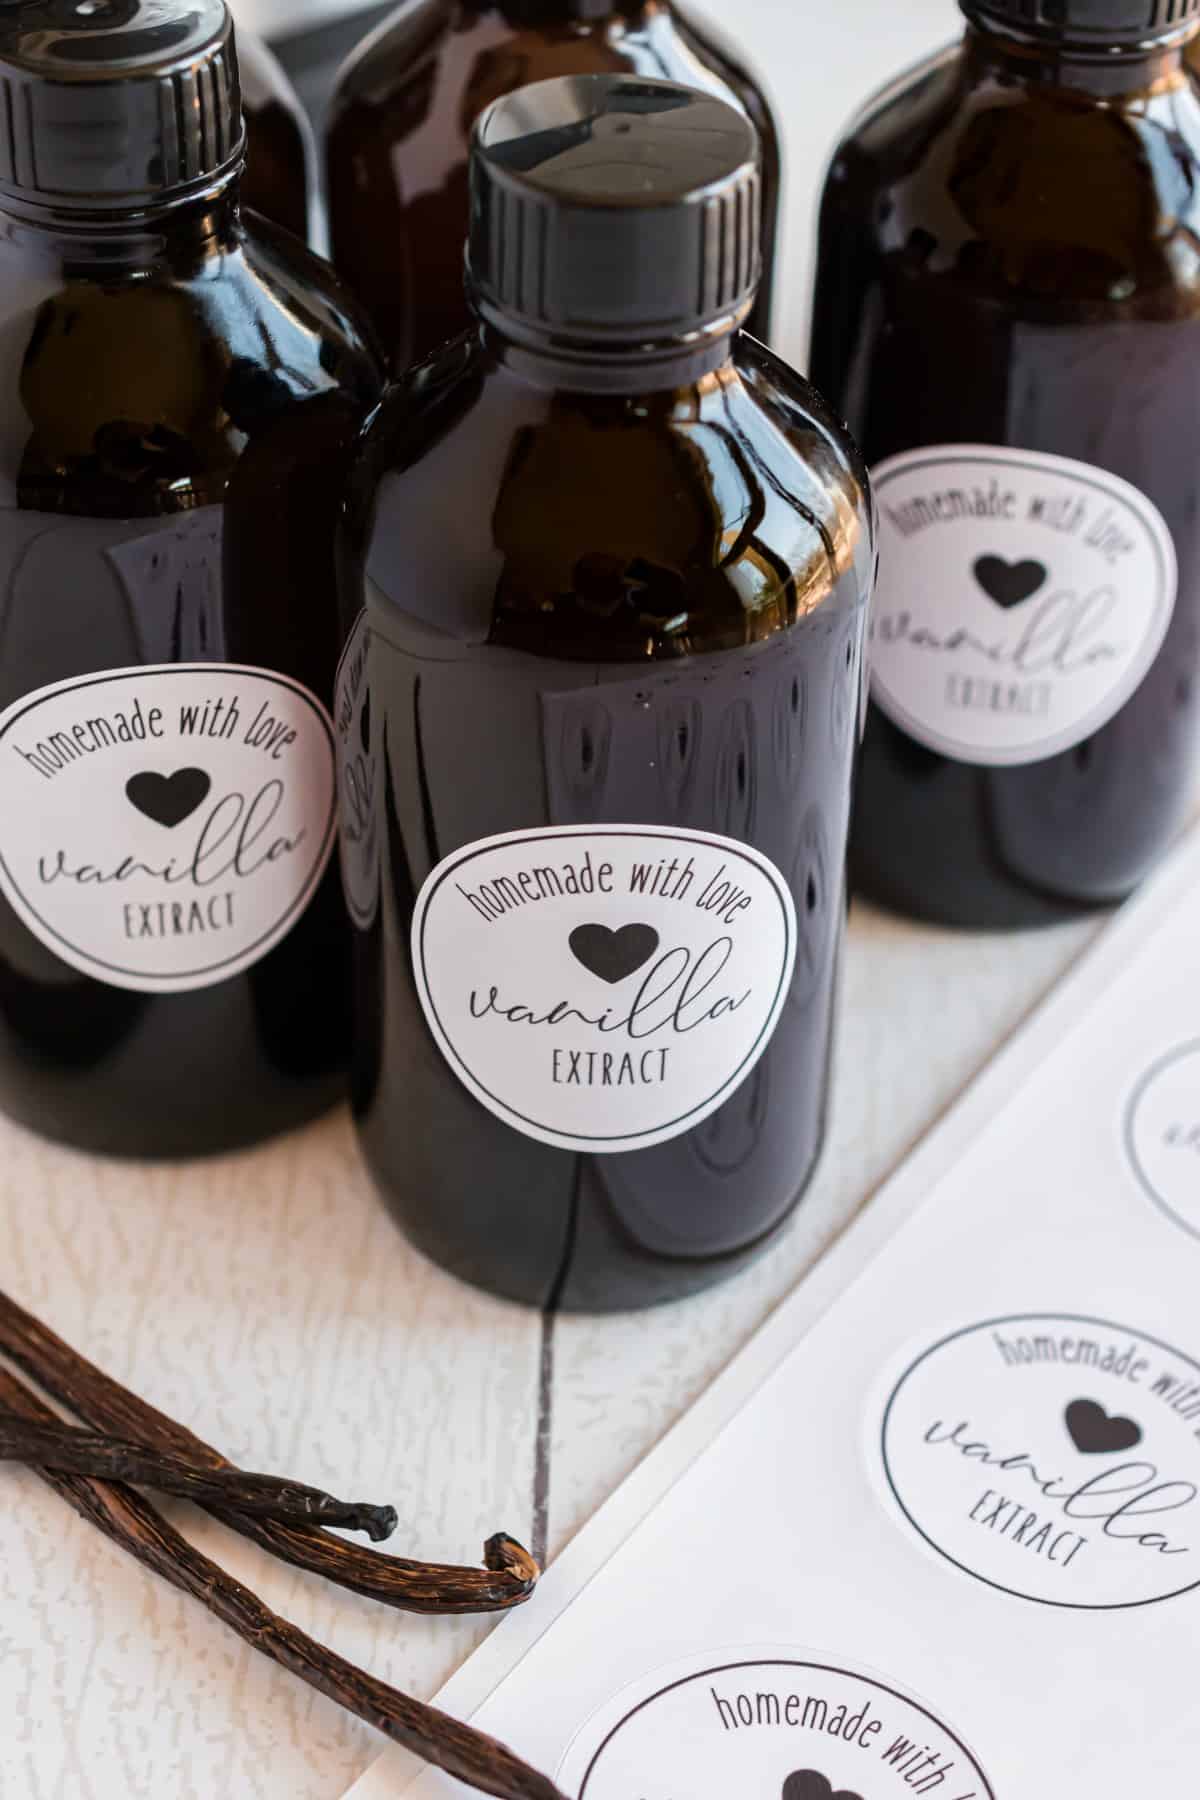
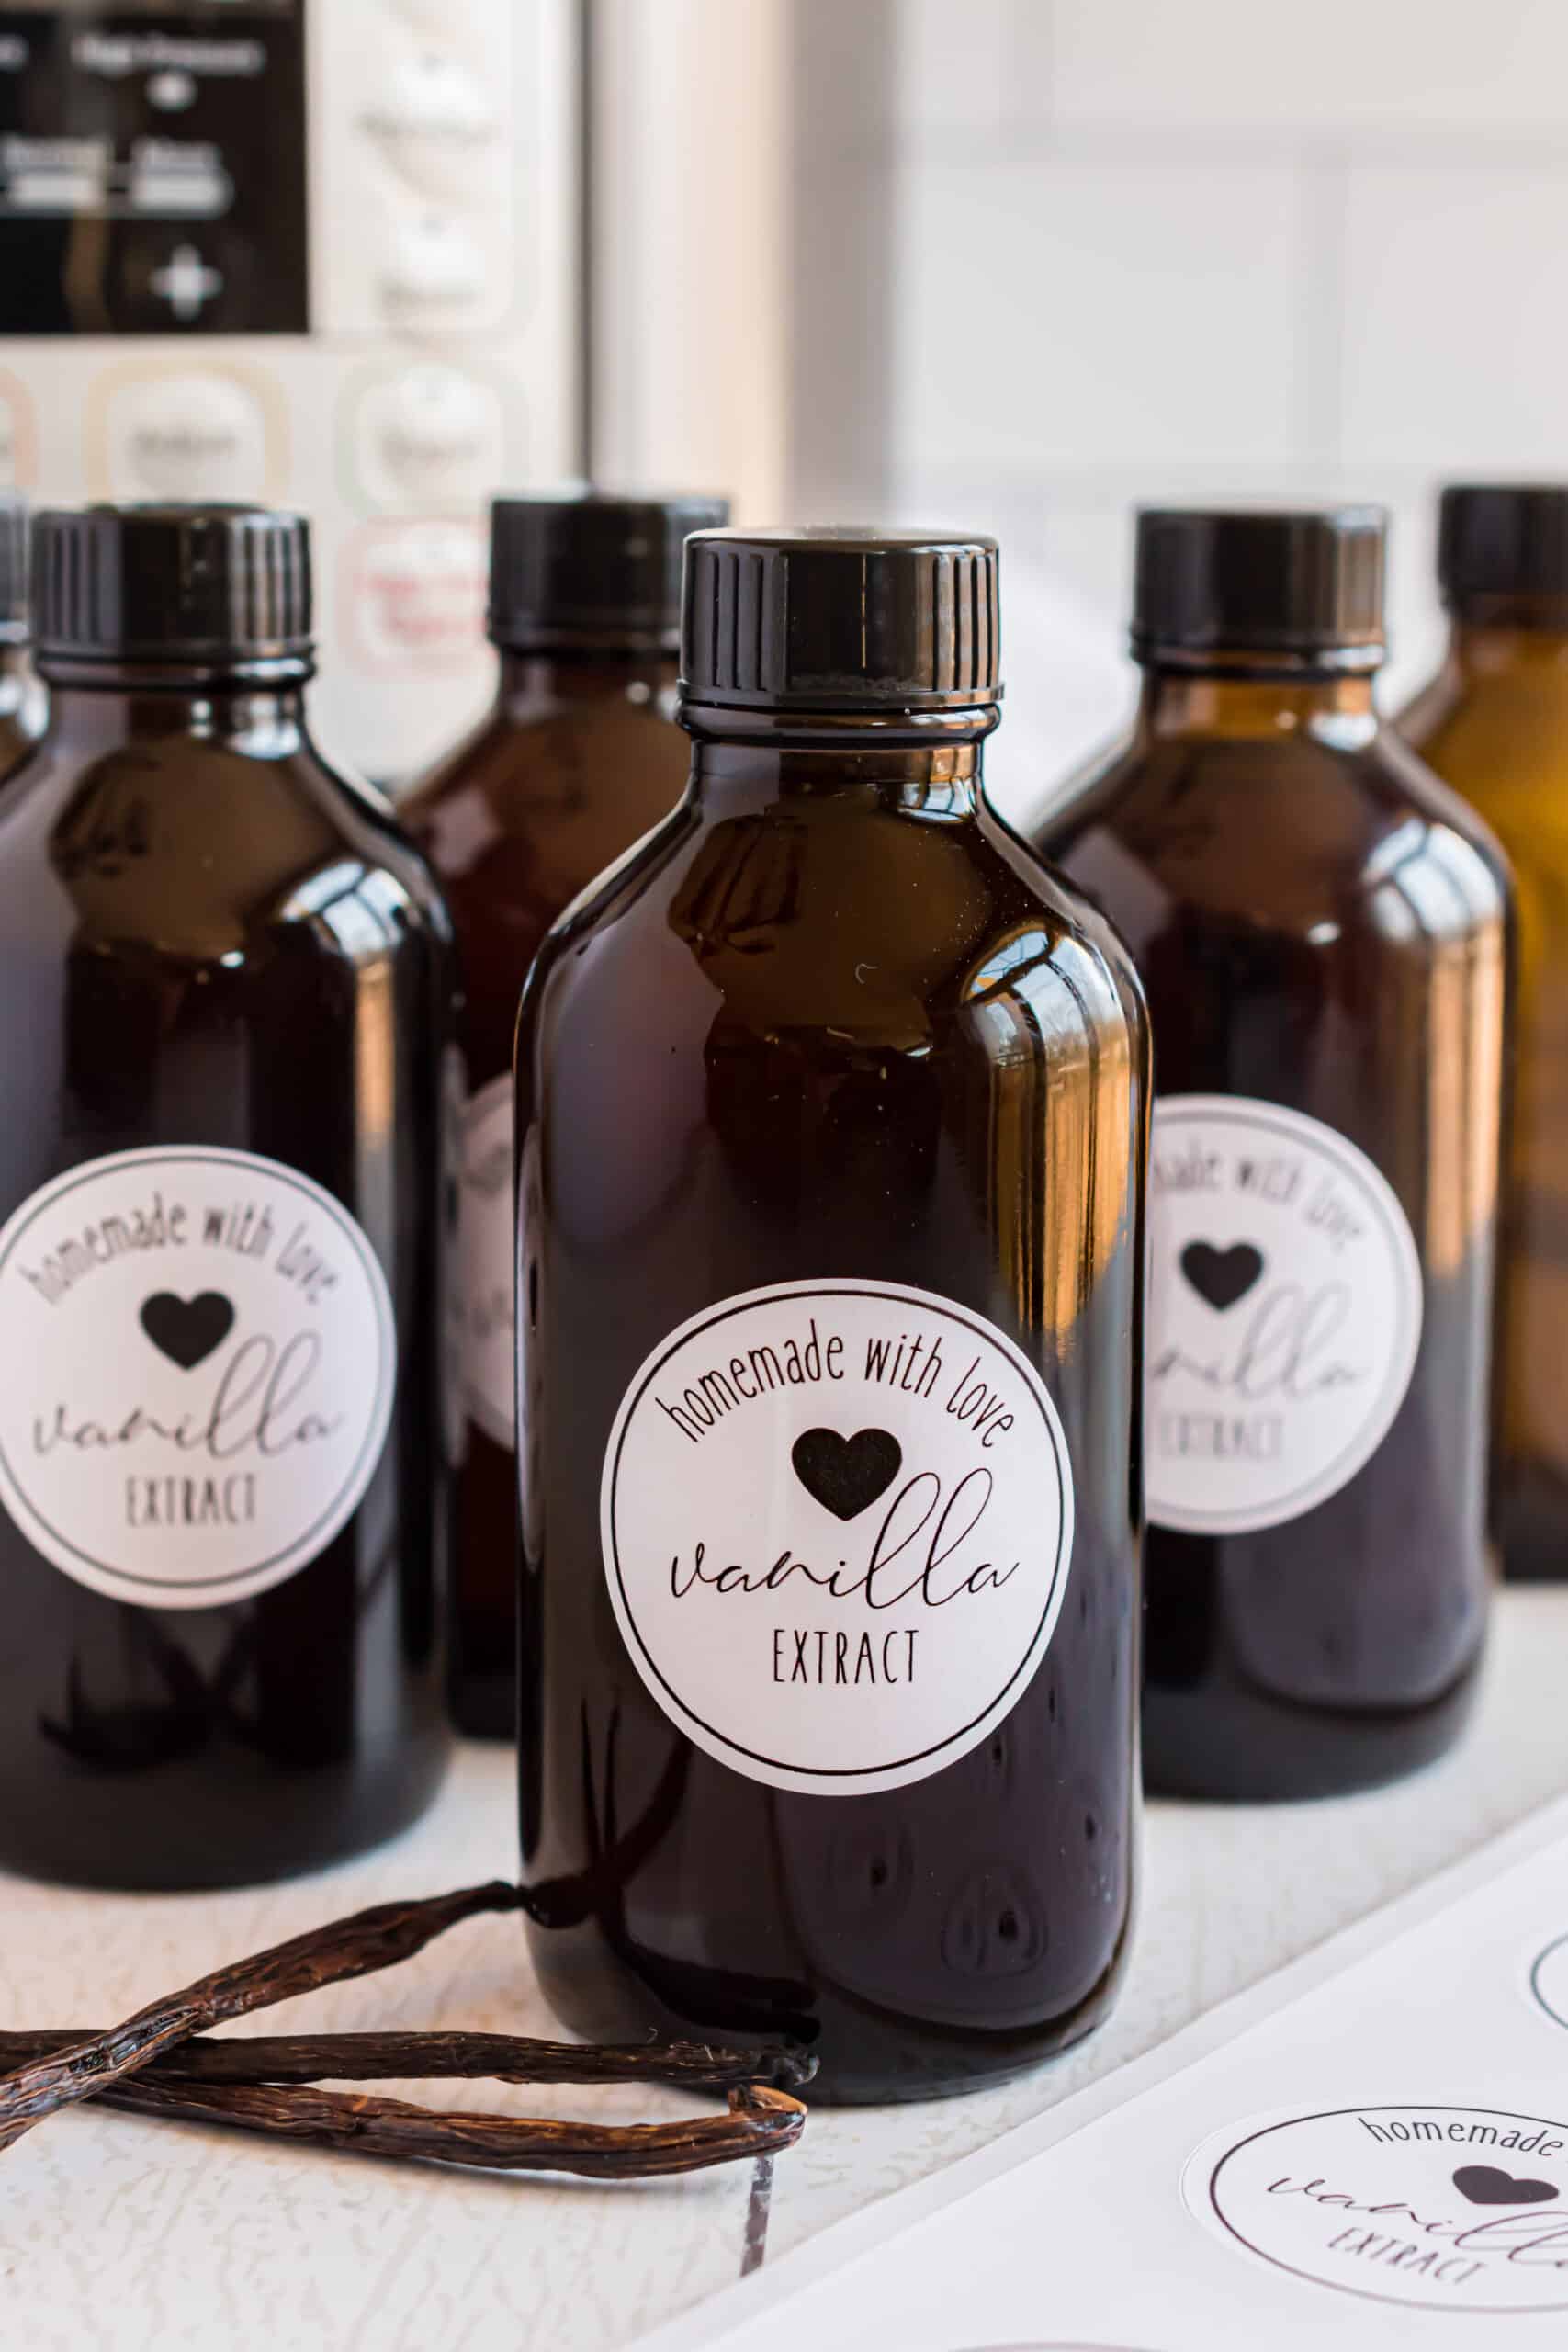
One more reason to make your own Vanilla Extract? It’s a wonderful, thoughtful gift that most everyone can use.
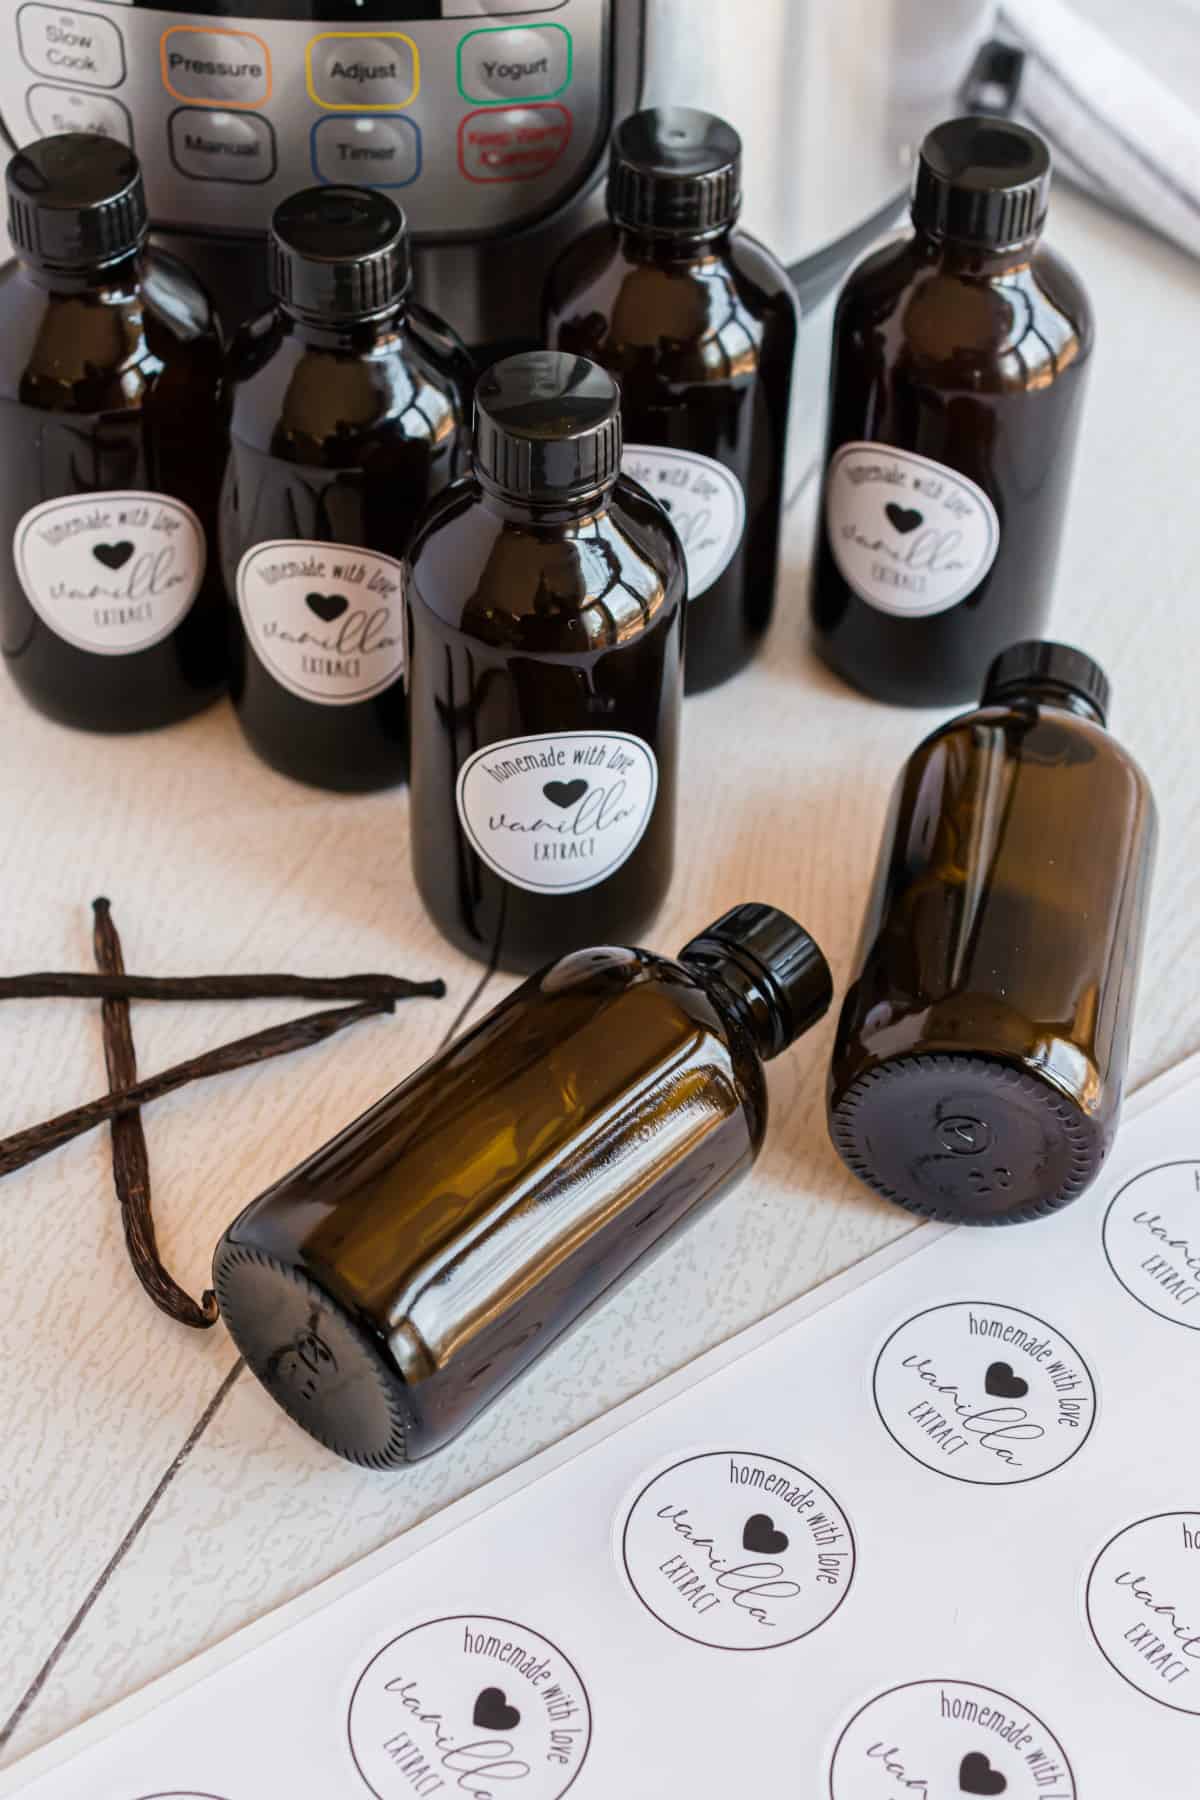
I’ve even created a label that’s free to download. You can print them out using these Avery 1.5” labels. Tie a pretty ribbon or some baker’s twine around the top of the bottle and you have a cute gift fit for everyone from girlfriends to teachers to hairdressers.
Click this link for the PDF of the labels I made!
Convinced yet? Let’s talk about how to make vanilla extract!
Vanilla Beans
First, you need vanilla beans. I purchased these on Amazon and got 10 for about $13. I’ve heard some folks have found great deals on vanilla bean pods at Costco and Sam’s Club too.
Spice markets and gourmet food stores are likely to have a selection of vanilla beans to choose from, too. You might see two varieties on the shelf: beans labeled Grade A and beans labeled Grade B.
What’s the difference?
- The Grade A are considered “gourmet” and are usually more expensive. Some say they also don’t extract as well and are better for recipes that call for the whole bean pod to be used.
- Grade B bean pods on the other hand can only be used for extract, as they lack the moisture content of the premium pods, but still have the same vanillin content.
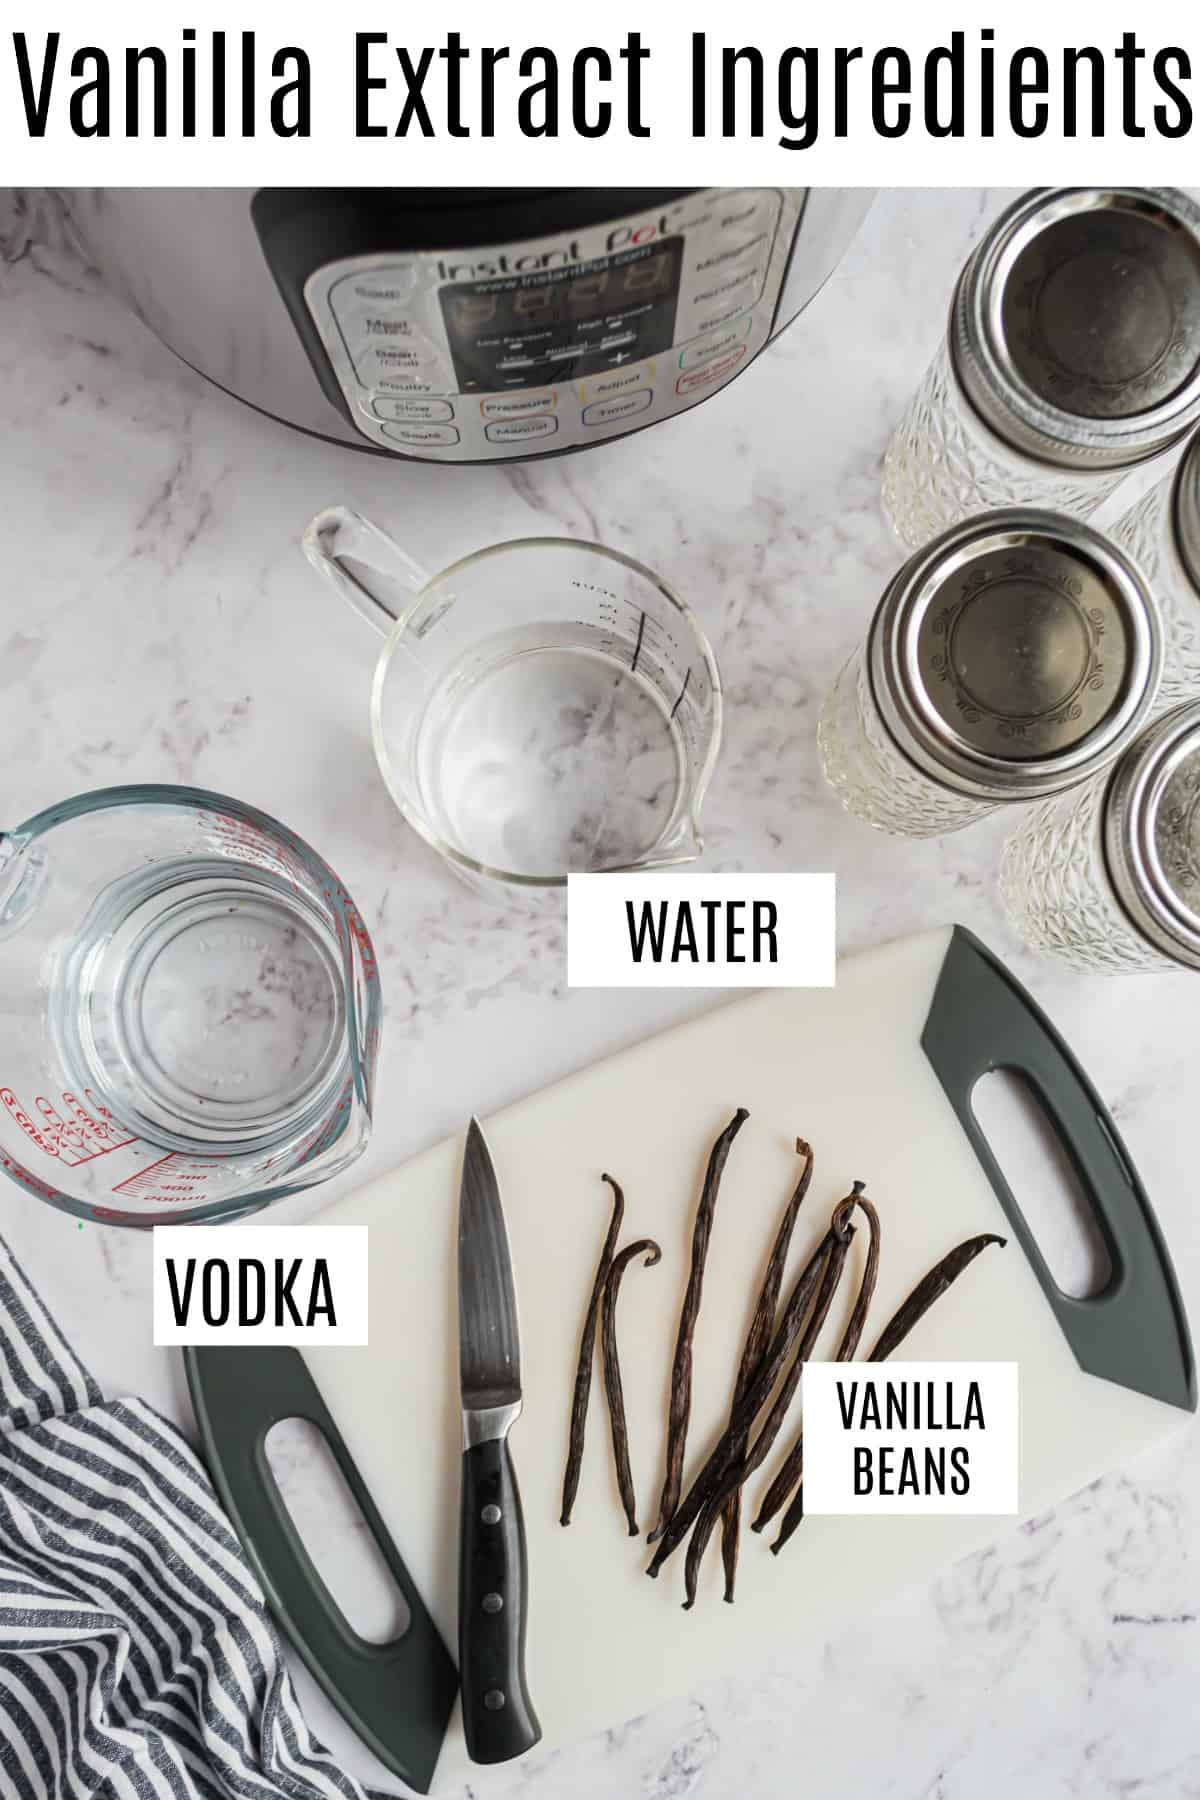
What Alcohol is Best
Vanilla extract is made by using alcohol to “extract” the vanillin from the bean pods. The most common alcohol to use is vodka, but you can use rum, bourbon, brandy or experiment with others.
It doesn’t have to be expensive alcohol either. I used Smirnoff plain vodka. Whatever you use, make sure it is 80 proof.
The higher the alcohol percentage, the better the vanilla flavor will get over time. The higher alcohol percentage also means the vanilla will last longer.
Using 80 proof vodka and following the recipe protocols, the shelf life of this extract is basically infinite.
Traditional vanilla extract recipes call for you to place vanilla beans in alcohol and leave them in a cool dark place for a long time. While this is no doubt effective, it requires patience and time you might not have.
To speed up the extracting process, I used heat provided by my Instant Pot.
Safety Precautions
This recipe should be made only as directed if using the Instant Pot.
Never attempt to work with alcohol near an open flame or on the stove top. The vapor released from the alcohol is flammable and an open flame or strong heat source acts as an ignitor.
Since the heat source of an Instant Pot is an electric coil enclosed in the pressure cooker housing, it is highly unlikely that the alcohol vapor would come in contact with the heating coil if you follow the natural release directions.
By the time you are doing a natural pressure release, the heating coil is off. Make sure to let the Instant Pot naturally release pressure for up to an hour (my Instant Pot lost pressure in just 30 minutes.) This will ensure that no alcohol vapor is released into the air.
Advantage of Instant Pot vs. Traditional Method
The primary advantage of using the Instant Pot to make homemade vanilla extract is the speed. You need to wait a bare minimum of 6 – 12 weeks before using the vanilla made in the traditional way, although the flavor is really best after 6 to 9 months.
When using your Instant Pot to speed up the extraction using heat, the vanilla can be used as soon as the next day if needed, but improves in taste as it ages.
Your patience will be rewarded when you taste the difference in all your vanilla treats, from Vanilla Fudge to French Vanilla Coffee Creamer.
Tips and Tricks
JARS. To ensure the jars work correctly, use brand new canning jars or those that have only been used once or twice.
Make sure lids are placed on the jars and are tightened by hand. Not making the lids tight enough will result in the alcohol vapor escaping from the jars and your vanilla will be not as strong, basically defeating the whole purpose of making your own.
The lids also keep the condensation out (which would dilute the extract).
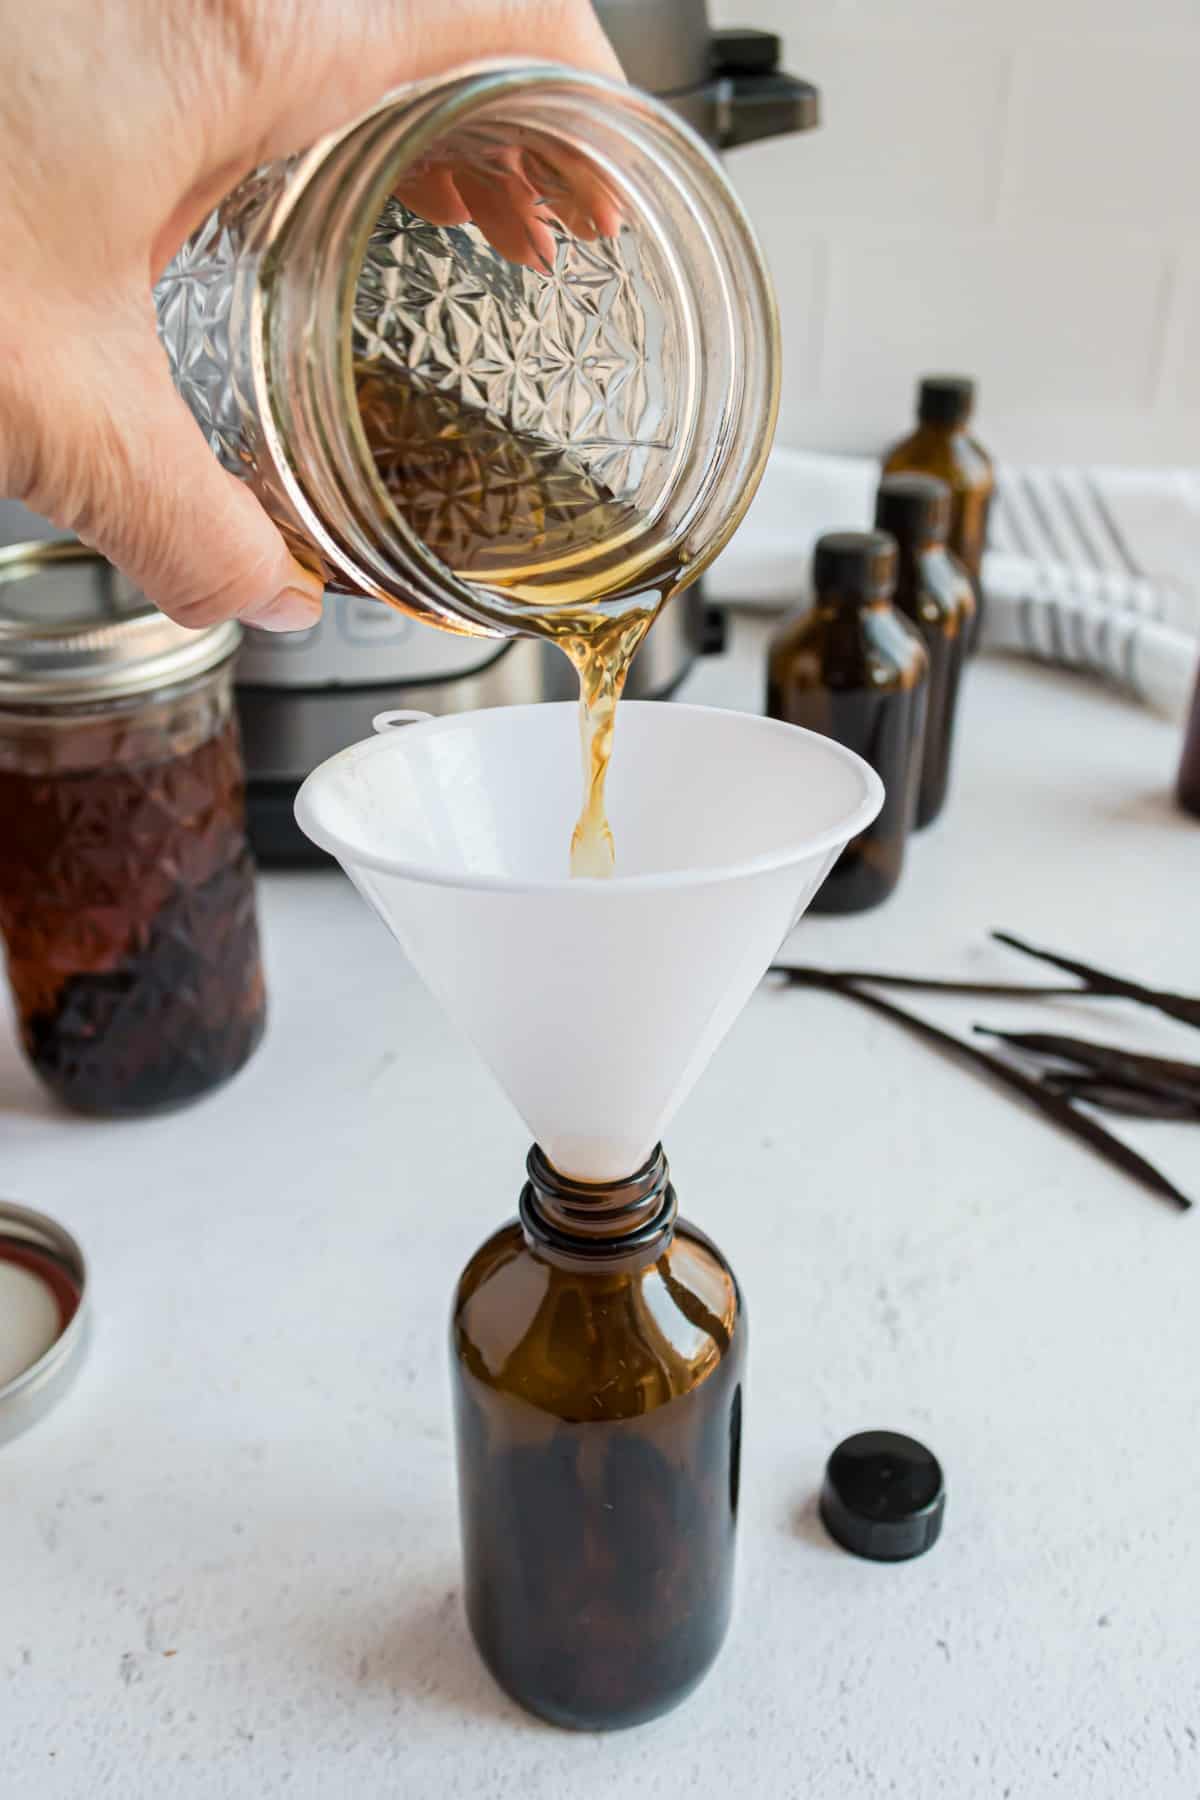
I purchased these to bottle up my vanilla extract and give as holiday gifts. I was able to make about 6 individual (4 oz.) bottles from my recipe, saving a little room at the top. If you try and fill them too full, you can spill some of that delicious extract!
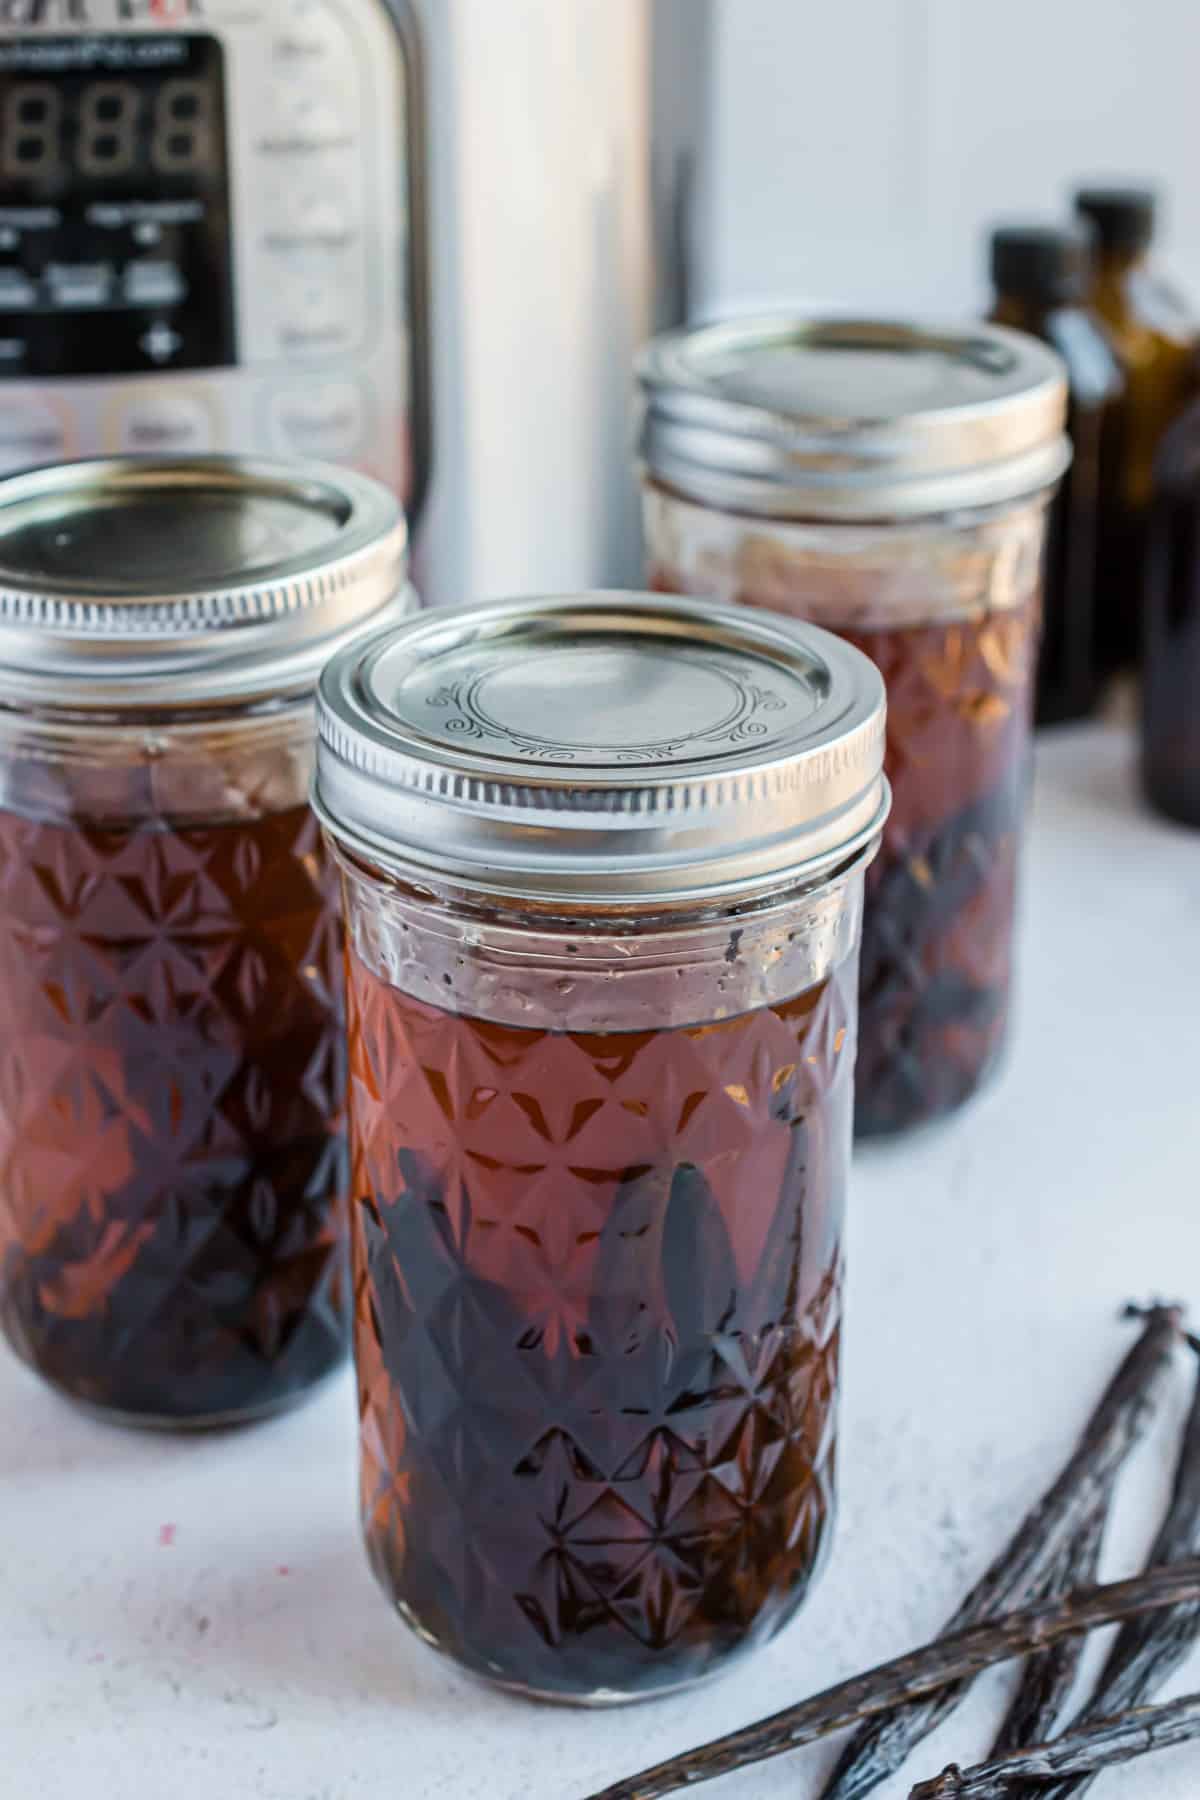
You can keep the vanilla bean pods in the glass container as long as they remain fully submerged. If you use some extract, and the vanilla bean pods are sticking out of the alcohol, remove them so that they don’t get slimy and ruin your extract. When giving this extract as a gift in small bottles, I recommend removing the pods first.
If you’ve kept a bean in your own bottle of extract, you can continue to “top off” your bottle or jar of extract by adding more alcohol to the container as you use it. Some people continue to top off the bottle for about a year before they start a new batch!
Recipe FAQs
I made vanilla extract with three 12 oz canning jars the first time and four 12 oz. jars the second. Three was a more comfortable fit for my Instant Pot but four worked fine too.
A bottle opener or sharp instrument may be needed to help release the vacuum seal that is created when the jar is in the Instant Pot. I used a bottle opener to pry the lid just slightly. I didn’t damage the lid so I could use the jar again to make another batch of vanilla.
The smell of the alcohol should get less strong with time. The longer your extract sits, the more the vanilla fragrance will take over. If you feel as though your vanilla still smells very strong of alcohol right after you make it, let it sit for a week or so, with the lid on. It should improve over time.
Store your extract in a sealed glass jar or bottle in a cool dry place. If you make it following either process in the recipe as directed, it should last forever!
Nope, don’t worry about removing them. They actually continue to give the vanilla a wonderful flavor. I actually scraped the seeds from the canning jar and made sure that some got into each individual bottle that I gave away.
If you decide to remove the vanilla bean pods from the bottle, don’t throw them away! You can let them dry out for a few days and then use them to make vanilla sugar using my recipe. You can also use them in your next batch of vanilla extract, although it won’t be as strong as the first.
How to Make Vanilla Extract without an Instant Pot
Wash and dry a quart size mason jar. Set aside.
Split the vanilla bean pods down the middle lengthwise and add the beans to the jar.
Pour vodka into the jar, making sure the vanilla bean pods are covered completely.
Seal the jar and store in a cool dark place for at least 6 weeks (but closer to 12 weeks is best). Shake the jar once a week until ready to use.
Kitchen Basics
See all Basics recipes


Pin this now to find it later
Pin It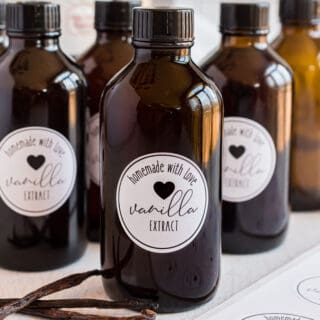
Vanilla Extract
Equipment
Ingredients
- 4 cups of 80 proof vodka
- 12 whole vanilla beans pods
- 1 cup water
Instructions
INSTANT POT RECIPE:
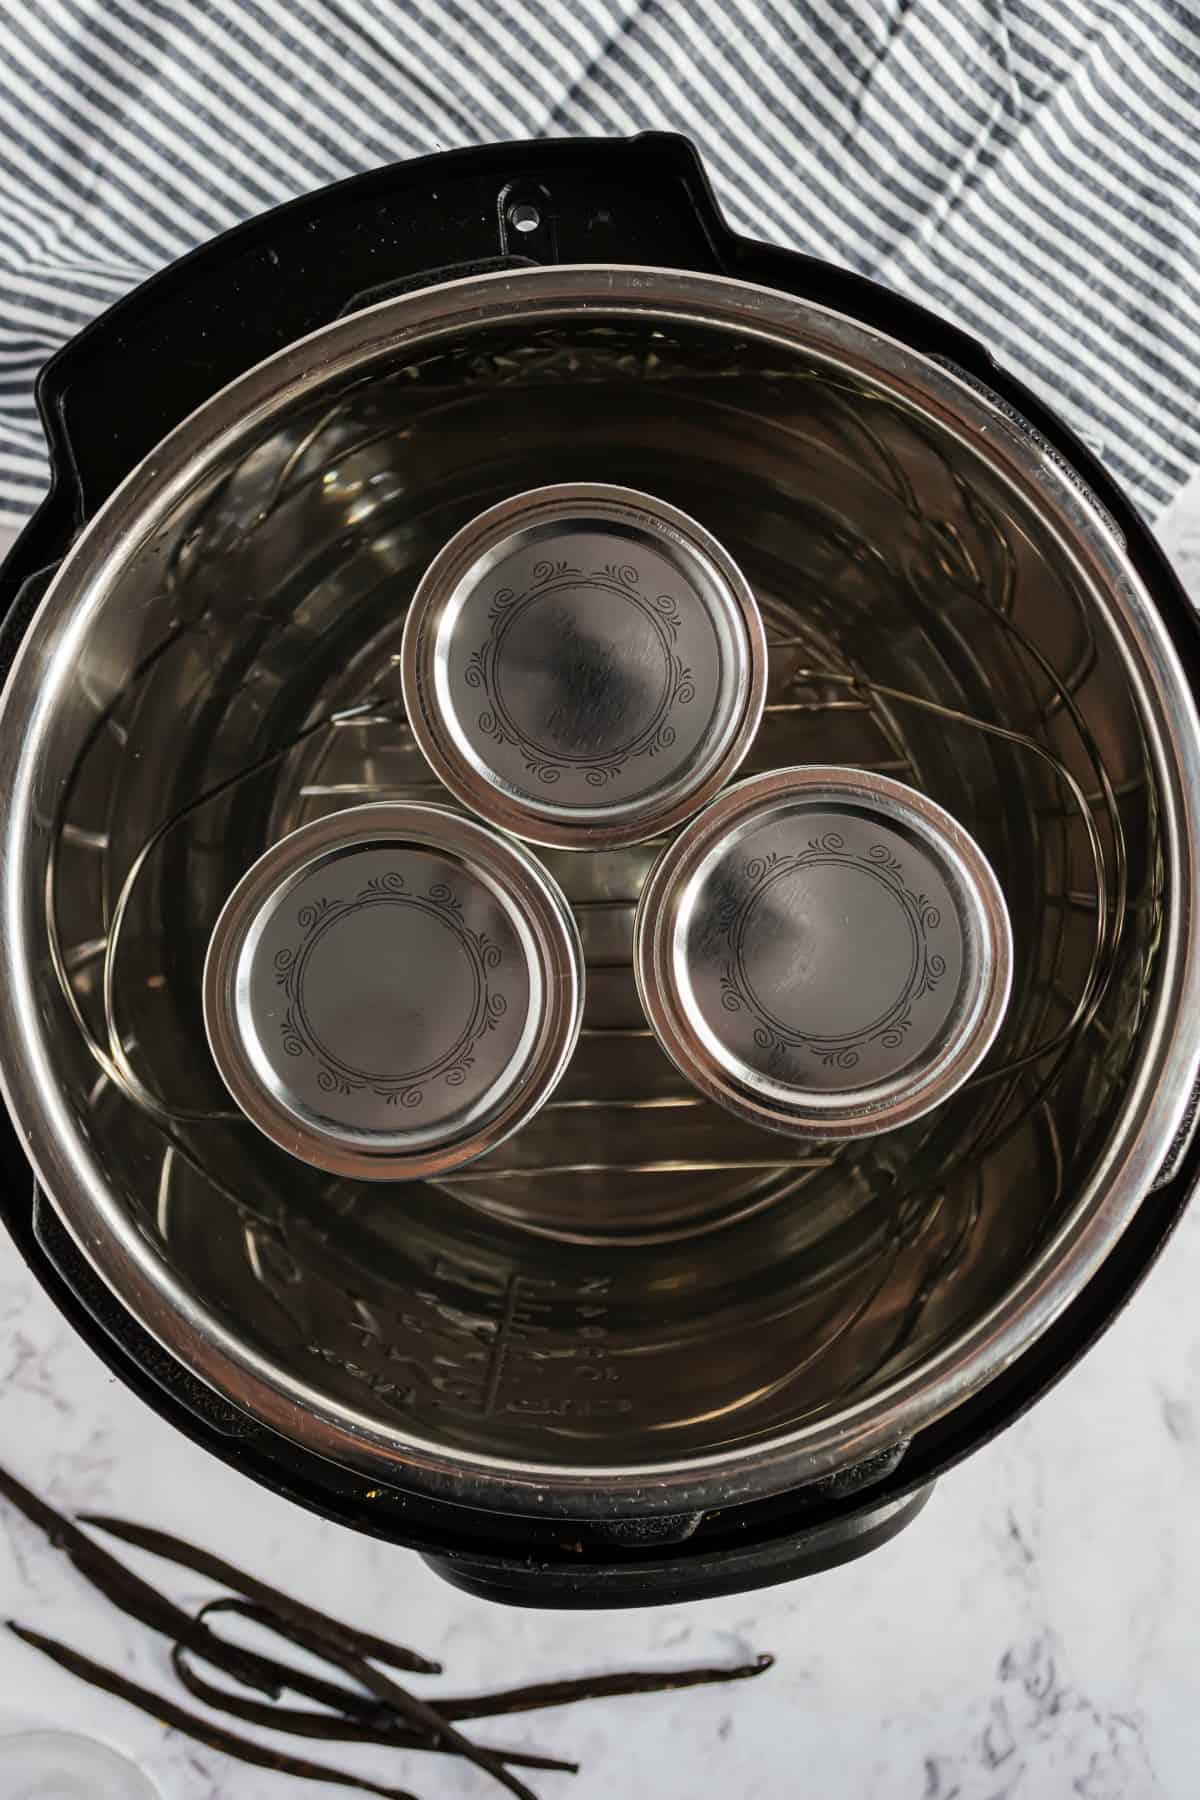
- Wash 4 glass (12 oz each) canning jars in hot soapy water and dry them. With a sharp knife, split the vanilla bean pods lengthwise down the middle leaving it attached at both ends. Then cut in half. Add 3 whole beans to each jar. Since I used 12 ounce jars, I added an extra half of a vanilla bean pod to each.
- Pour vodka into each of your canning jars, leaving about an inch at the top. This extra room will allow for the liquid to expand while it is in the Instant Pot. Even though my jars were 12 ounces, I added just slightly over a cup of alcohol to each jar.
- Add 1 cup of water to the bottom of the Instant Pot. Place a trivet into the bottom of the Instant Pot.
- Place a canning lid on each jar and finger tighten with ring. Place the jars in the Instant Pot on the trivet. Secure the lid and make sure the valve is set to SEALING.
- Select the MANUAL SETTING or HIGH PRESSURE COOK for a cook time of 45 minutes.
- Once the cook time ends, let the pressure NATURALLY RELEASE FOR 1 HOUR.***
- After the hour has passed, turn the valve to VENTING and carefully open the lid away from your face.
- The jars will still be very hot. In fact, the liquid will still be bubbling. Use a potholder to transfer the jars somewhere to safely cool. You could even turn your Instant Pot off, unplug it, and allow them to cool right there.
- Once the liquid has cooled, transfer the extract to individual bottles using a small funnel or leave it in the original jar for use later.
TRADITIONAL VANILLA EXTRACT METHOD:
- Wash a quart size mason jar in hot soapy water and dry.
- With a sharp knife, split the vanilla bean pods lengthwise down the middle leaving it attached at both ends. Add 12 whole beans to the jar.
- Pour 4 cups of vodka into the glass container, covering the vanilla bean pods completely.
- Seal it and store it in a cool, dark place. Shake it once a week until ready to use.
Notes
- Recipe tested in a 6qt Instant Pot.
- DO NOT SKIP the natural release. This is an important SAFETY measure. Do not allow the Instant Pot to be near an open flame.
- Jars- 12 oz canning jars worked great!
- FREE PRINTABLE LABEL download!
- There is a lot of tips and tricks and ingredient information in the blog post. Be sure to go back and read everything before starting.
Nutrition
Homemade Vanilla Extract elevates the simplest desserts to new heights of flavor and taste. With the tiniest bit of effort–and a little patience–you’ll have plenty of this magical aromatic ingredient to share with friends and loved ones.


Made this for Christmas gifts. Everyone love this recipe!
My instant pot doesn’t have a trivet, can I still do this?
You mention it is best to use new jars. Would just buying new lids work? It would keep the cost down.
Yes that works.
Does the timing change if you use 8 oz jars instead? My instant pot is smaller, so I was going to use 3 8 oz jars instead.
I’ve used your recipe and method and am very happy with my vanilla extract! Thanks a million!
Just tried this recipe for the first time and my first time using an IP. The vanilla looks great. But I had to use pint jars since I could not find the 12 oz in any box store.
Questions:
1)Do I leave the vanilla in the pint jars for 6-12 weeks and then transfer it to the smaller gift bottles, or do I transfer it to the gift bottles now? If so, do I leave a vanilla bean in each small bottle?
2) For my next batch, since I’m using 16 oz jars, can I add more than 1 cup of vodka to each jar and add another bean to get to maybe 12-14 oz of liquid?
All your questions are answered in the blog post 🙂 Feel free to scroll on up!
This is the simplest and easiest vanilla, I will never go back to making vanilla any other way!!!
When you put it in the bottles. How many do you end up with. Are they shelf stable. I was going to pass them out for Christmas.
They are shelf stable, and it depends on the size bottles you use. You will end up with about 24 ounces of vanilla.
Does it matter where the beans come from? Tahitian, Madagascar, etc. The ones you listed from Amazon are Tahitian. But there are several other ones on Amazon that are from other places. So I’m just curious if the flavor is different.
Beans from different locales have different flavor profiles but they are all deliciously vanilla flavored. I’ve never met a vanilla bean I didn’t like. 💙
When you make the vanilla,nthat you let set for 12 weeks do you still need the 1 cup water, you only said vanilla beans and vodka Thank you
The water is for the instant pot recipe. It’s needed to create the pressure in the pot, bit for the vanilla extract.
Do you have to age this similar to the traditional method? For how long?
I’ve got all the details in the blog post for you 🙂
I can’t wait make my own vanilla extract.I love everything about vanilla. Thanks! Aimee