Hot chocolate is so much more fun when you make it with Hot Cocoa Bombs! Learn how to make hot cocoa bombs in all kinds of flavors to give as a gift with this easy-to-follow guide.
Whether you serve your hot chocolate balls in a steaming mug of milk or turn it into a mocha by pouring hot coffee over the top, kids and adults LOVE making and serving these sensational chocolate treats.
The Ultimate Hot Chocolate Bomb Recipe
Have you discovered the joys of Hot Cocoa Bombs yet? These little spheres of pure chocolate bliss are my latest obsession.
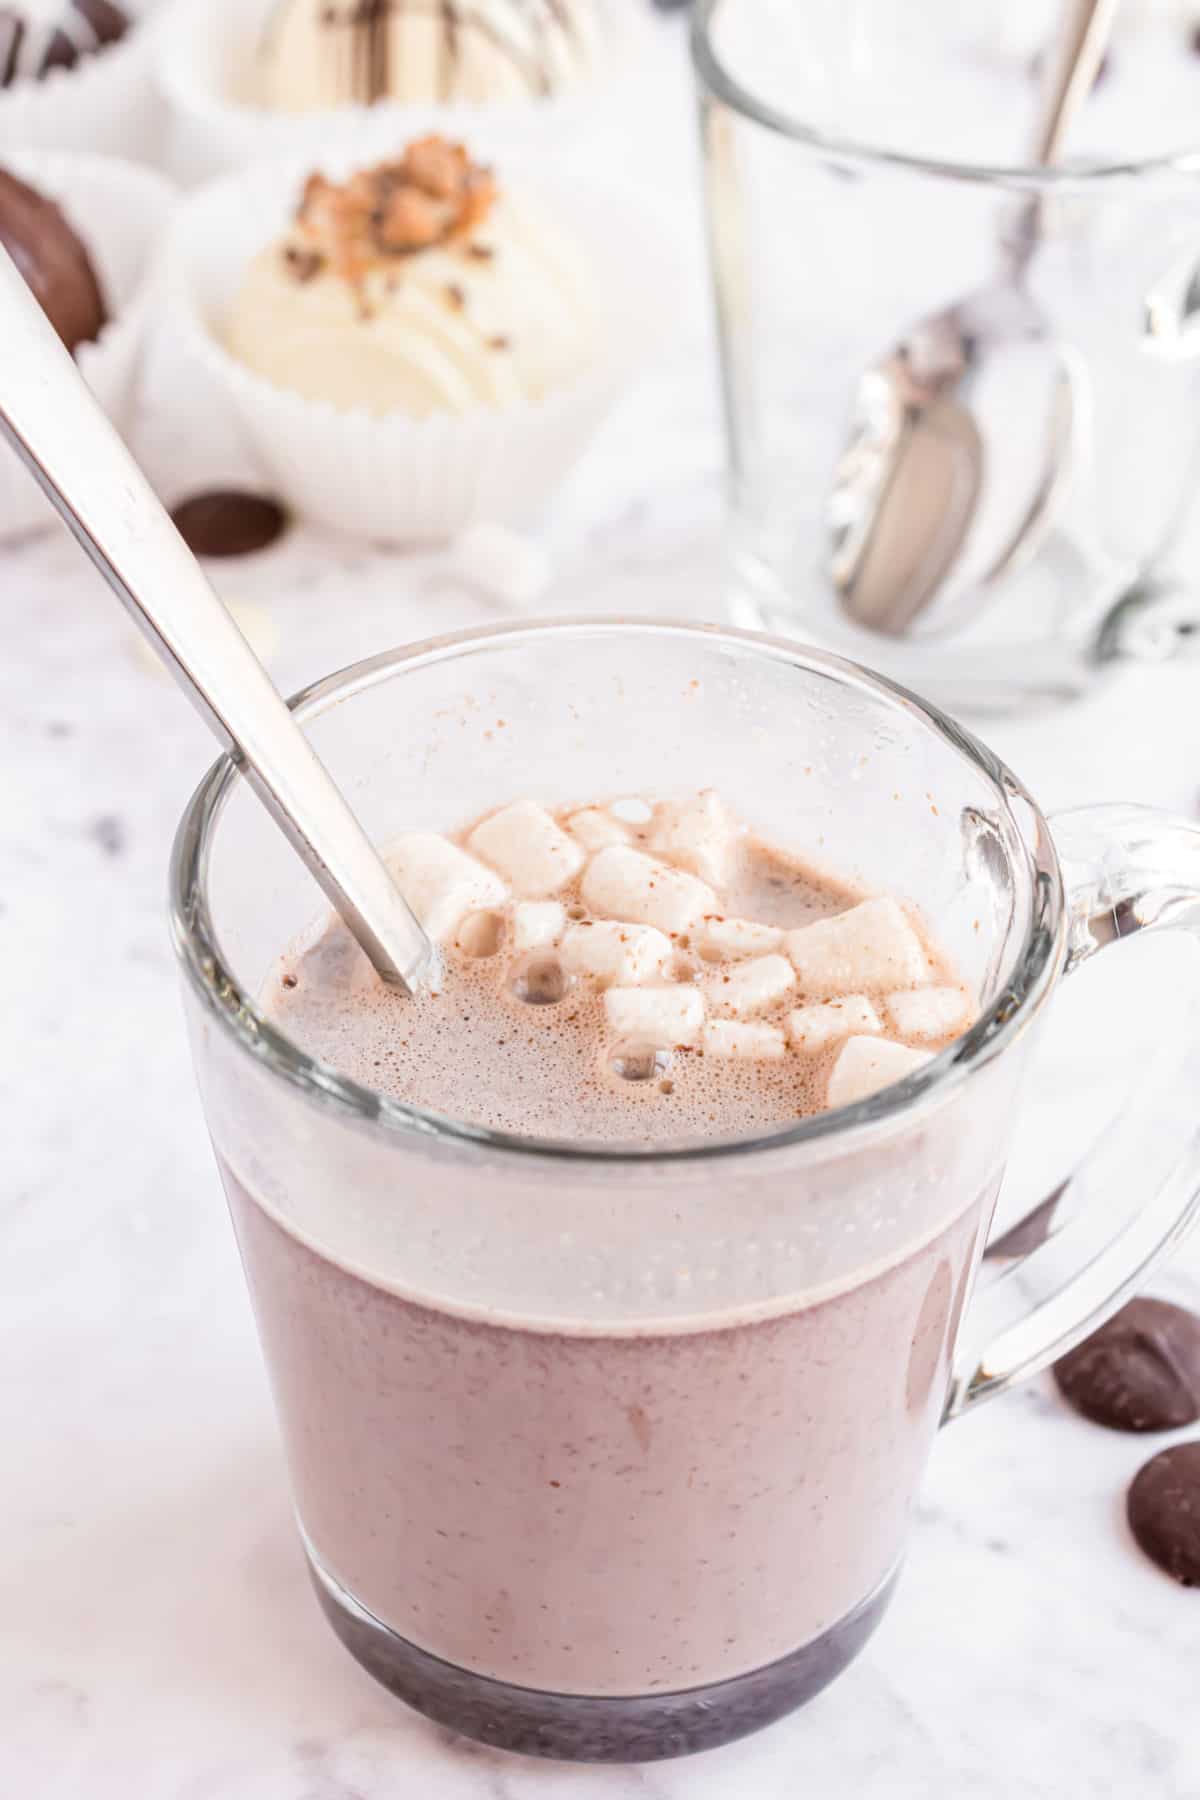
You put them in a mug, pour hot milk over them and stir to create the perfect creamy homemade hot chocolate! It tastes so much fun compared to using plain powdered hot chocolate mix on it’s own.
I find it ultra satisfying to watch the smooth chocolate bomb dissolve into the mug of hot milk!
With a little practice and the right ingredients, making homemade hot chocolate bombs is easier than you think.
Make a batch with your favorite hot cocoa flavors then give them as a gift to anyone who could use a little more chocolate in their life.
Scroll down for everything you need to know, from tools, ingredients and much more. I’ve even included a printable tag that you can attach to gift your cocoa bombs this holiday season!
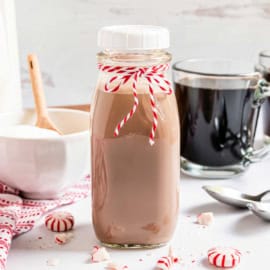
Top off your mug of cocoa with some peppermint marshmallows, made from scratch!
Ingredients and Tools Needed
Before you start, make sure you have the right equipment.
You’ll need:
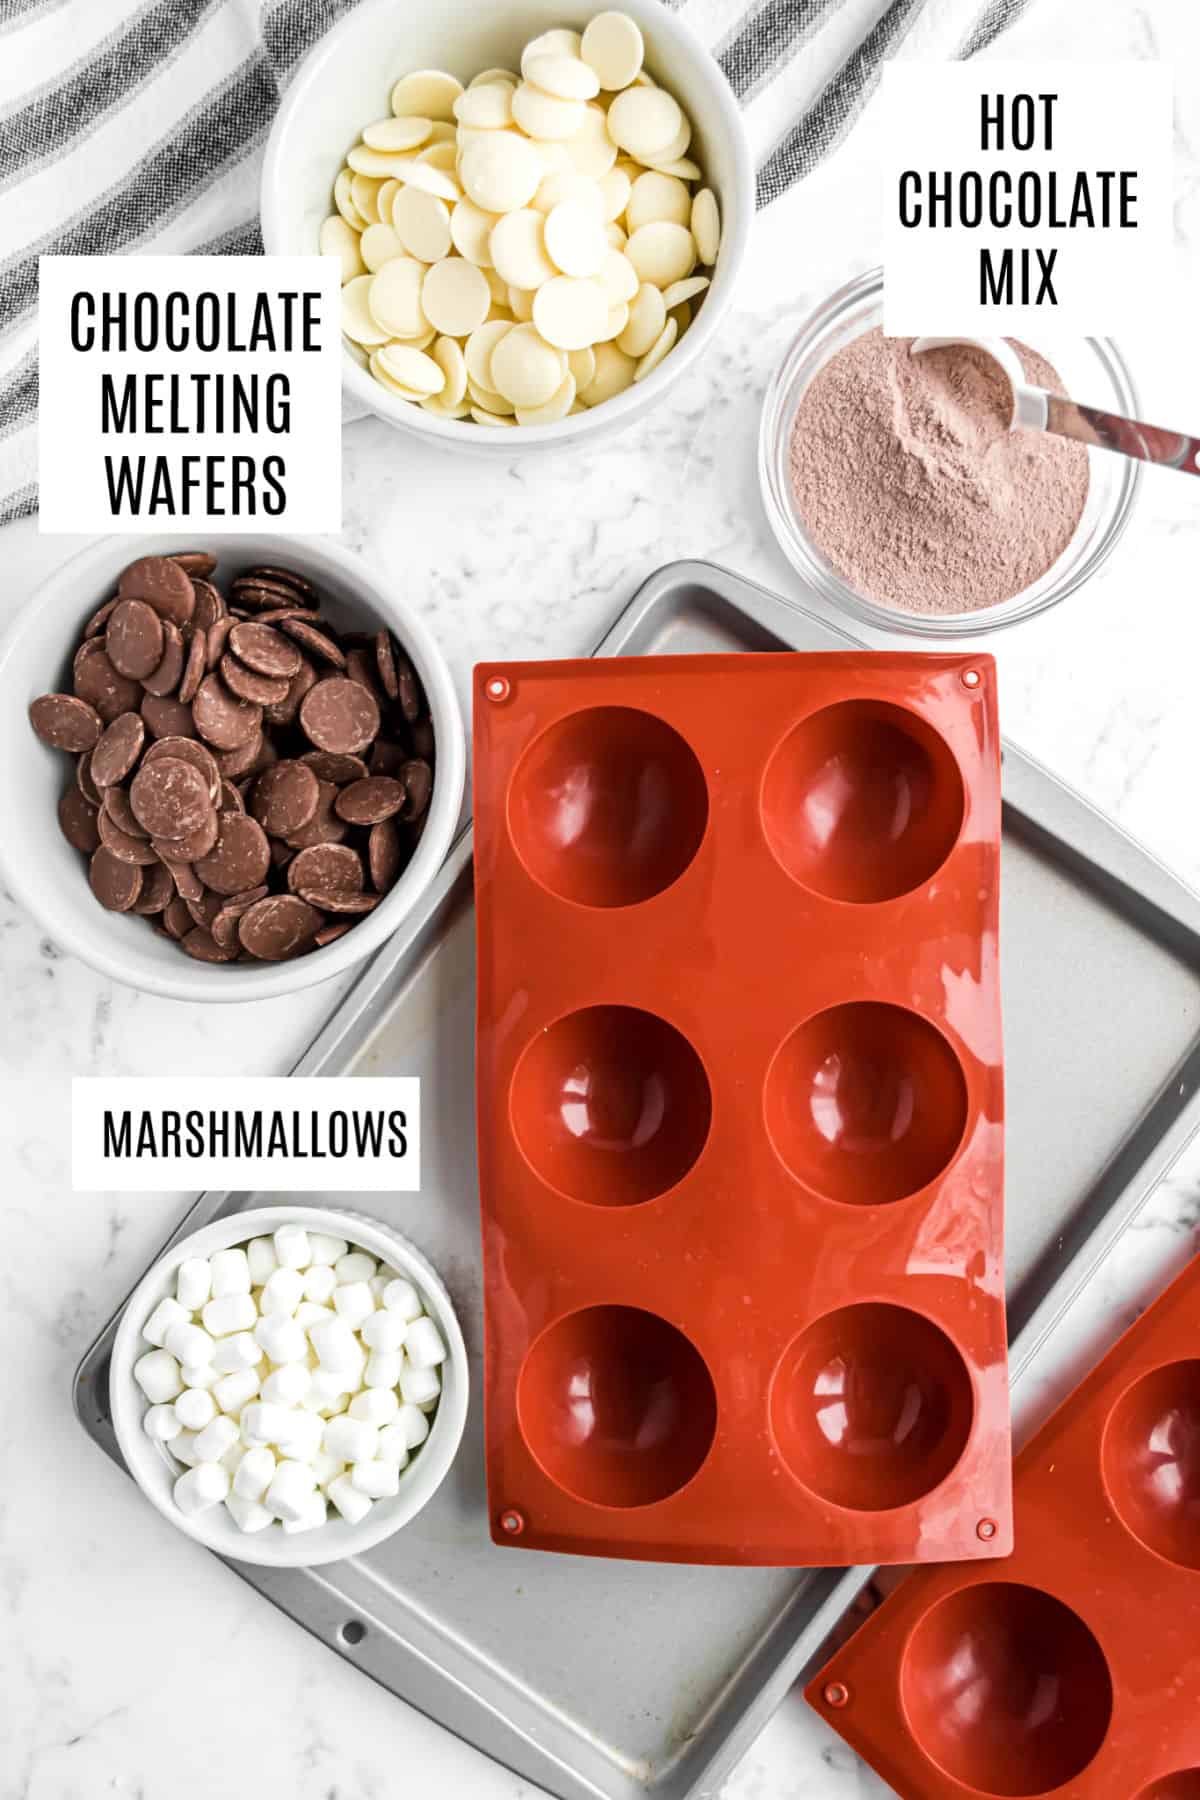
Silicone Baking Mold
Larger molds work better. If the mold is too small, you’ll have a harder time getting the cocoa mix into the chocolate bomb. I used this 2.5 inch diameter mold. Make sure the silicone pan has only been used for food (not bath bombs or other crafts).
Skillet or sauce pan -This will be heated and used to soften the chocolate. I find a skillet holds and distributes heat best. A warmed plate would also work.
Baking sheet – For supporting the silicone mold in the freezer and holding the finished hot cocoa bombs as they set.
Ingredient Notes
- Ghirardelli Melting Wafers – Use milk, white or dark chocolate flavors depending on your preference.
- Favorite hot cocoa mix – Powdered – any flavor works!
- Marshmallows – Mini marshmallows or dehydrated marshmallows. Lucky charms marshmallows work well too! Use our homemade marshmallows for a flavorful filling too!
- Optional fillings – See my notes below the instructions for easy fillers to make different flavors!
How to Make Hot Cocoa Bombs
This is my easiest method for making the best hot chocolate bombs. You’ll first make the hollow chocolate spheres before choosing your filling. While there are different techniques on the internet, this is the one that I use for best results.
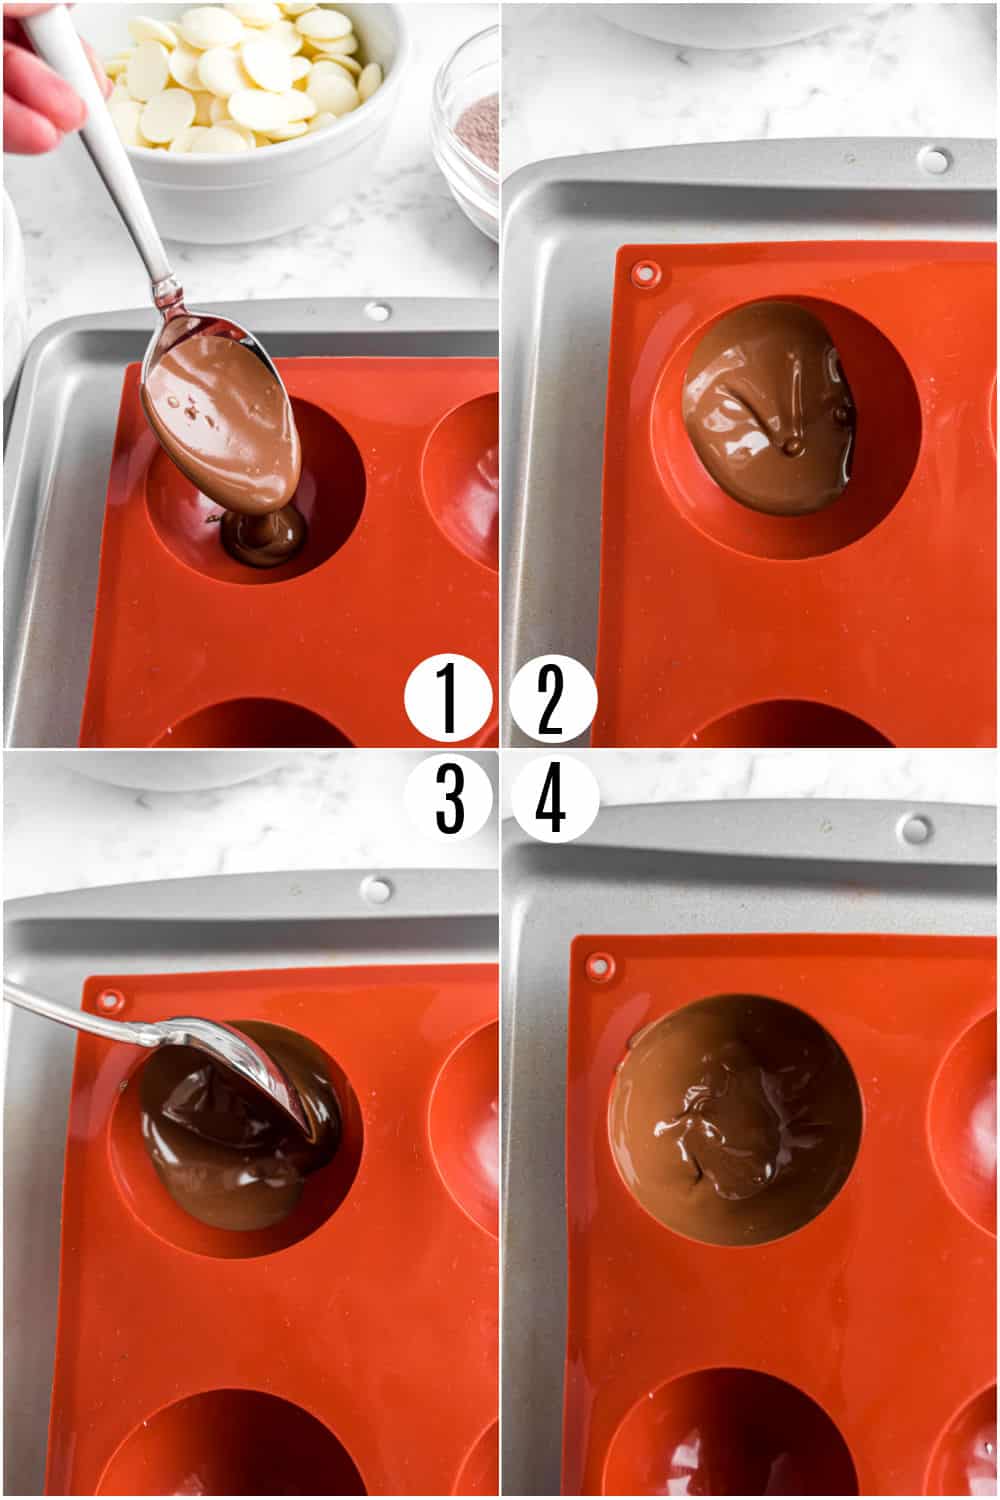
STEP 1. Melt the chocolate
- Place the chocolate melts in a microwave-safe bowl and melt according to package directions. You can also use the double boiler method if desired.
- Place the silicone mold over the baking sheet.
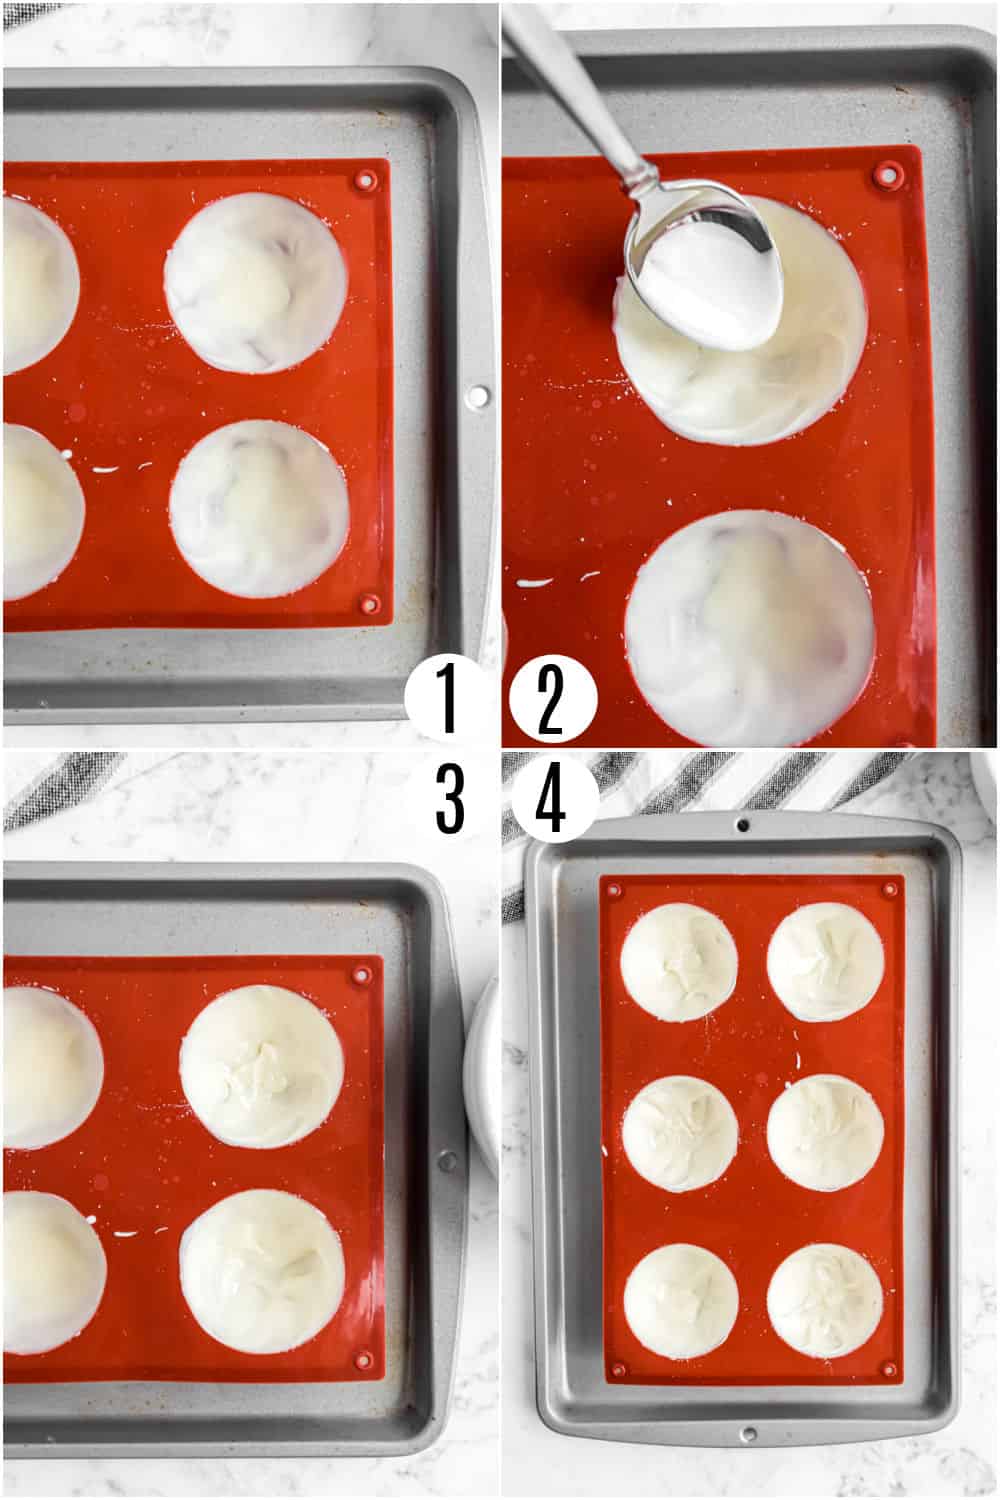
STEP 2. Fill the molds
- Pour up to 1 tablespoon of the melted chocolate into the well of the mold.
- Push the chocolate up the sides with a spoon to make sure it covers every surface of the mold.
- You can even tilt the mold slightly to see the insides to check that it’s completely covered. When I filled mine, I imagined the inside of the sphere as a clock face and tried to get chocolate over each “number.”
- This is the body of your cocoa bomb so you want to be sure it’s completely filled and stable! Any excess chocolate on the mold can be “cracked off” after freezing.
STEP 3. Freeze
- Transfer the baking sheet with the mold to the freezer.
- Let it chill for 10 minutes to set.
STEP 4. Second chocolate coating
- Take the mold out of the freezer and check the insides.
- If any parts of the outer shell look thin, add a second layer of chocolate using a small spatula, spoon or even a food safe paint brush. I found that the white chocolate mold always needed a second coating.
- Return to the freezer for another 5 minutes.
Tip: When in doubt it’s better to do two thin coats instead of one thicker layer.
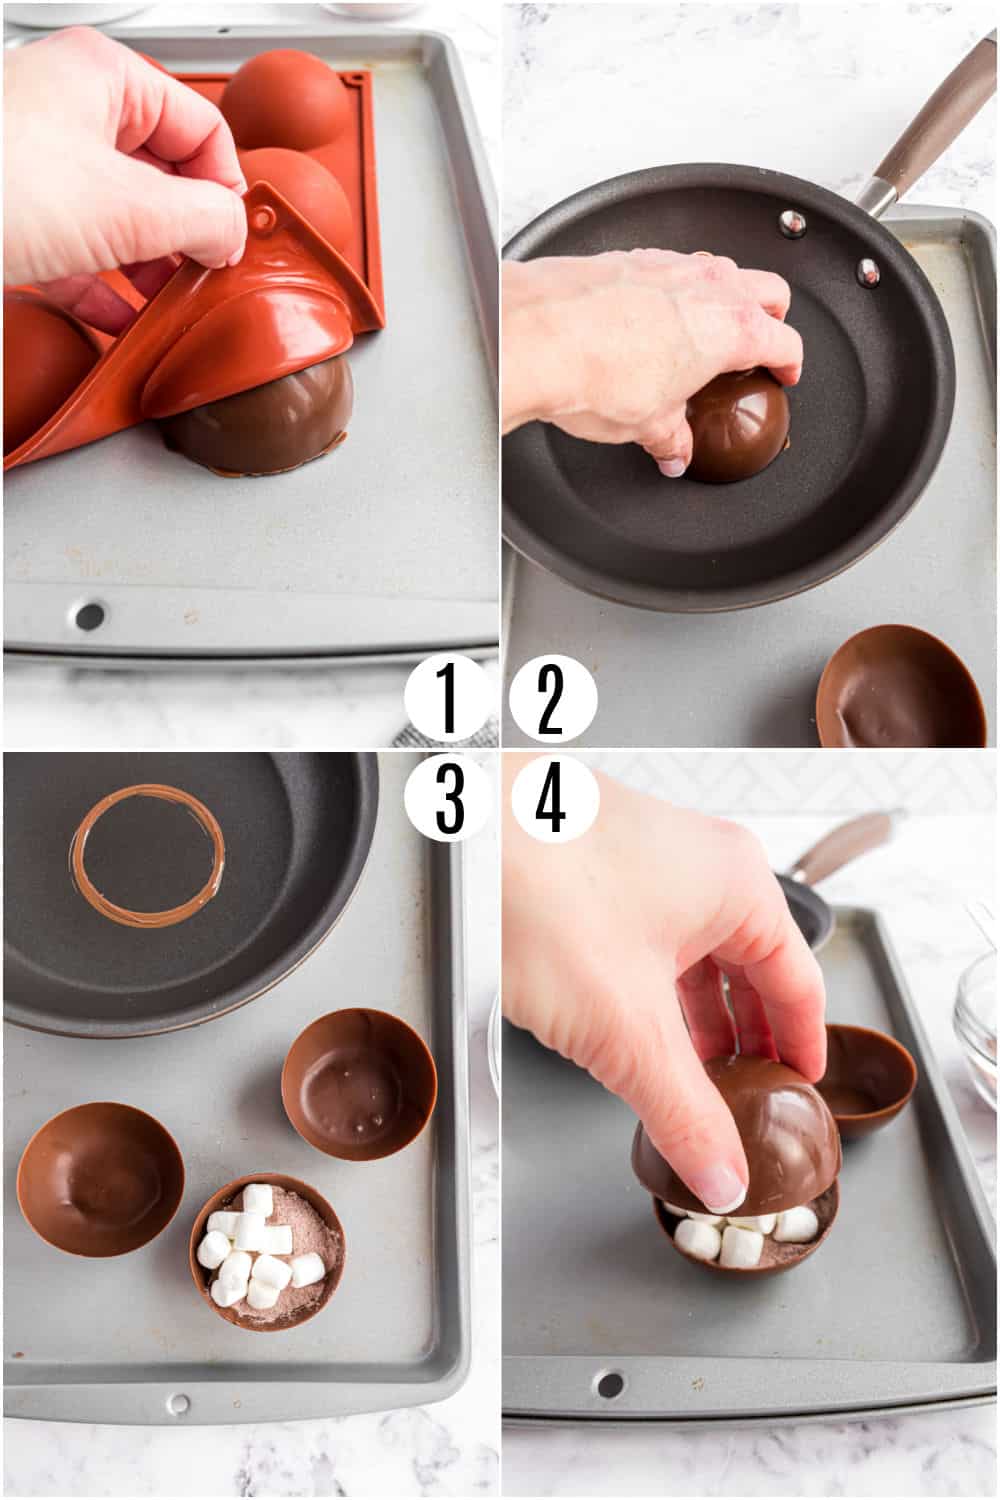
STEP 5. Remove from molds
- Take the mold out of the freezer and flip it so the round side is facing up. Gently peel off the silicone from the hardened chocolate half spheres.
- You can press your finger into the well to help with this but be careful not to push too hard or the chocolate may crack. Each mold cavity will create two halves of a sphere.
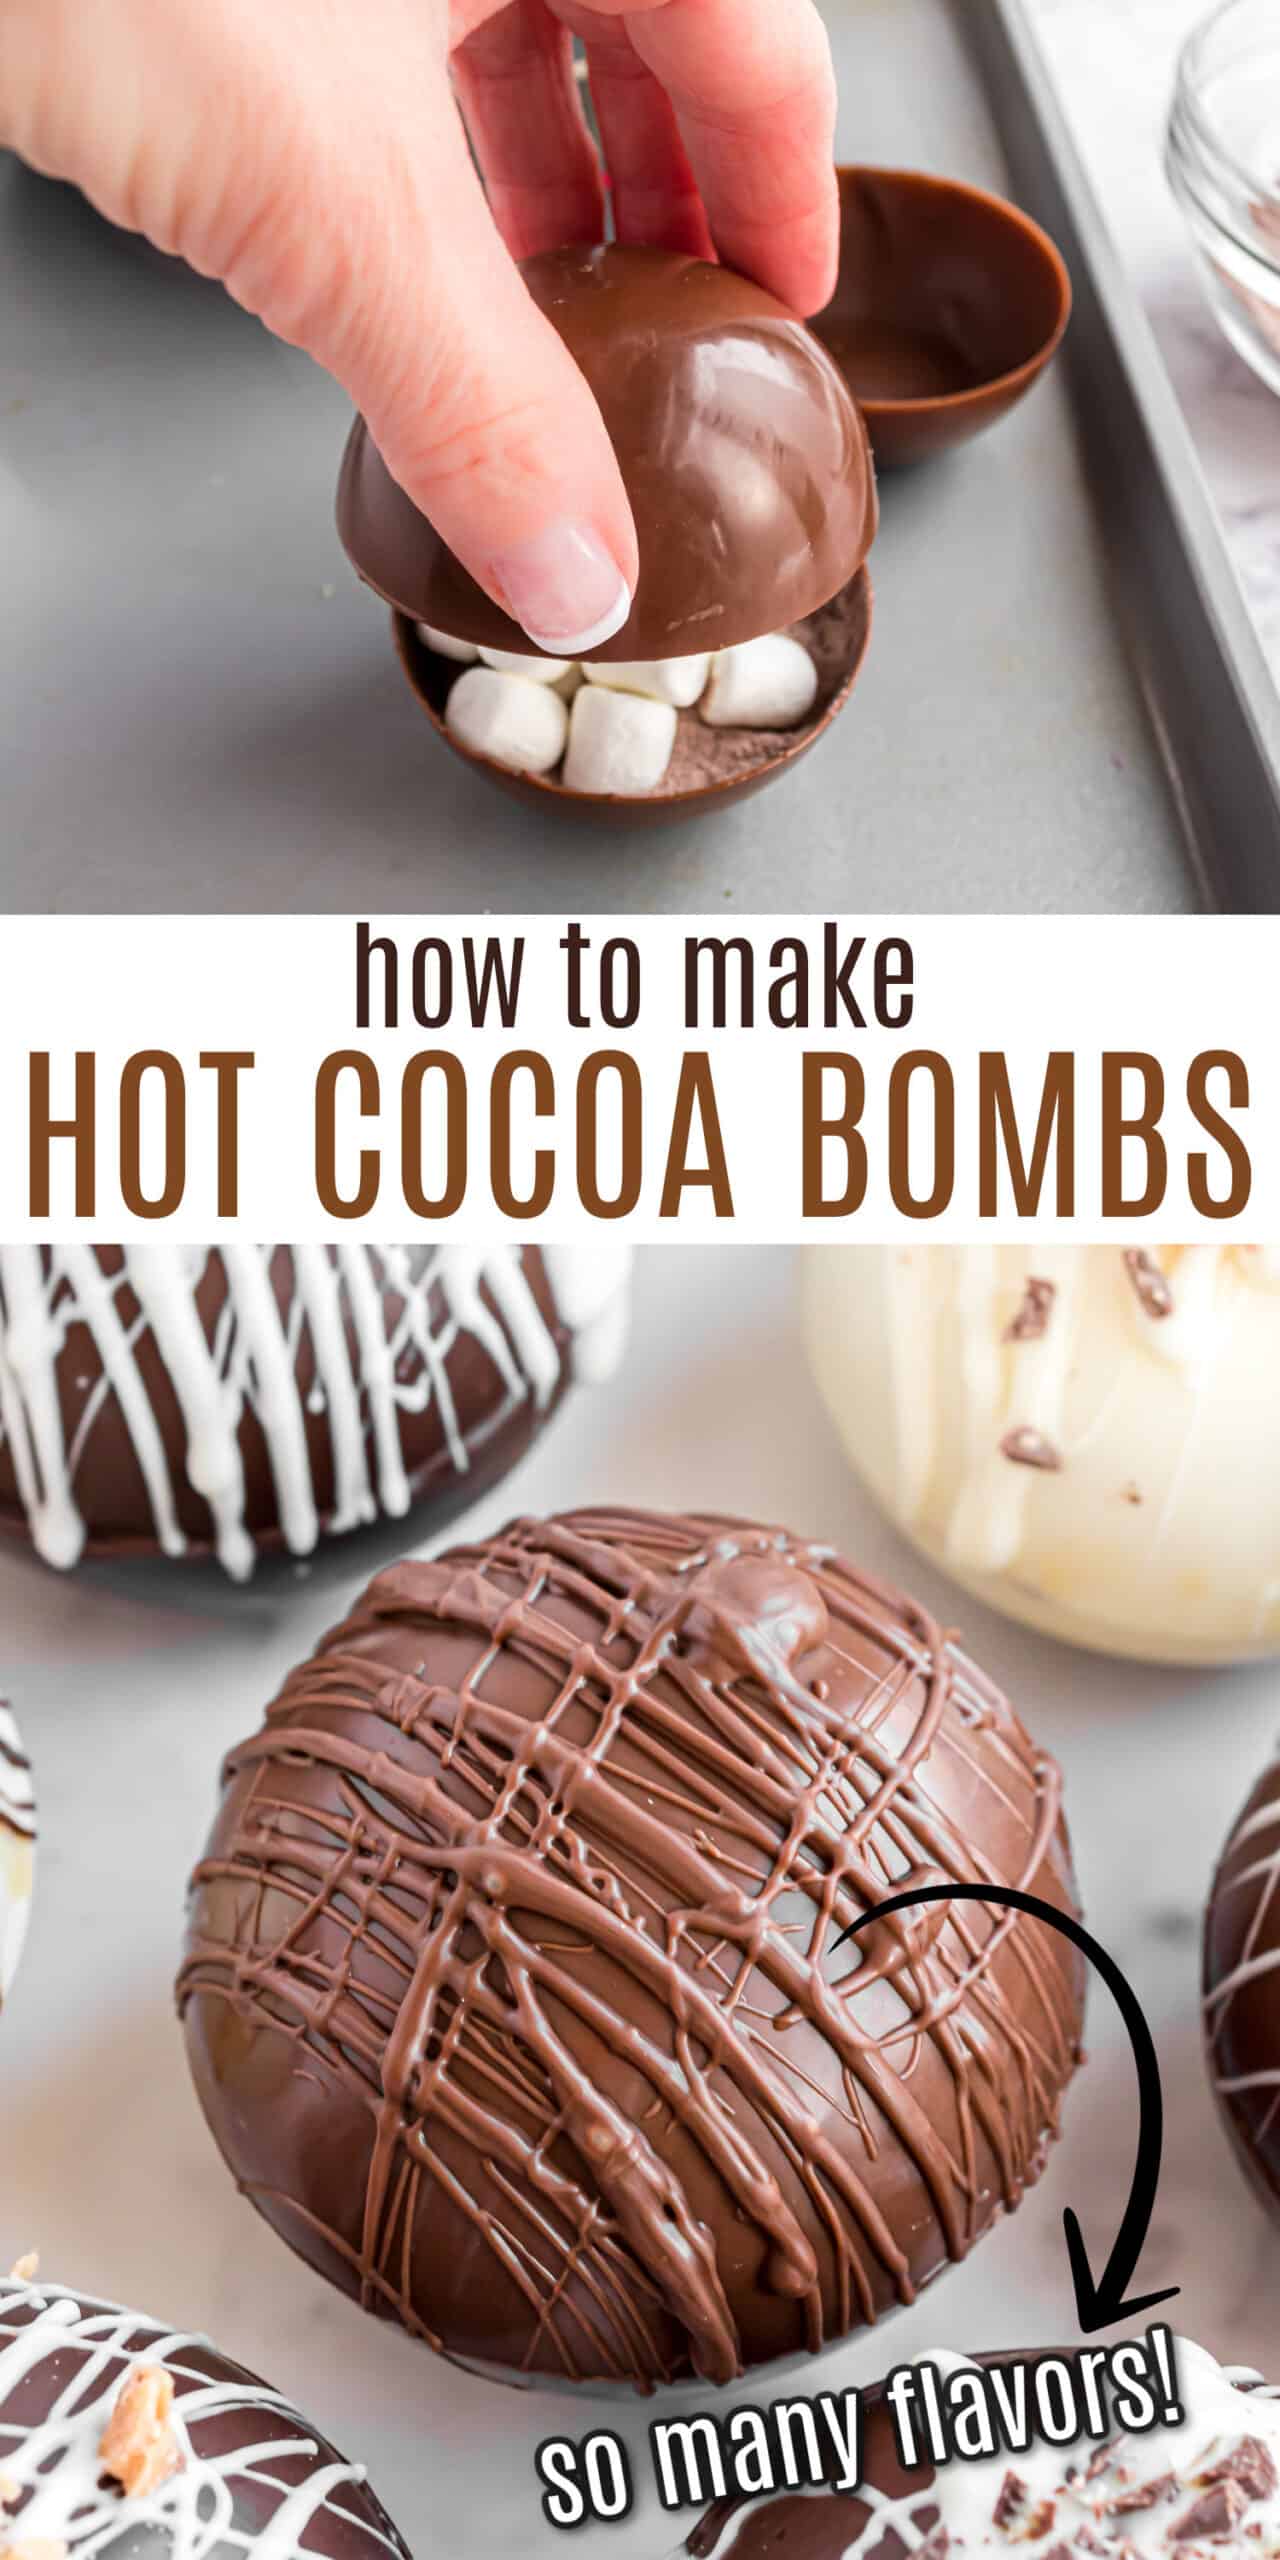
STEP 6. Fill and Seal
- Heat a skillet, sauce pan or plate just until warm, then remove from heat. Take one of the chocolate shell halves and place it (round side up) on the warm surface just until the edges begin to soften and melt.
- I found that a heated skillet worked best for this because it held the heat longer than a sauce pan or plate.
- Place the shell with the softened edge (open side up) on a cold cookie sheet and fill with 1 tablespoon of hot cocoa mix and a handful of mini marshmallows.
- Warm another chocolate shell half on the hot surface, then place it on top of the filled shell. The melted edges will come together as a glue for sealing the hot cocoa bombs.
Tip: Keep the shells away from the heated surface when you’re not using them. They’re sensitive to heat and will begin to melt.
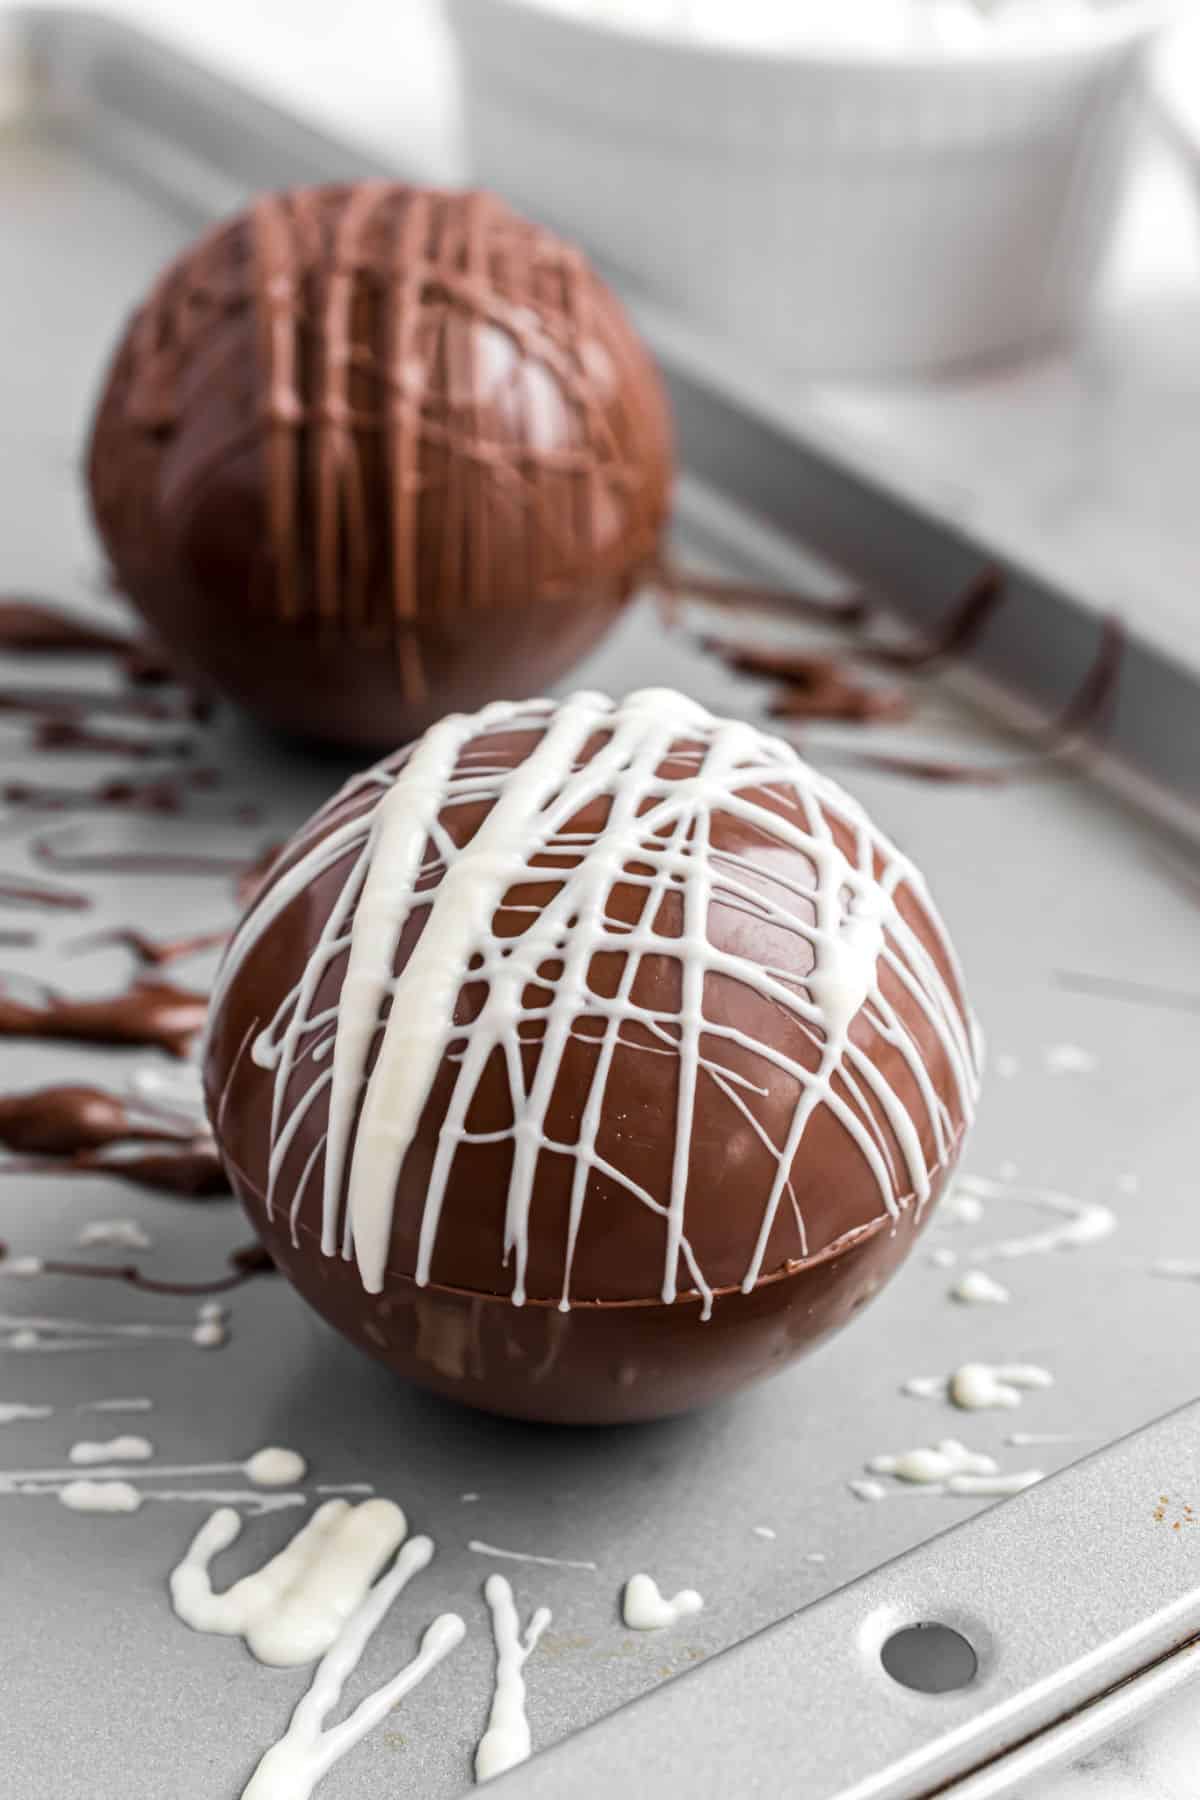
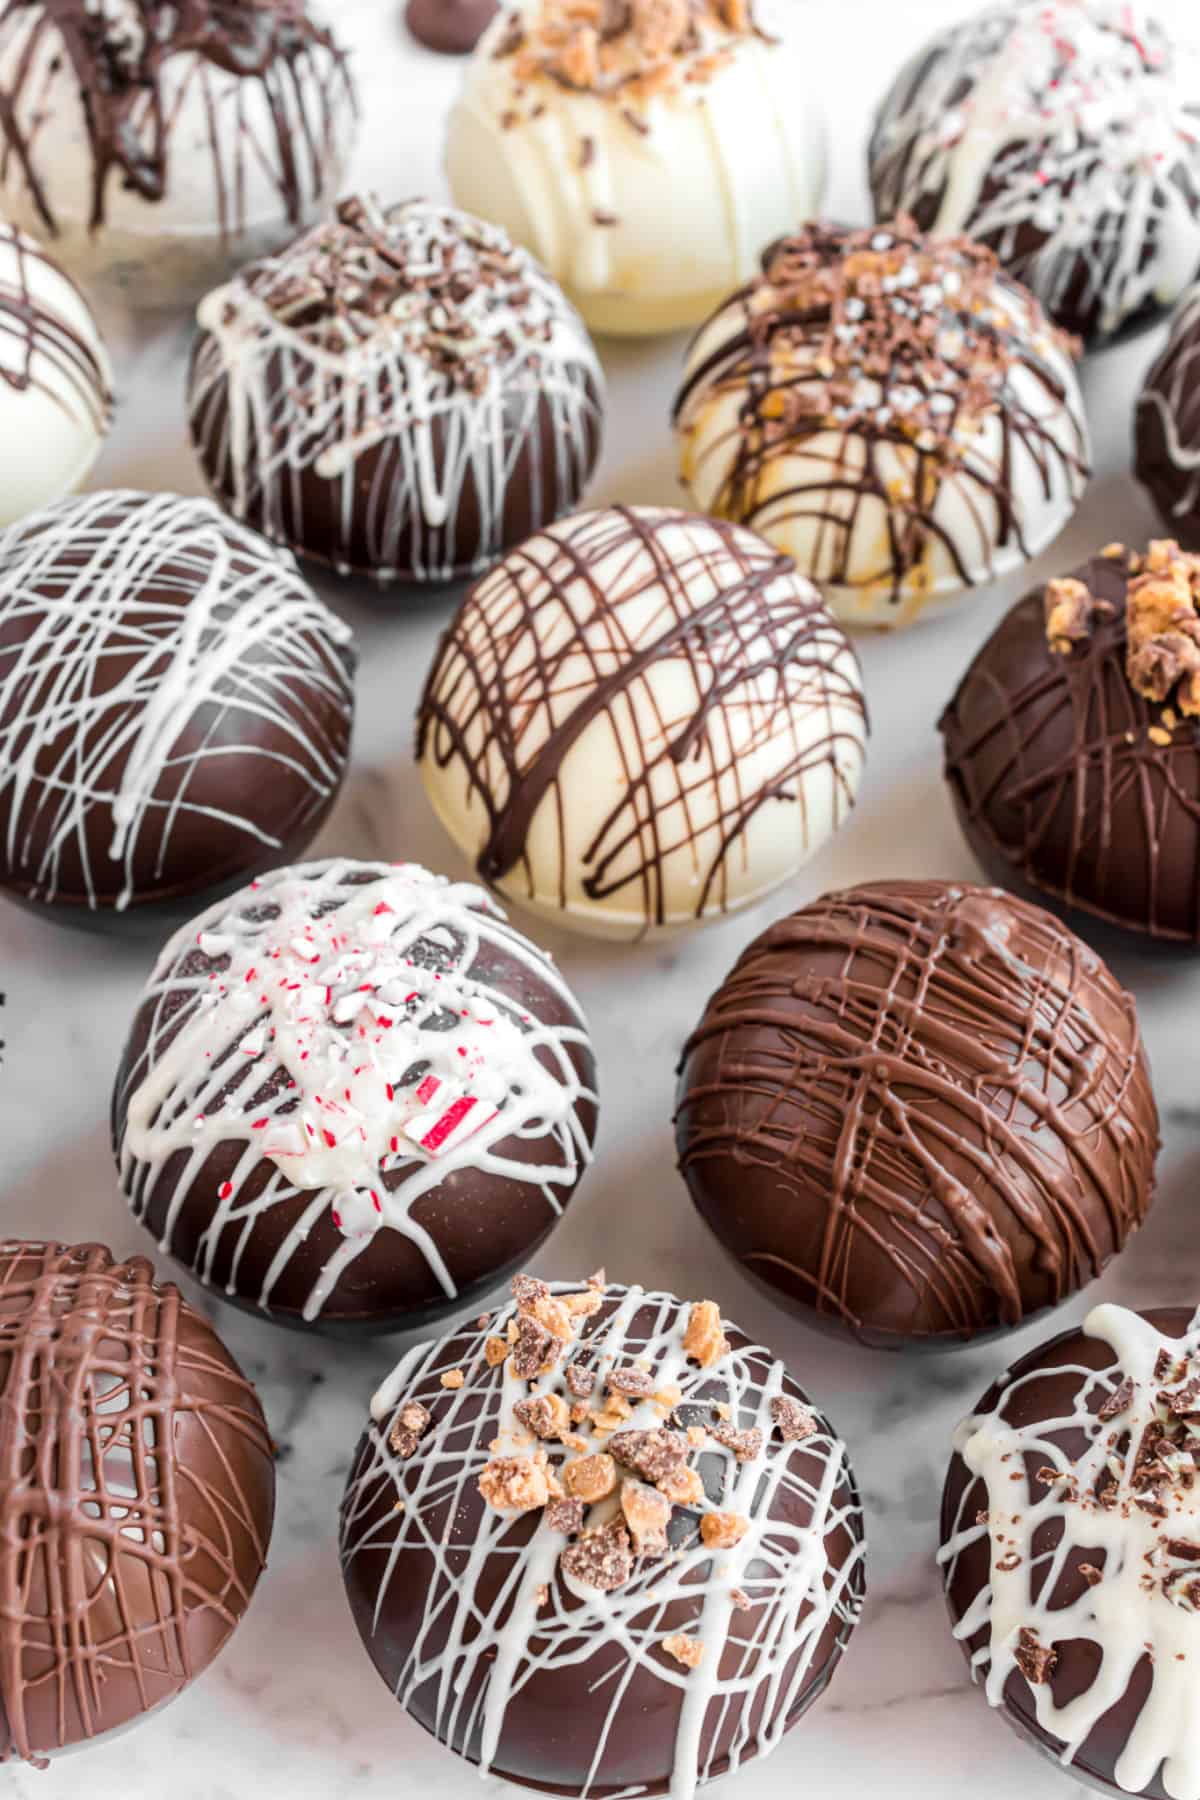
STEP 7. Decorate
- Make your cocoa bombs look as good as they taste by drizzling melted chocolate on top. You can use chocolate that matches the shell or use a contrasting color to make pretty designs.
- Let the melted chocolate set for a few minutes, then store your finished homemade hot cocoa bombs in sealed bags, jars or a plastic container at room temperature. Be prepared to enjoy a delicious cup of hot chocolate!
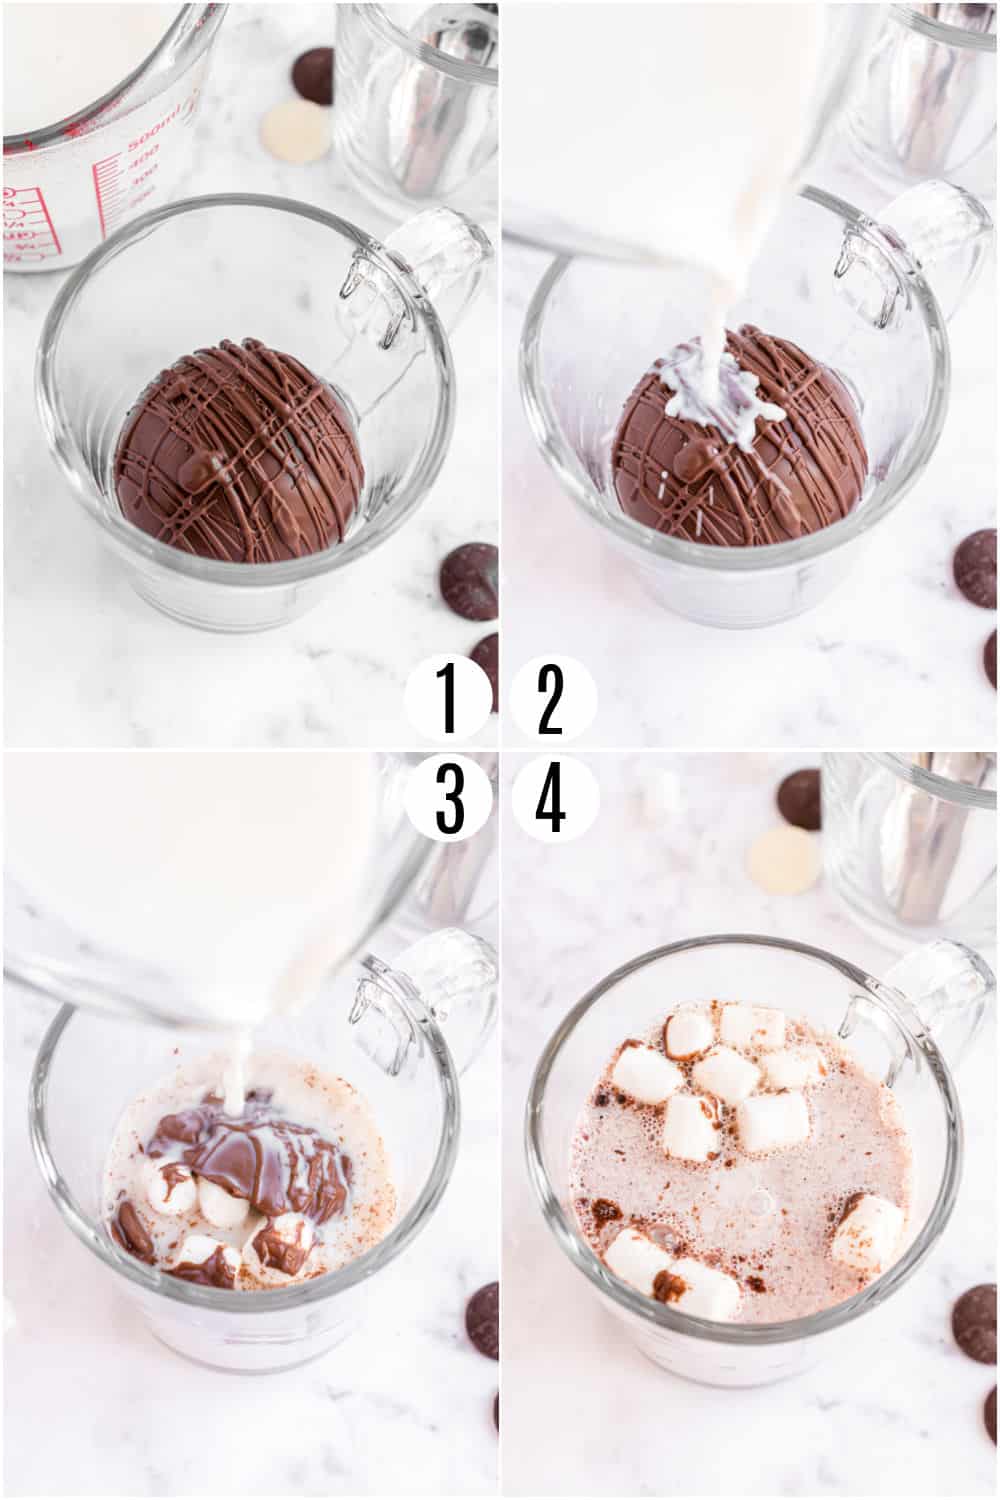
How to Use Hot Cocoa Bombs
- Place one chocolate bomb in the bottom of a mug.
- Pour 6 ounces of heated milk over it and stir until the contents are fully dissolved.
- Enjoy the hot cocoa on its own or top with Whipped Cream for an extra special treat!
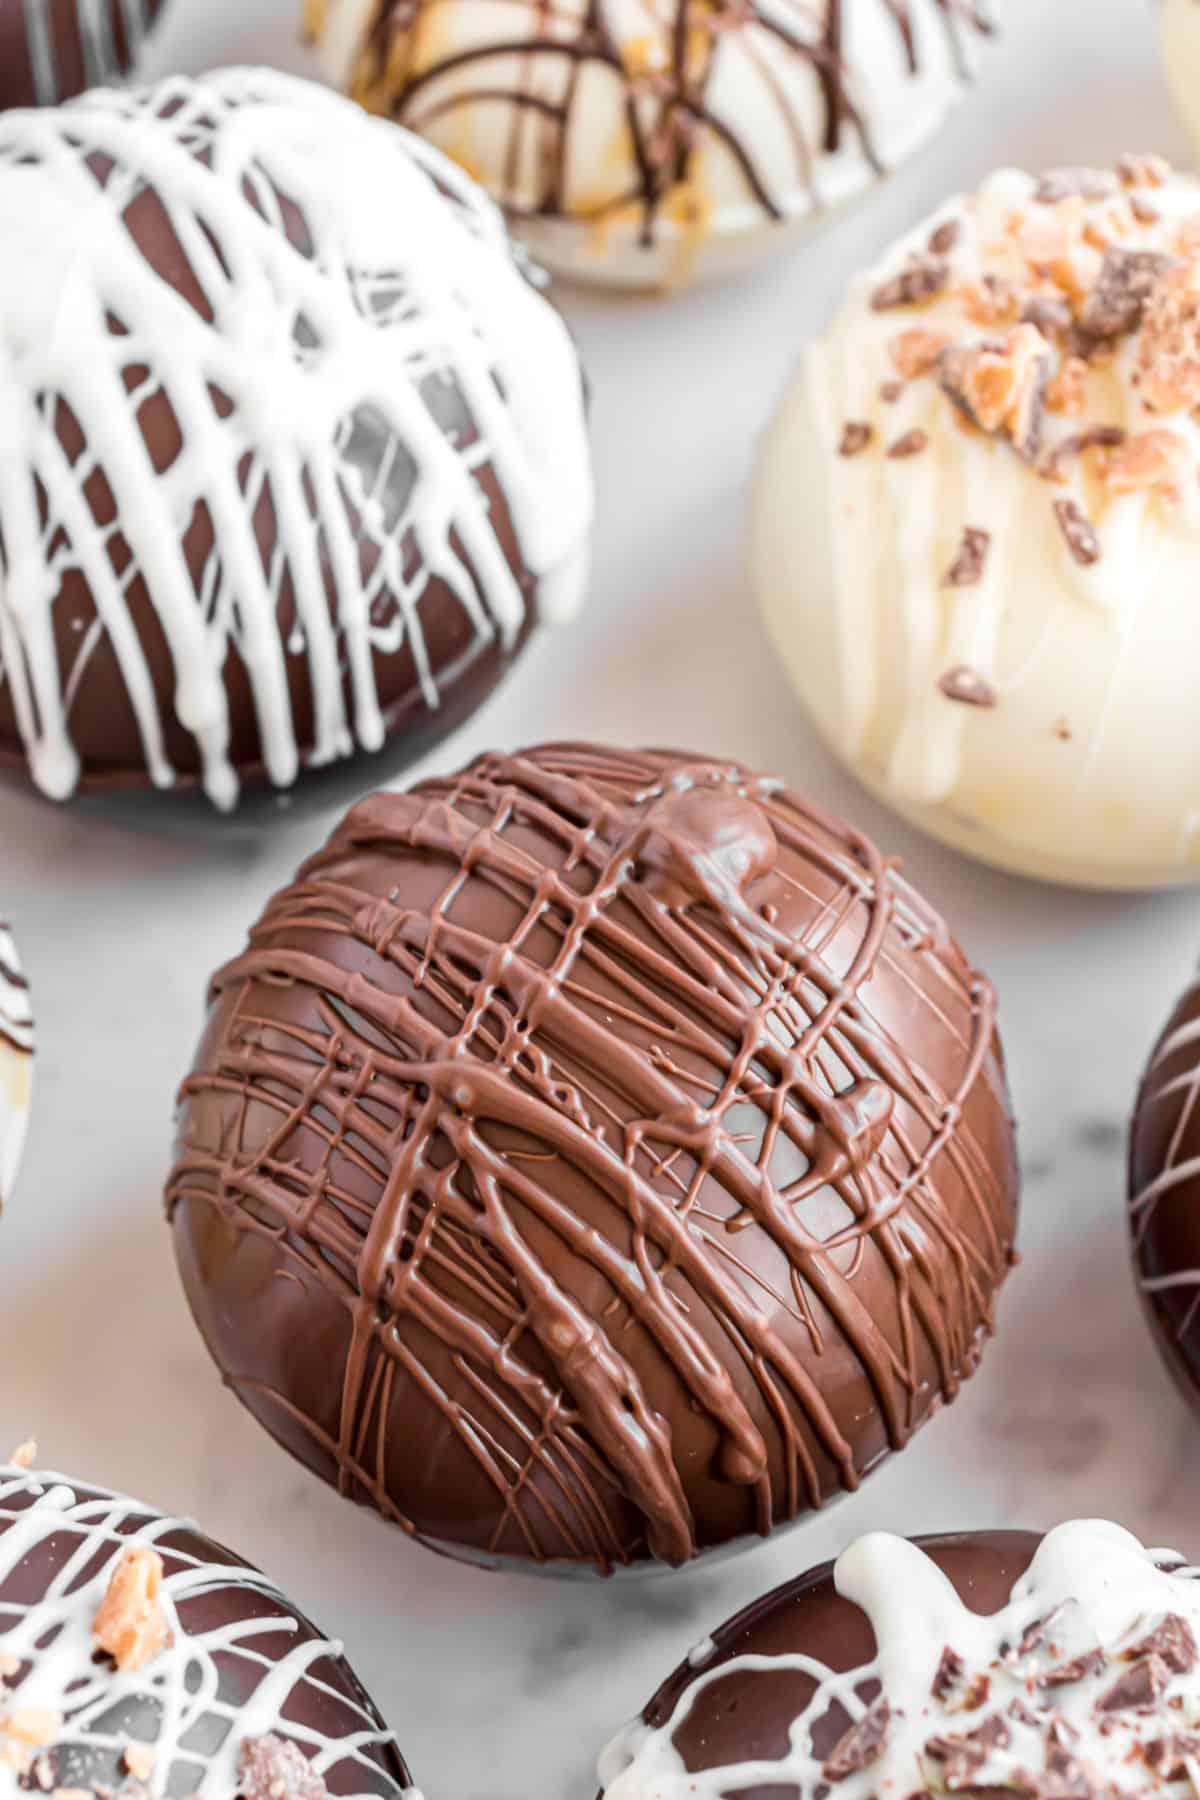
Flavor Options
Once you learn how to make hot cocoa bombs there’s no limit to the variety of flavors you can create.
Every chocolate bomb needs one tablespoon of cocoa mix plus different fillings depending on the flavor you’re going for. You can also change up the shell using white, milk or dark chocolate. Here are a few of my favorite combinations to get you started!
Classic Hot Chocolate Bomb
- Mini marshmallows — plus more for topping!
- Your choice of milk, white or dark chocolate melting wafers
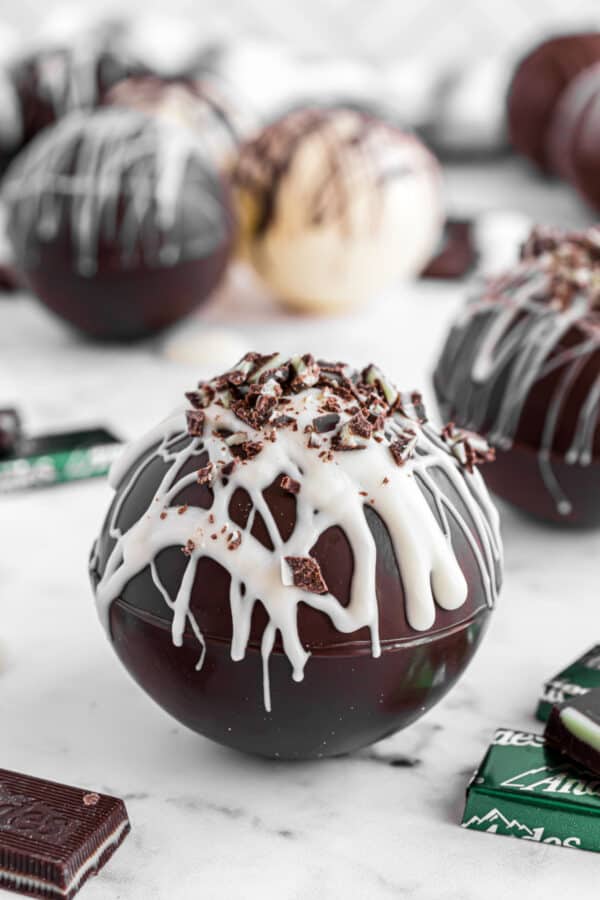
Mint Chocolate Bomb
- Dark chocolate melting wafers (I like a good quality chocolate, like Ghirardelli)
- 1 Andes mint chocolate bars. Chop the candy into fine pieces and place it inside the bomb, reserving extra for decorating the outside.
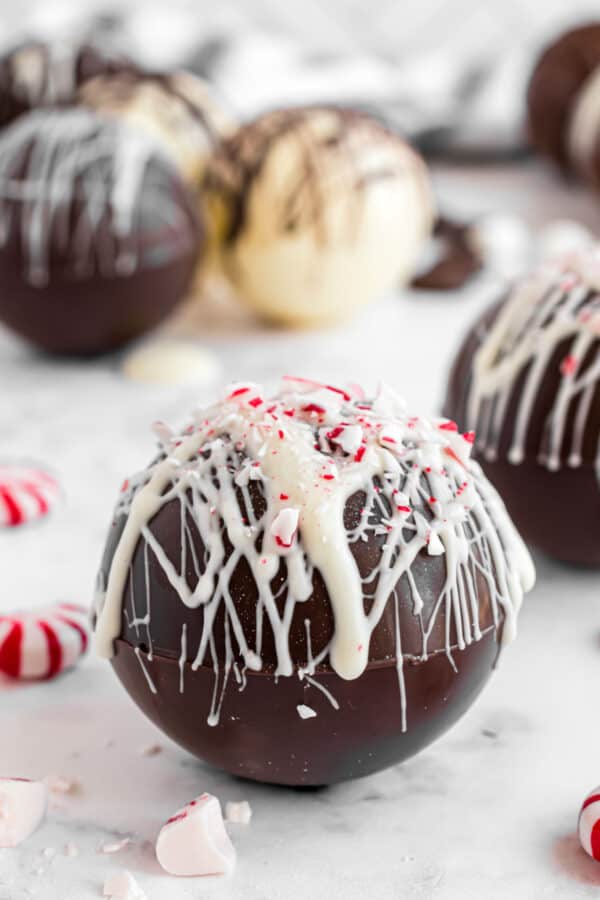
Peppermint Hot Chocolate Bomb
- Dark OR White chocolate melting wafers
- 1 teaspoon crushed peppermint or candy canes (plus more for top)
- Mini marshmallows
Amazing to give as a gift for Christmas!
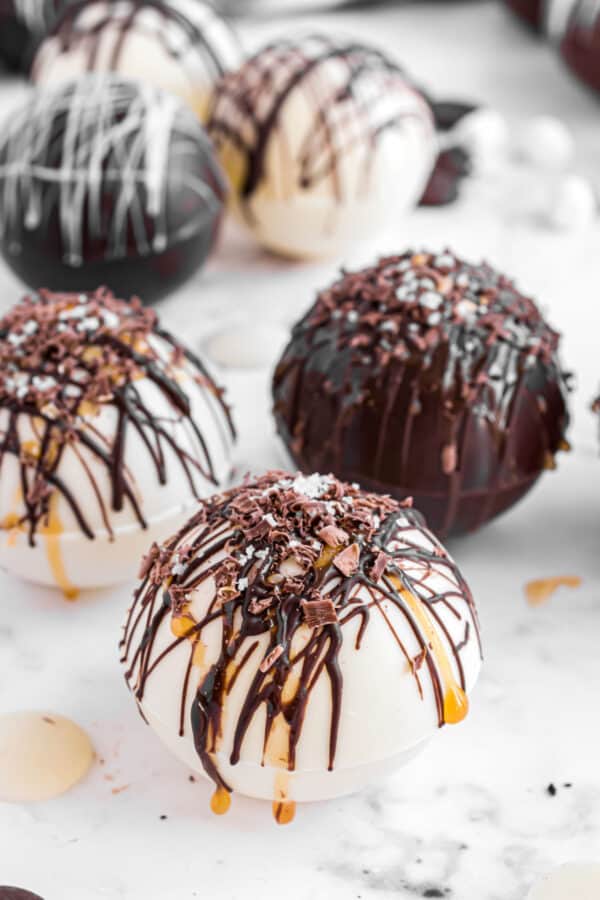
Salted Caramel Hot Chocolate Bomb
- Dark OR White Chocolate melting wafers
- Caramel sauce. Placed inside the bomb plus more drizzled on top.
- Coarse sea salt. Sprinkled on top of the bomb.
- Chocolate curls or shavings. For decorating the top.
These need to be stored in the fridge.
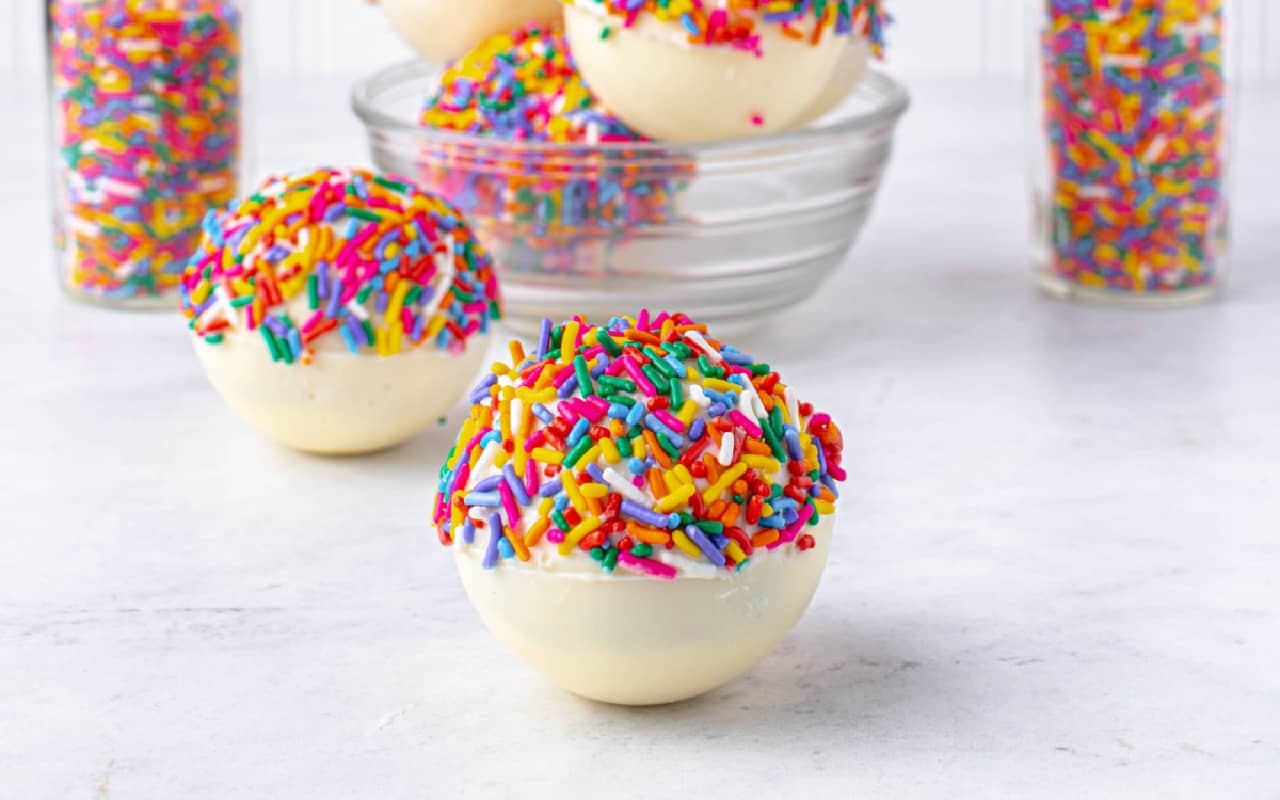
- White Chocolate melting wafers
- White Hot Cocoa Mix
- Sprinkles
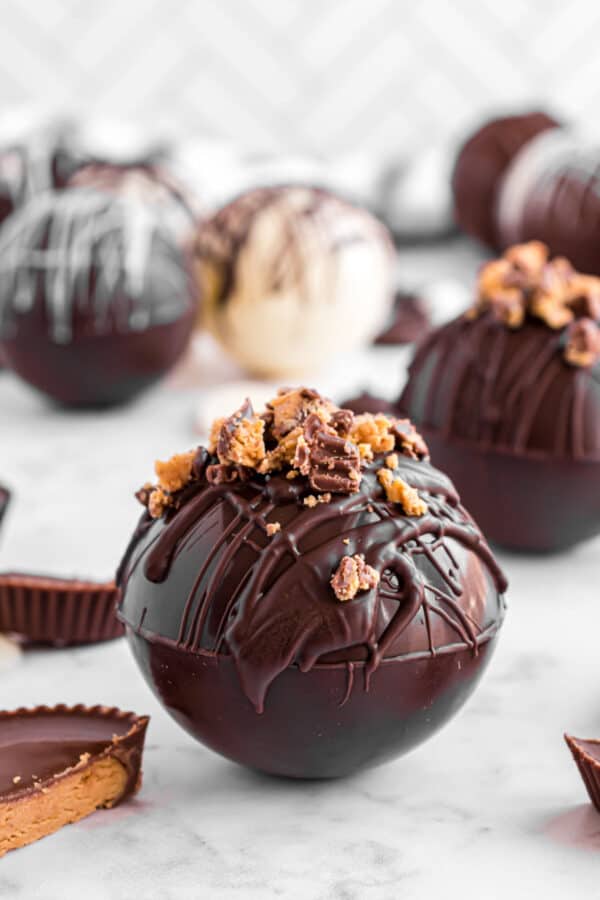
Chocolate Peanut Butter Bomb
- Milk chocolate melting wafers
- Half a Reese’s peanut butter cup chopped up to fill the cocoa bomb.
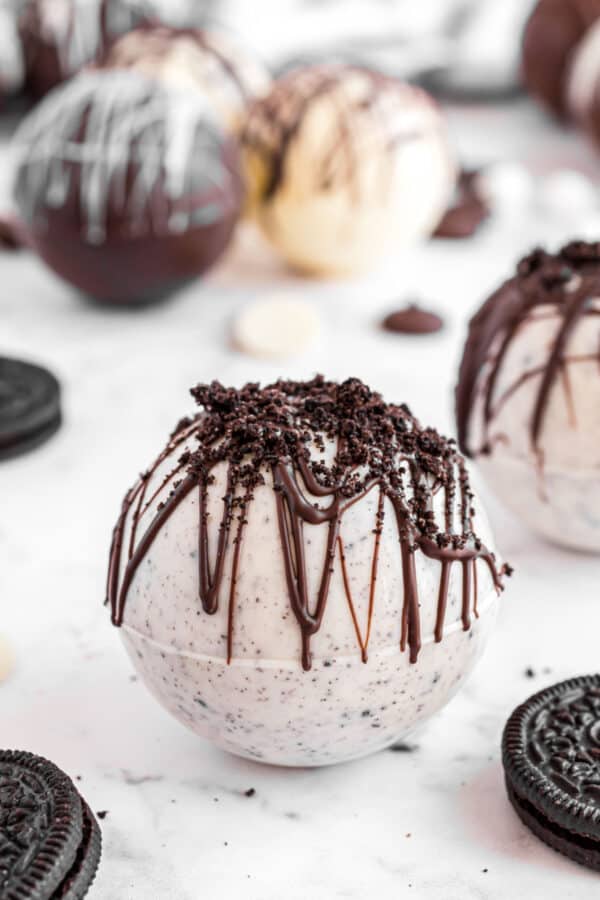
Cookies and Cream Bomb
- White Chocolate Melting Wafers
- Crushed Oreos. Stir into the melted chocolate before coating the sillicone molds.
- Oreo crumbs for decorating
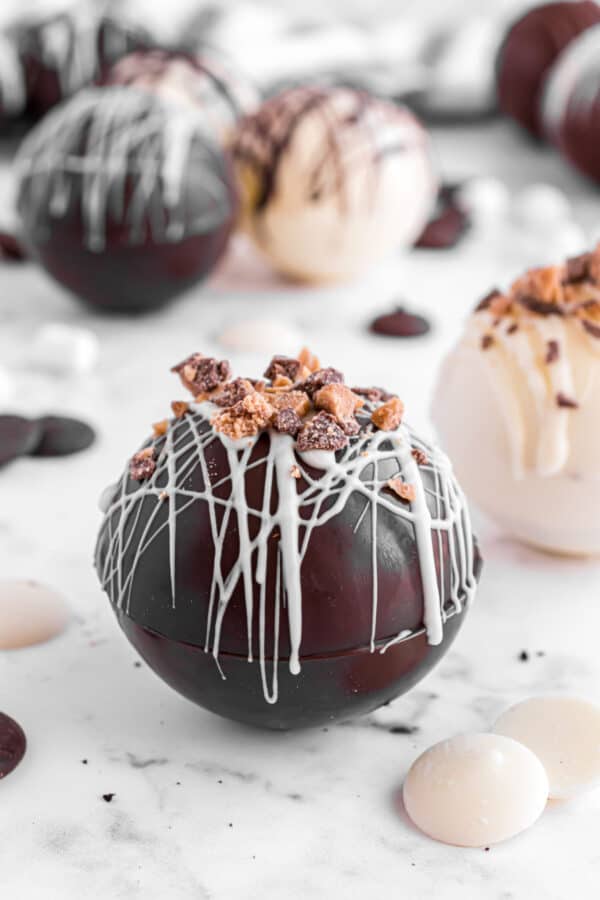
English Toffee Bomb
- Dark or Milk chocolate melting wafers
- Heath toffee bits- For inside and more for topping.
Coffee Bomb
A mocha lover’s dream
- Instant coffee granules or espresso powder
- Dark chocolate melting wafers
- Pour 6 oz. of hot water over bomb instead of milk.
PRO TIP: Want to turn a classic hot chocolate bomb into a coffee flavored treat? Pour coffee over the cocoa bomb instead of milk!
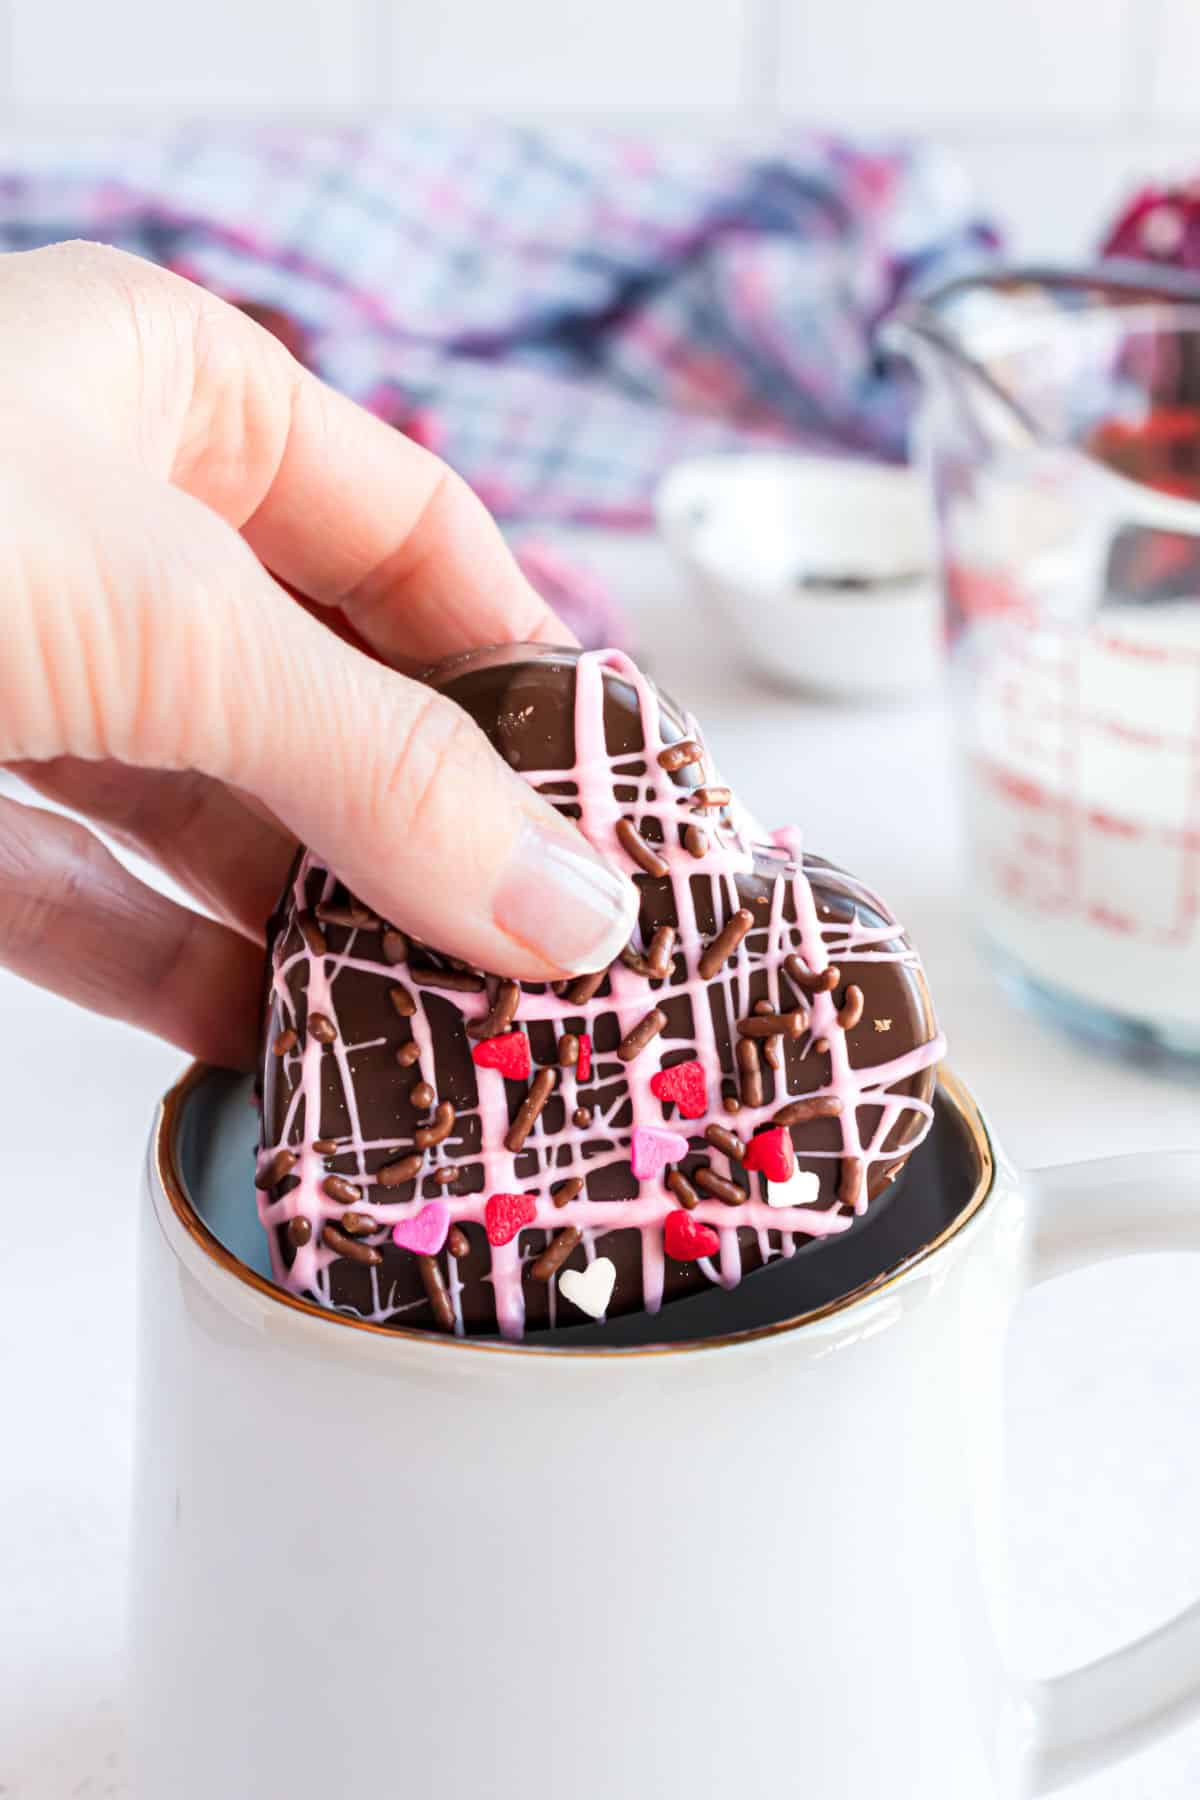
Valentine’s Day Hot Cocoa Bombs– whip up a fun batch of these heart shaped chocolate bombs!
More Tips & Tricks
- If you’re making chocolate bombs with two or more colors of chocolate, make sure to wash and dry your molds between each color.
- Make sure to chop up any added fillers finely so they melt with the chocolate when milk is poured on top.
- It might take a couple of tries to create a smooth even seal. Keep trying; I got the hang of it after a few attempts.
- Storage- depending on the filling choices above, most hot chocolate bombs can be stored in an airtight container at room temperature.
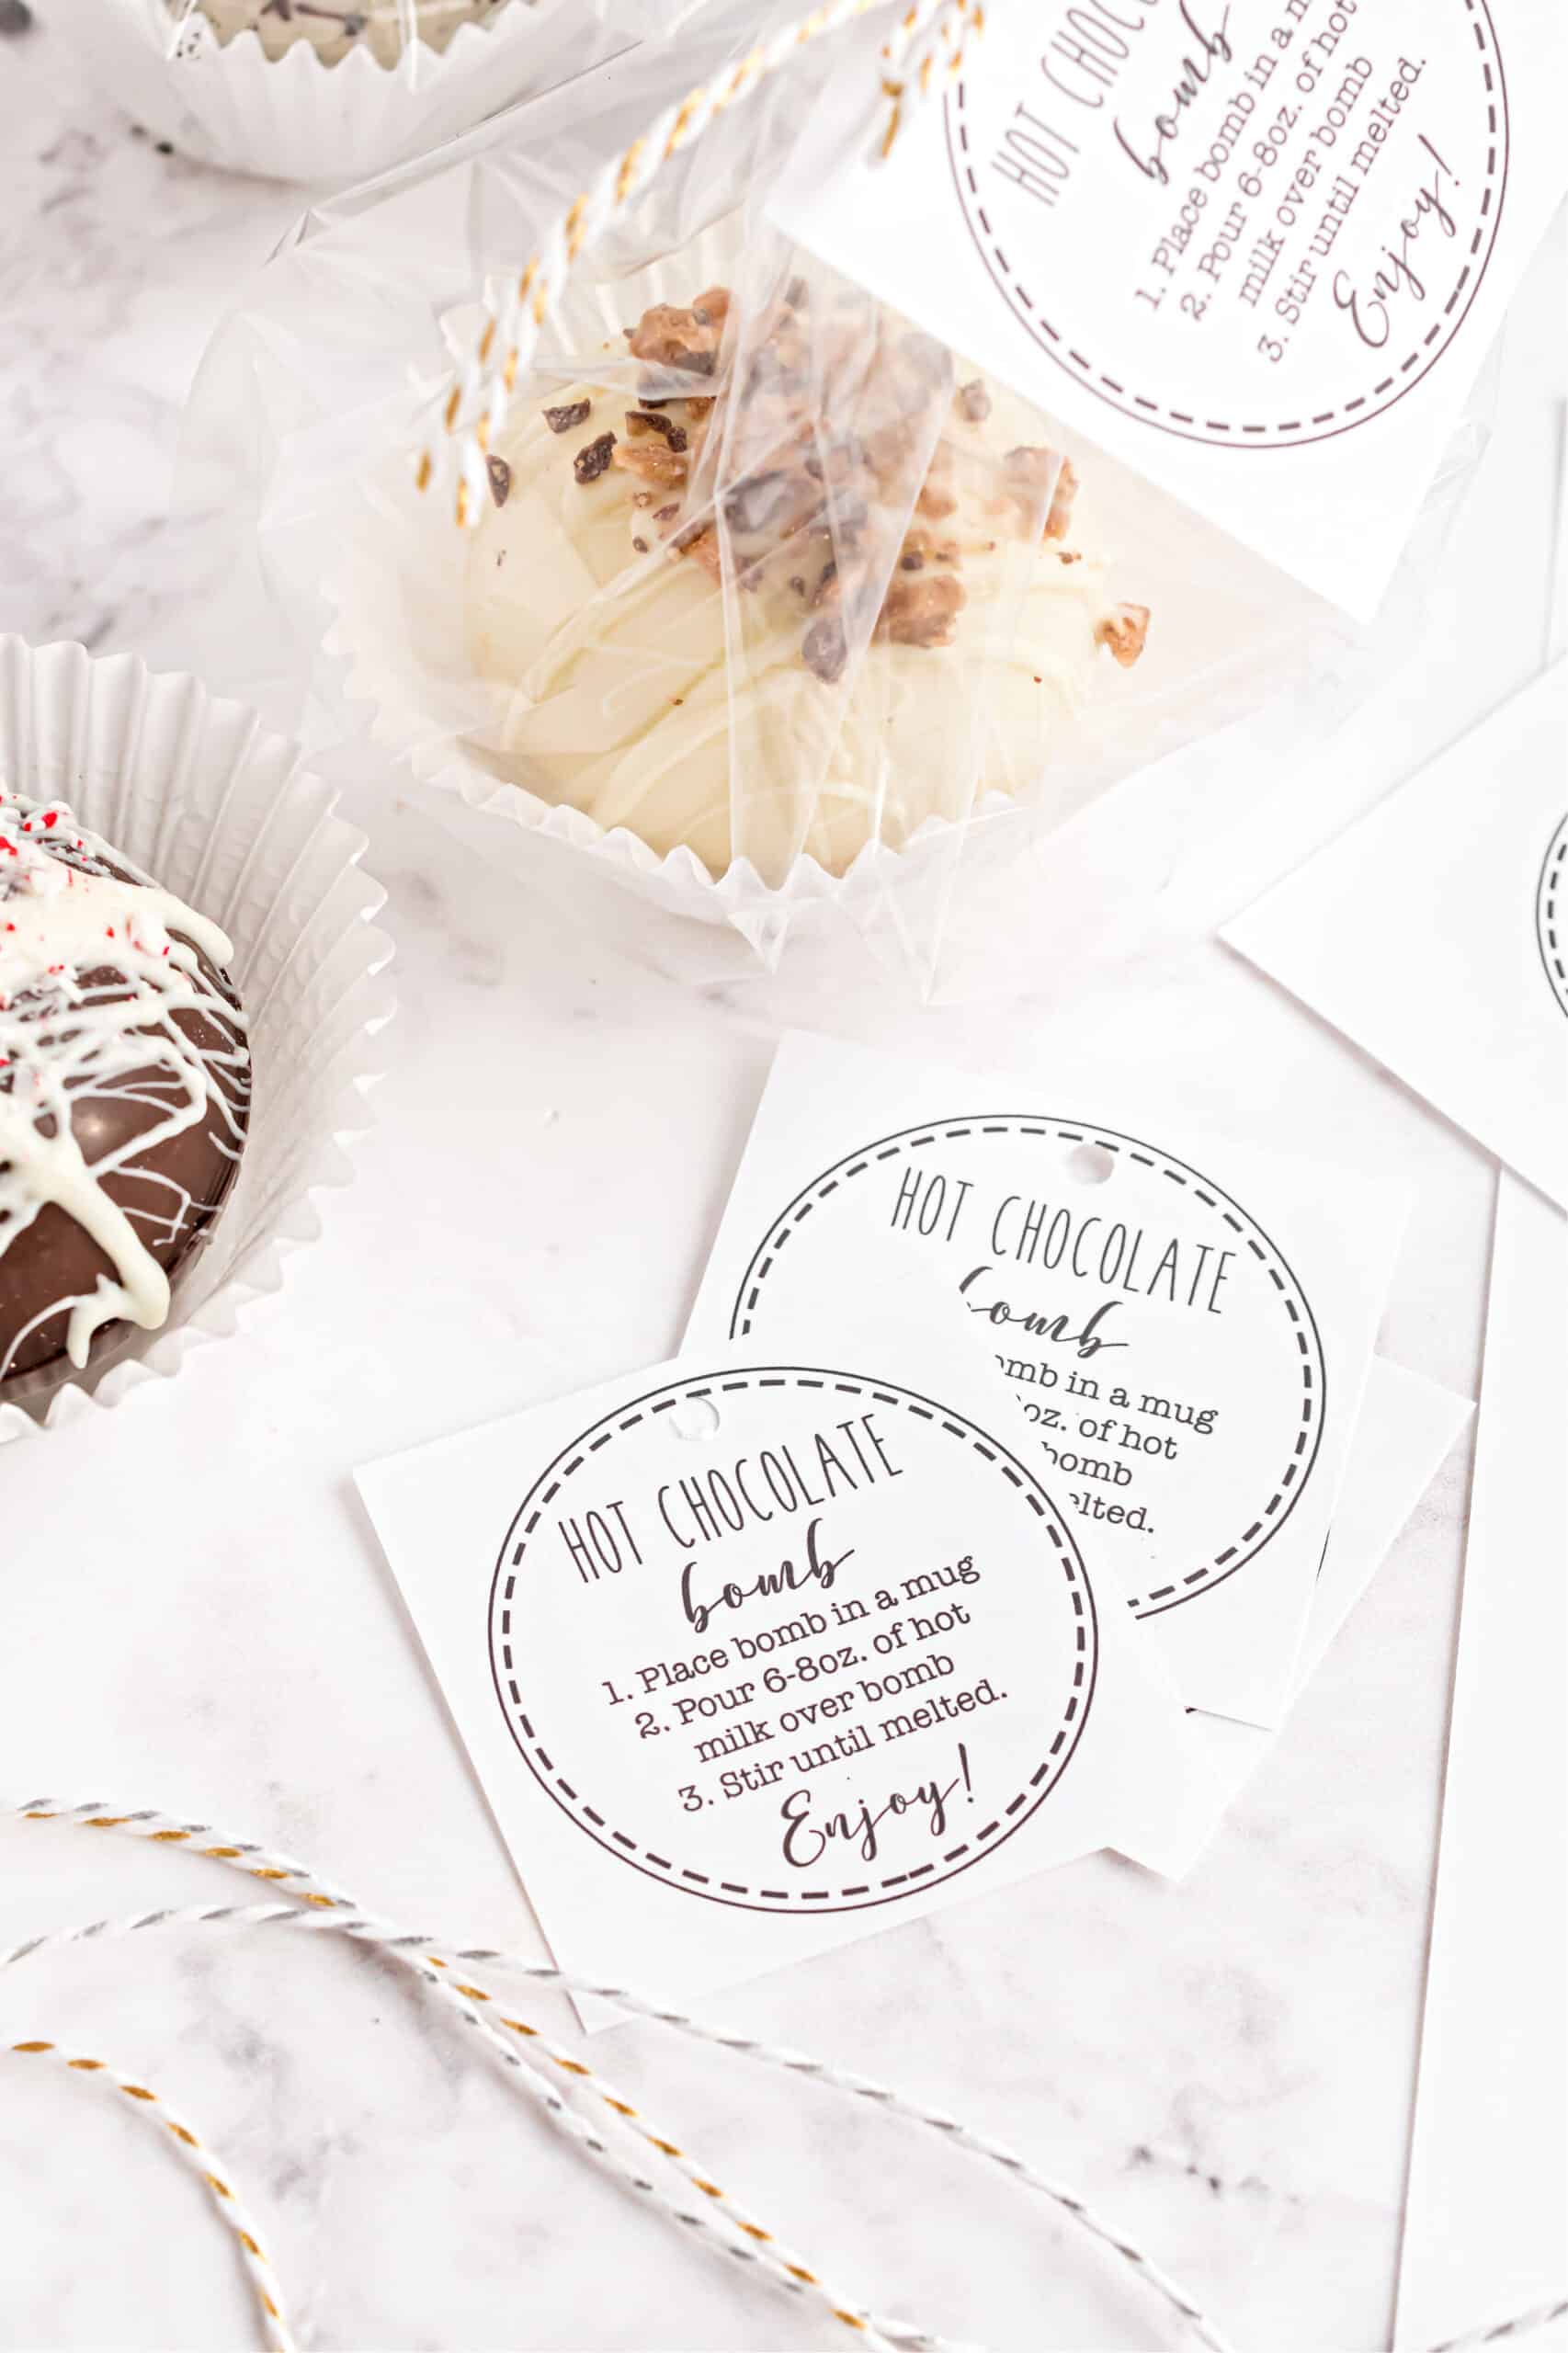
Give as a Gift
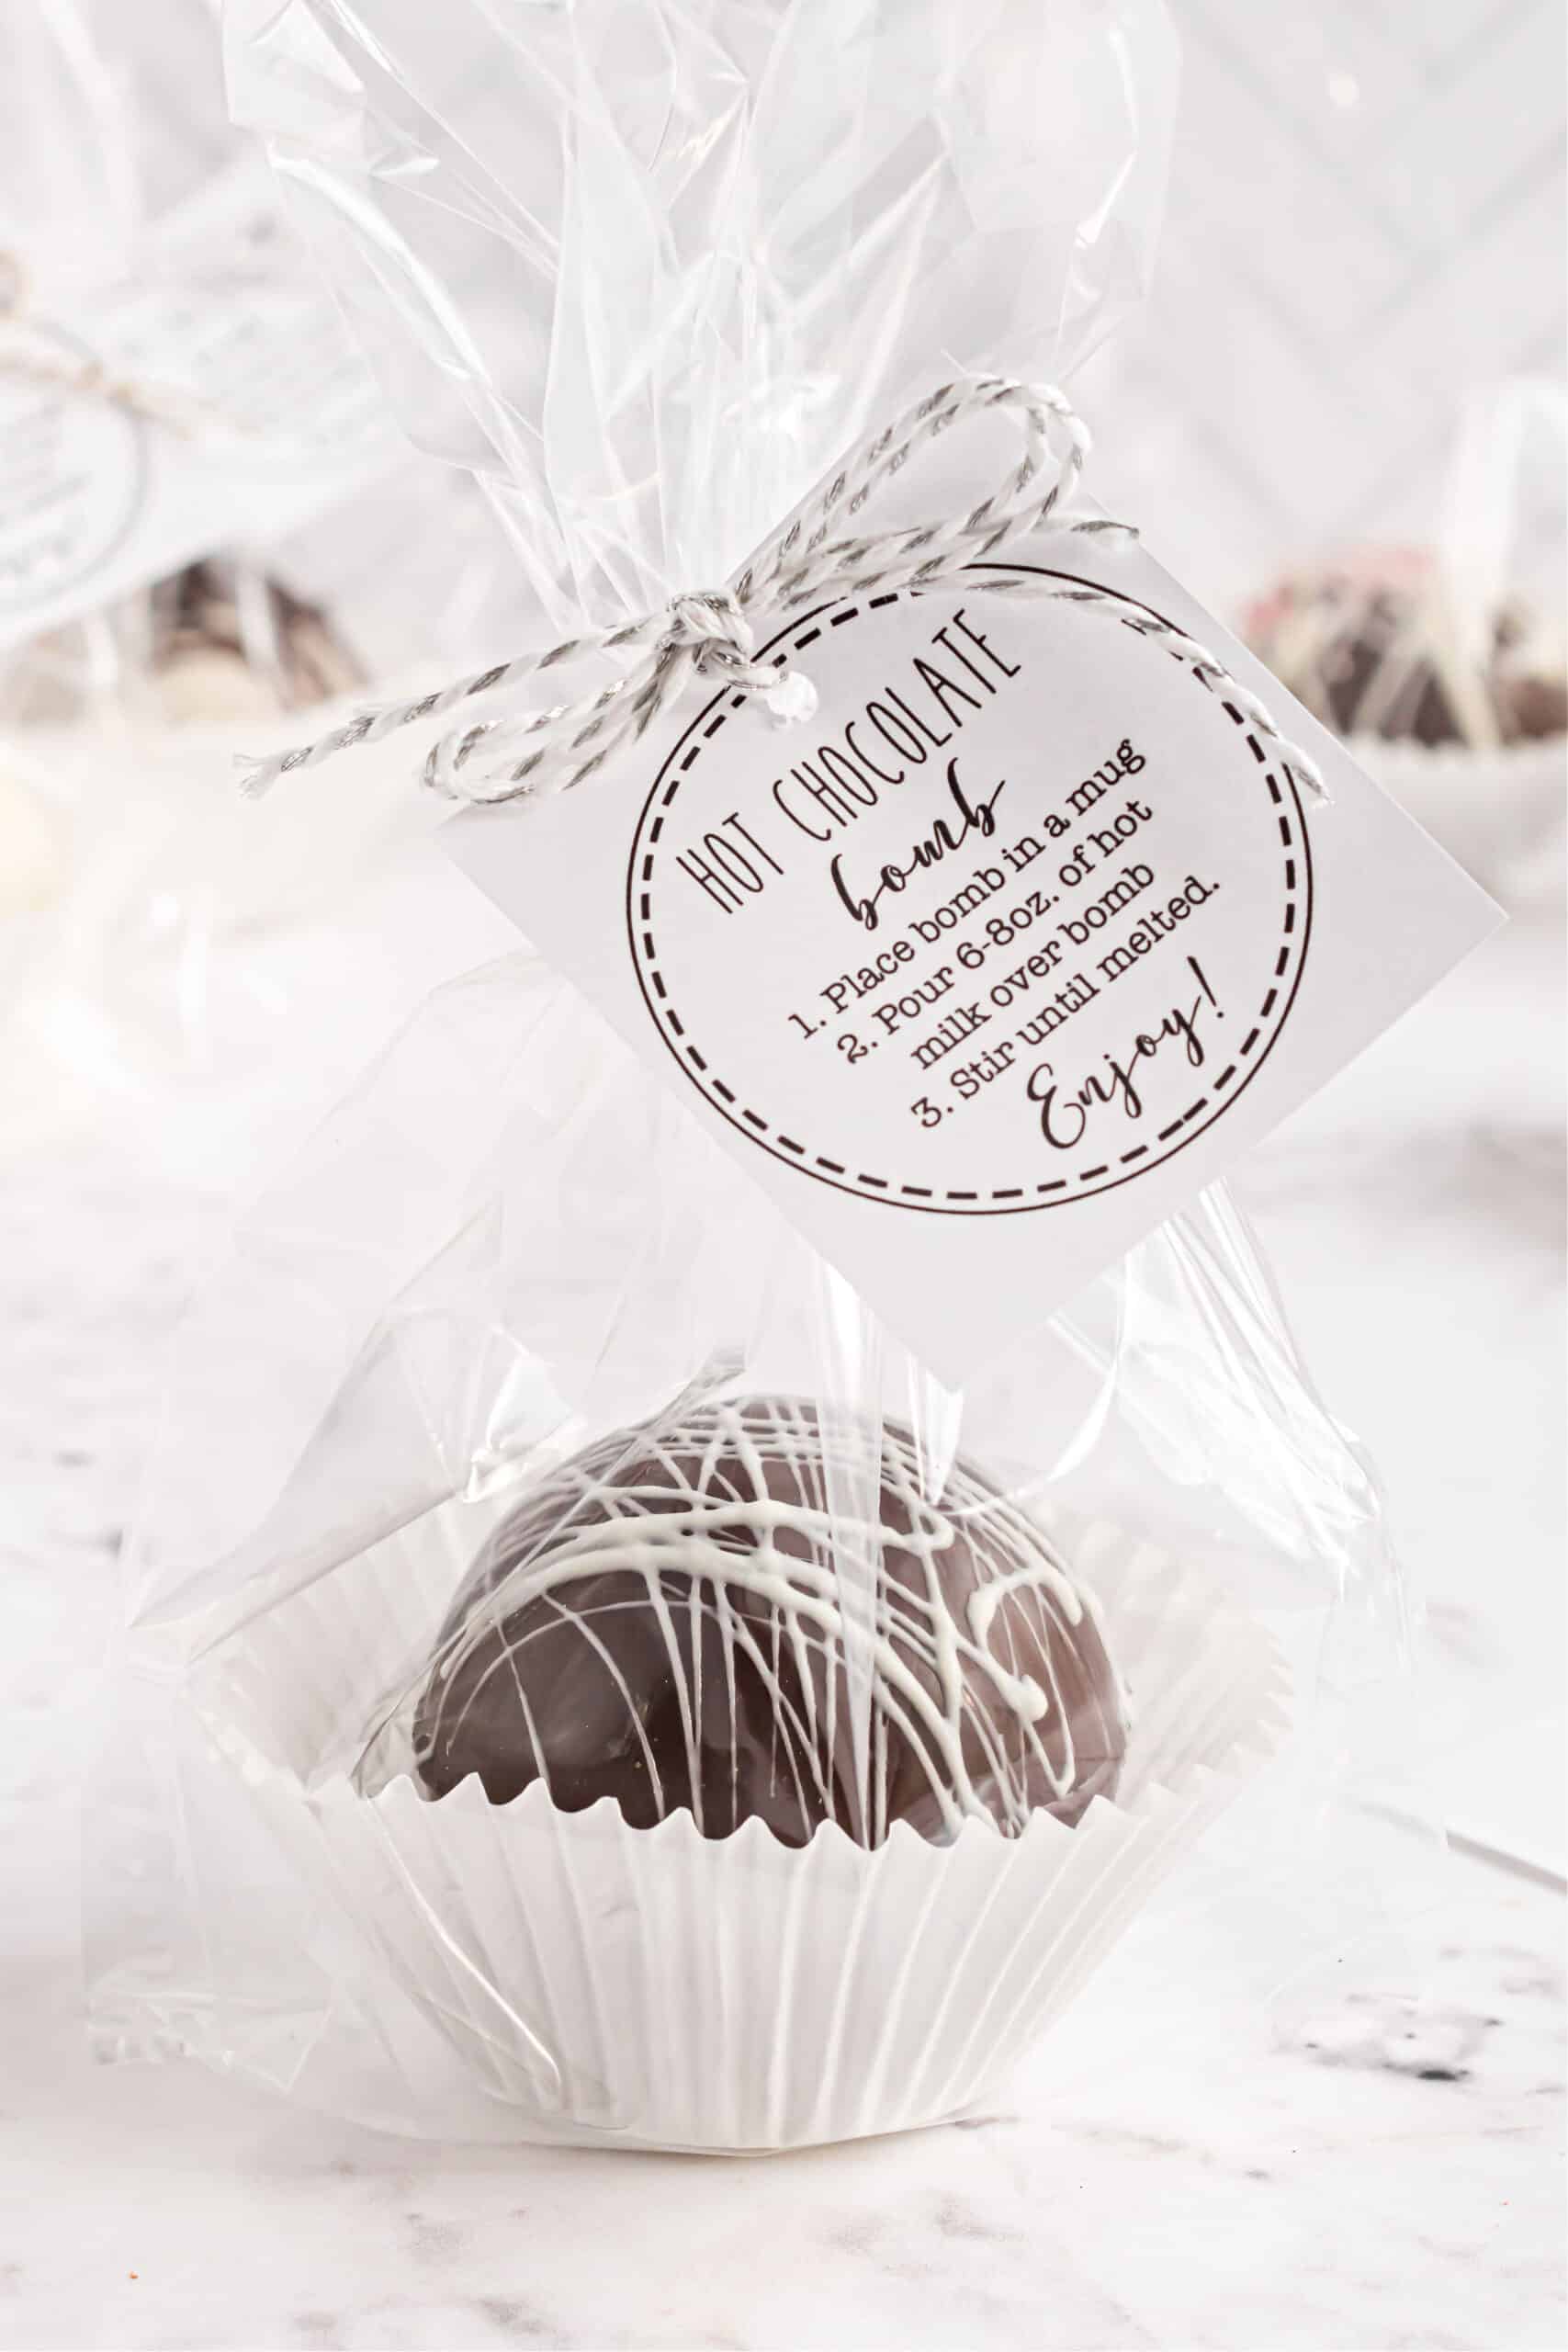
These make lovely personalized gifts for family friends, teachers or anyone on your list! Who doesn’t love a sweet mug of hot cocoa?
Place in mason jar tied with a ribbon or wrap the bomb in plastic and arrange it in a mug filled with tissue paper.
You could also place the hot chocolate bomb in a cupcake liner, slide into a clear plastic dessert bag and attach a cardstock label.
The printable labels I created can be printed on these Avery labels or you can just print on cardstock, cut them out and attach with a ribbon.
Now your recipient knows how best to enjoy their hot chocolate kit! And trust me, these make a great gift for cozy night enjoyment!
Download a sheet of FREE printable Hot Cocoa Bomb instruction labels below to attach to your hot chocolate bomb gift bags!
Recipe FAQs
You do not need to temper the chocolate first with this recipe if using Ghriardelli melting wafers.
No, you can not make this with chocolate chips as a substitute for the wafers. They don’t melt well and contain additives that affect the flavor of the finished chocolate bombs. Chocolate candy melts can be used though.
If you’re not happy with the appearance of the seal on your hot chocolate bombs, I have great news: it’s easy to disguise!
Place your bomb in a jumbo cupcake liner or drizzle chocolate over the rustic part. (There’s nothing a little melted chocolate can’t fix!).
Most hot chocolate bombs can be stored at room temperature. You only need to keep them chilled if you add perishable fillings (like caramel sauce).
No, you should not freeze hot cocoa bombs. The freezer will cause condensation to form on the balls, affecting the texture.
Pin this now to find it later
Pin It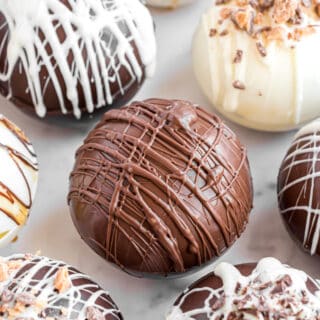
Hot Chocolate Bombs Recipe
Equipment
Ingredients
- 10 oz Ghirardelli milk dark or white chocolate melting wafers
- 6 Tablespoon hot cocoa mix
- 1 cup mini marshmallows
For serving:
- 6 cups hot milk
Instructions
Make the Chocolate Mold
- In a microwave safe bowl, melt chocolate according to the package. Stir until smooth.
- Place the silicone mold on a cookie sheet, jelly roll pan, or something that will support your mold and can be placed into the freezer.
- Put about ½-1 Tablespoon of melted chocolate into the well of the silicone mold. Using the back of a spoon, push the chocolate up the sides until the entire mold is covered with a layer of chocolate. (When I was doing this step, I thought of the circle like a clock face and I pushed the chocolate up to each number. This helps make sure the sides get covered.) Pay special attention to the sides making sure the chocolate completely covers the mold. You can even tilt the mold slightly as you are using the back of the spoon to coat the mold – it helps with the visibility of the mold.
- Transfer the baking sheet to the freezer for about 10 minutes.
- Remove the tray from the freezer and make sure there is chocolate going all the way up the side of the mold. If the chocolate layer seems thin at the edge, add a little more chocolate to thicken the edge using a spoon, small spatula or food-safe paintbrush. It is better to do 2 thin coats. If you try to put too much chocolate in on the first layer, it all runs down and makes a very thick layer on the bottom. Don’t worry about how the shell looks from the inside – it won’t be visible when the bomb is complete. Return to the freezer for 5 minutes.
- Remove the mold from the freezer and flip the mold over, rounded side facing up.
- Gently press the center of each well and peel the silicone mold back from the edge of the chocolate sphere to remove the hardened chocolate. If you press too hard on the center of the mold, it can cause the shell to crack on the edges.
- Heat a small skillet, saucepan or plate until it is warm. Place one half of the chocolate shell, rounded side up, on the hot surface, just until the edge begins to melt and creates an even edge for sealing the bomb. Keep your hot surface away from the other shells, as they are very heat sensitive and can begin to soften.
- Place this half of the chocolate bomb on a cookie sheet and fill with 1 Tablespoon of hot chocolate mix and 10-12 mini marshmallows.
- Place the other half of the chocolate bomb on the heated skillet, saucpan or plate. Place it gently on the filled shell. The melted chocolate edges will meet and act as a “glue” to hold the 2 halves together.
- Decorate by drizzling melted chocolate that matches the shell or contrasting melted chocolate to make a pretty design.
To Serve
- Add hot chocolate bomb to mug.
- Pour 6-8oz. of hot milk over bomb. Stir to dissolve and enjoy!
Notes
- Tempering chocolate – If using Ghirardelli melting wafers, you will not need to temper the chocolate as many recipes direct.
- Do not use chocolate chips. Melting can be problematic and they include additives that will affect the taste of the different flavors.
- Flavored cocoa mix is a great option. A variety of different flavors can be purchased on amazon.
- Double layer of chocolate was needed when using the white chocolate for making the chocolate shell. It is important to do 2 thin coats as opposed to trying to make the shell thick in just one layer. If you add too much chocolate on the first step, it just ends up running down and making the bottom thick. When in doubt, do a double layer to make sure the shell is thick enough.
- If issues making a pretty seal, it can be disguised by placing the bomb in a jumbo cupcake liner or drizzling melted chocolate over the top. It took me a few before I really got the hang of it. But, it was a pretty fast learning curve and it didn’t take long before I had a pretty seal.
- I ended up using a small skillet to melt the edges. It was the best at holding the heat for a long time. But, if you are doing 2 different color melts, make sure that you only melt that color chocolate in one spot and another color in a different spot. Otherwise the colors will mix.
- The larger molds are better. If you get a mold that’s too small, it’s hard to get the mix and fillers into the bomb. We used this one. It is about 2.5” in diameter.
- Make sure to wash the molds in between different colors of bombs. It’s very easy to have tiny chocolate pieces left over that get in your next color.
- Do not use the same silicone mold for food that is used for other crafts (bath bombs etc.)
- Mini marshmallows work well. You could also add dehydrated marshmallows or Lucky Charms marshmallows.
- For the different versions, make sure to chop up the items added for flavor finely to make sure they melt when the milk is pour over top.
- See blog post for all the flavor variations.
Nutrition
Go have fun crafting your own beautiful and gift-able hot cocoa creations. Before you know it you’ll be a Hot Chocolate Bomb pro!


Looks delicious
Awesome Recipe.
Thank you.
How do you store the made bombs.
I’ll try again later but every one of my 12 bombs cracked when I gently tried to remove the silicone. I slowly stretched it first then the entire thing cracked. Not even one came out whole. Brand new 2 1/2 “ molds that I washed and dried first. 🤷🏻♀️
How long would you say these are ok to store? Looking to make them prior to the holidays.
Thank you! Such a great step by step recipe. It was really easy to follow. I used chocolate compound to make the shell. Its cocoa particles settle on top of milk even after mixing. Any tip to avoid that?
What a fun idea! I can’t wait to make these.
Can these be mailed? They sound fragile, so they’d need to be packed carefully in Mason jars ( padded with mini marshmallows), but I’m not sure how they’d do in the various temperatures they’d be exposed to.
They are definitely pretty fragile, and I would worry about changes in temperature causing chocolate to melt.
I have found that using a heating pad and a glass plate makes a perfect surface for warming the shells to meld them together. I set my heating pad to high and it worked perfectly for the 2 dozen bombs I made for Christmas!
This is the best step by step recipe I’ve seen so far, thanks for this, I can’t wait to get the molds & make these with my boys!!
Enjoy and have fun!!