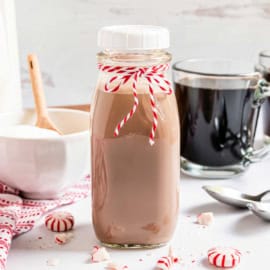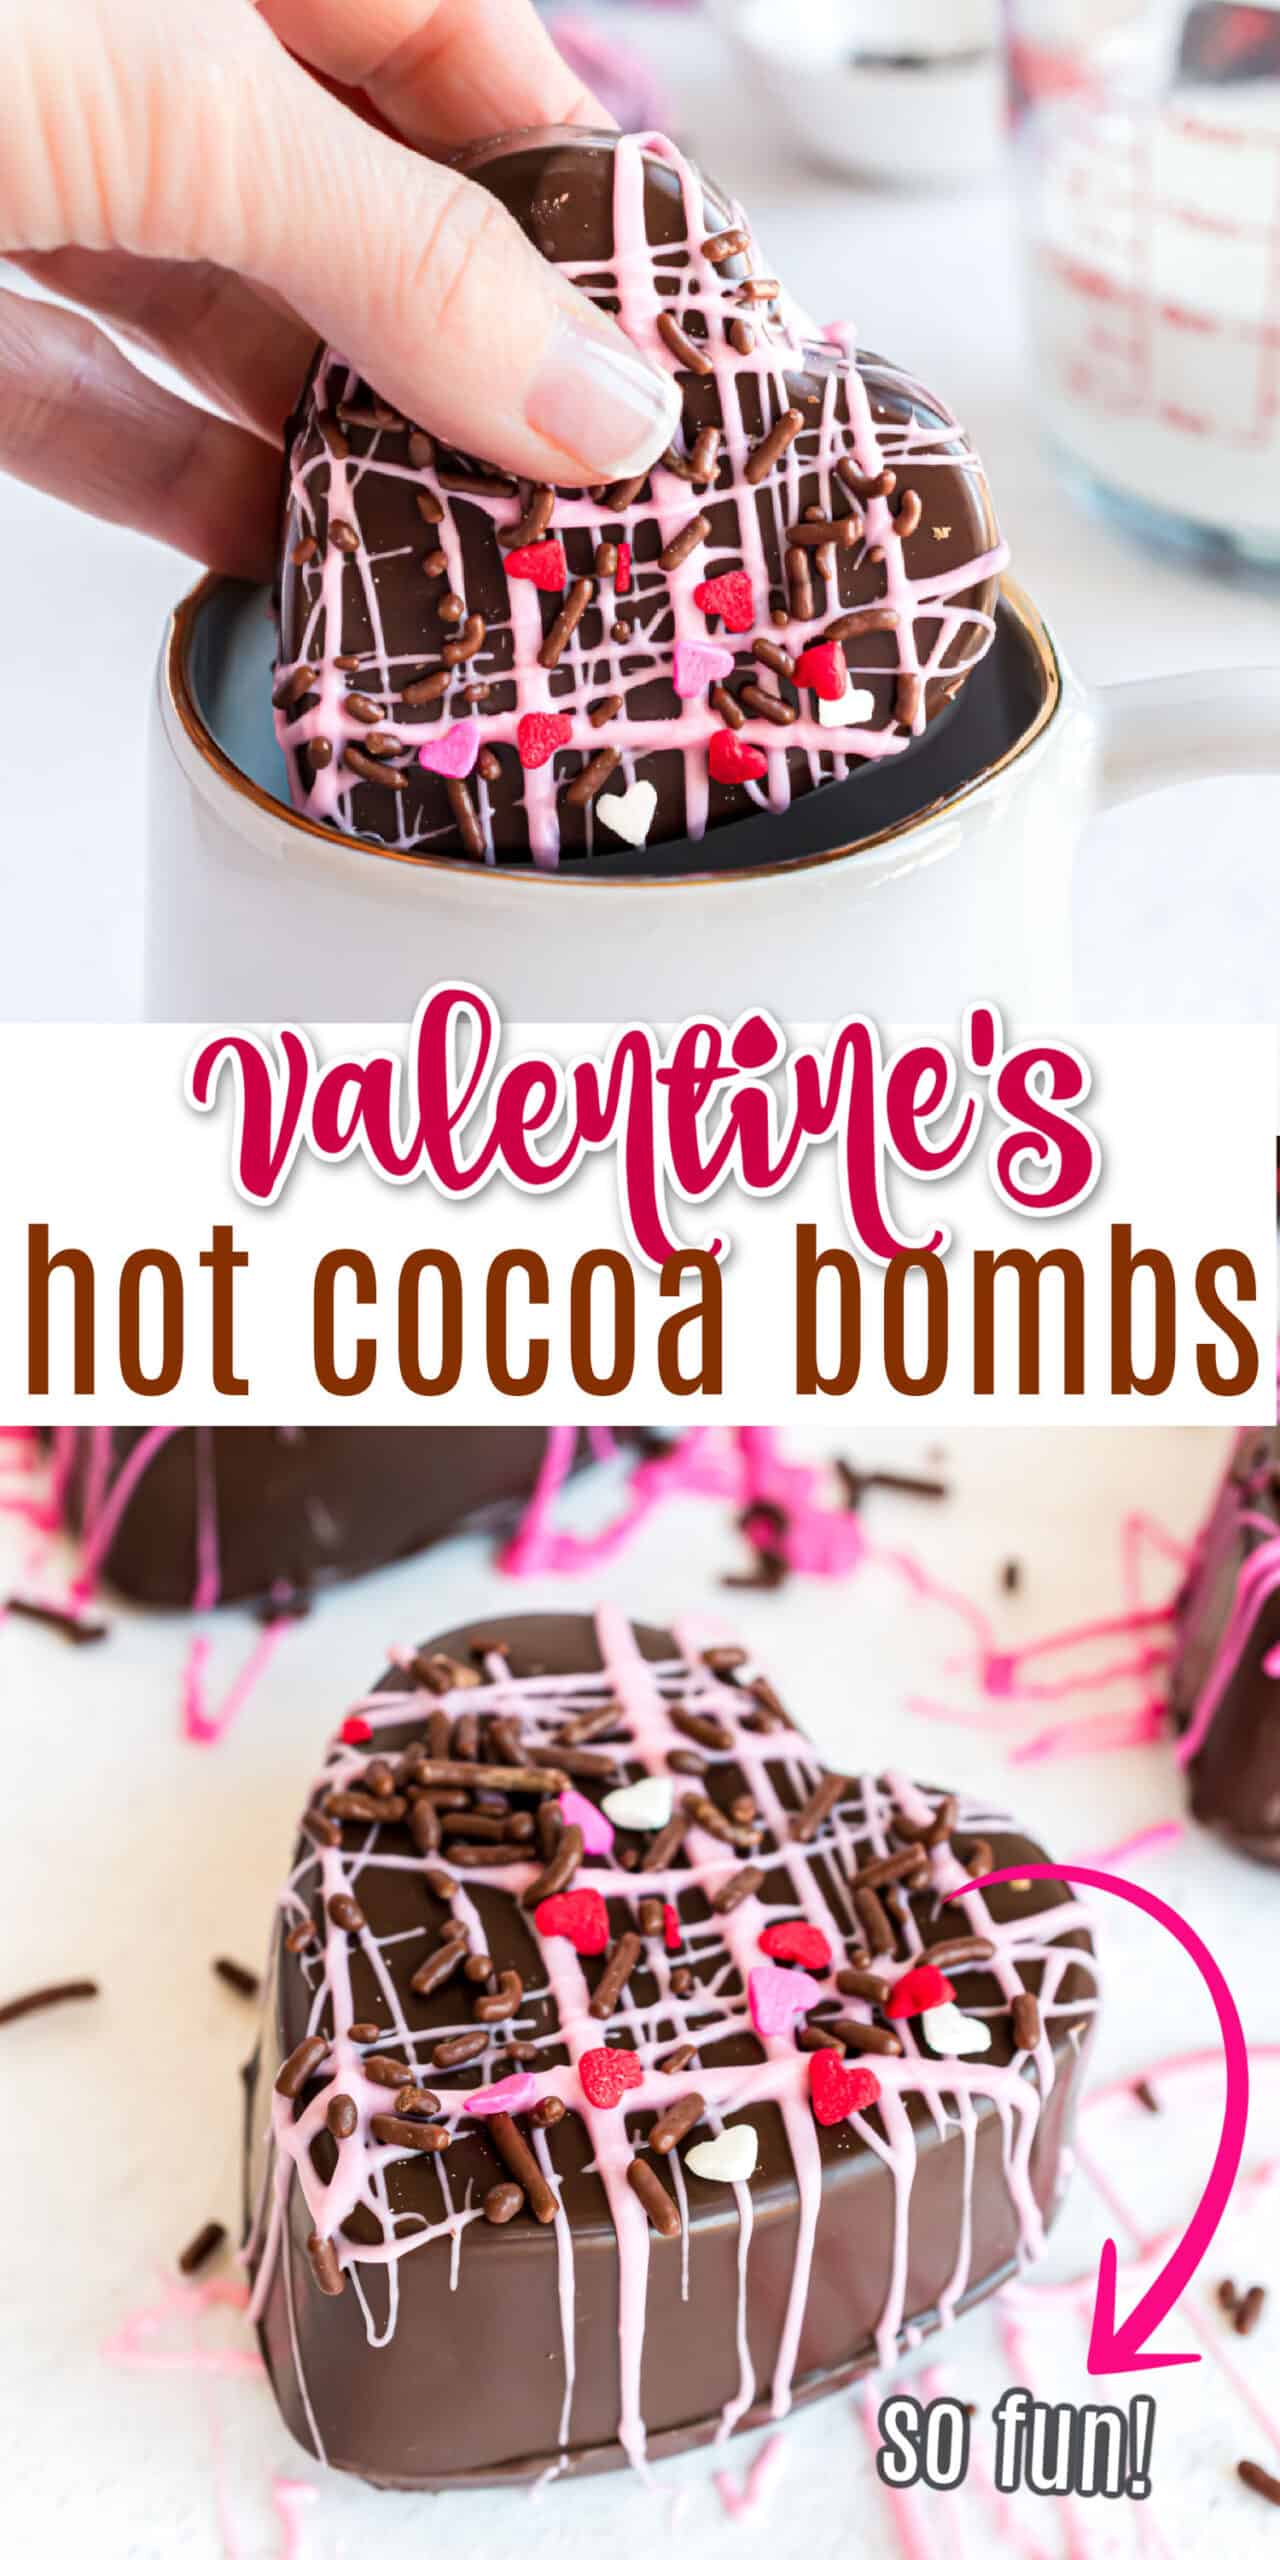
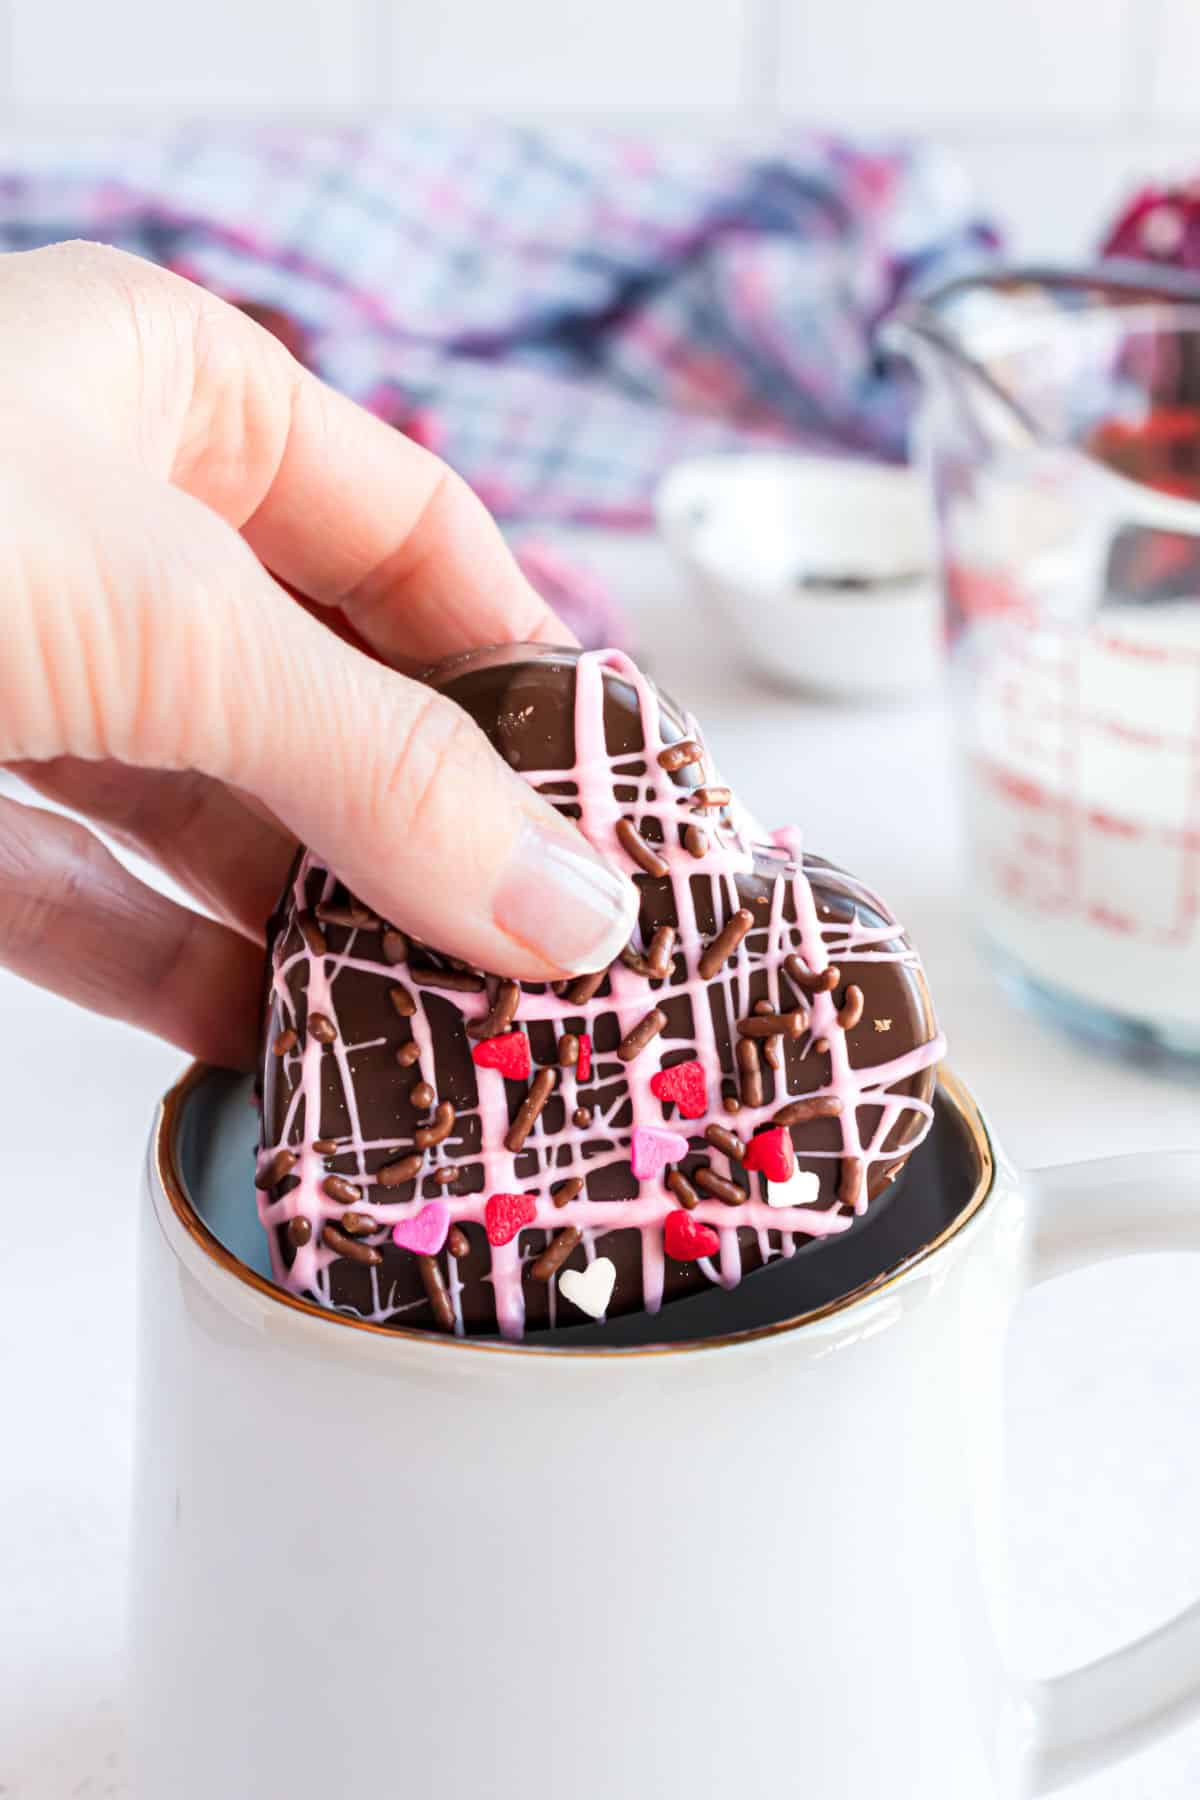
Valentine’s Hot Cocoa Bombs – An adorable and delicious way to spread the love! Decorated with pink and white sprinkles and melted chocolate, these bombs create the best hot chocolate for Valentine’s Day!
The Perfect Holiday Treat
What’s Valentine’s Day without a lot of chocolate? Any holiday that gives me an excuse to make and eat chocolate treats is a holiday I love.
This year, think beyond the usual heart shaped cookies, chocolate covered strawberries, and valentine brownies. Make a custom sweet gift for the special someones in your life.
These Valentine’s Hot Cocoa Bombs can be made with a heart shaped mold or a regular round mold. Drizzle them with white chocolate and Valentine’s sprinkles, then wrap them up as a gift.
Or save them for the kids to enjoy as special Valentine’s day treat! Pour hot milk over these bombs and let them dissolve for a perfect mug of creamy hot cocoa!
I admit it. I can’t stop making Hot Cocoa Bombs! These heart-shaped Valentine’s versions are cute as can be. Check out my guide for How to Make Hot Cocoa Bombs for even more tips and tricks!
Ingredient Notes
- Chocolate Melting Wafers. You’ll need dark chocolate wafers for the shells and white chocolate for decorating. I use Ghirardelli brand. Pink candy melts are also amazing for decorating add more color!
- Hot cocoa mix. Use any kind of instant hot chocolate powder you like. Classic milk chocolate is always a hit, or mix it up with other flavors.
- Sprinkles. Optional, but add an eye-popping touch. These Valentine’s sprinkles are perfect, or use any combination of red, pink and white sprinkles.
Note: You need a heart shaped silicone baking mold to make these hot chocolate bombs.
How to Make a Hot Chocolate Bomb
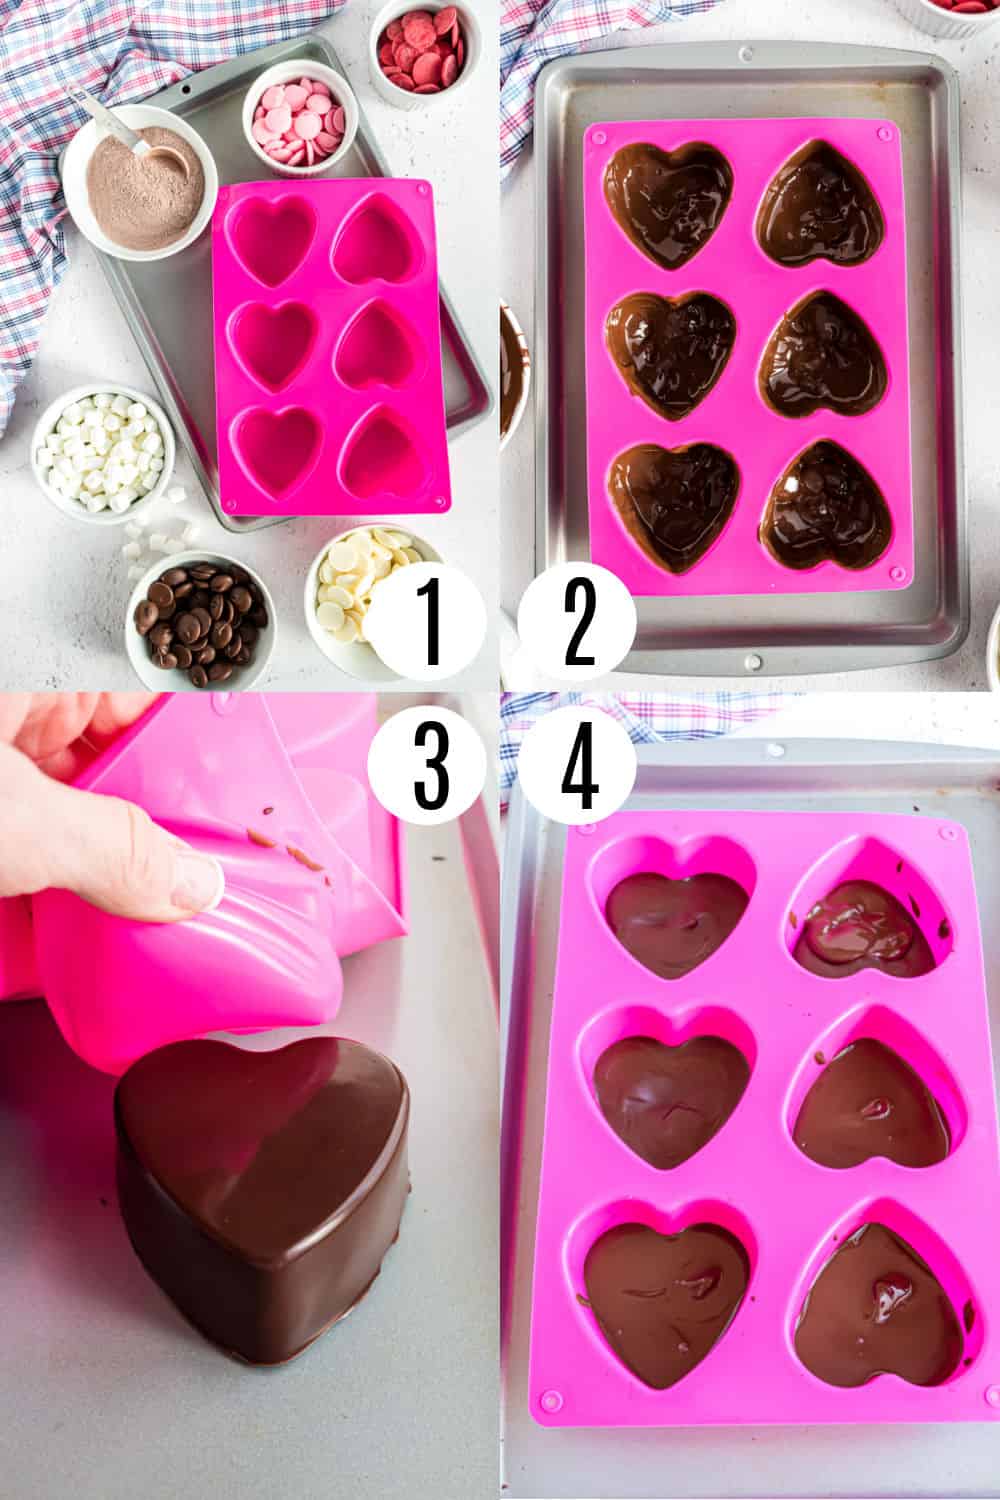
STEP 1. Melt chocolate
Melt the dark chocolate wafers in the microwave. Stir until smooth.
STEP 2. Fill molds
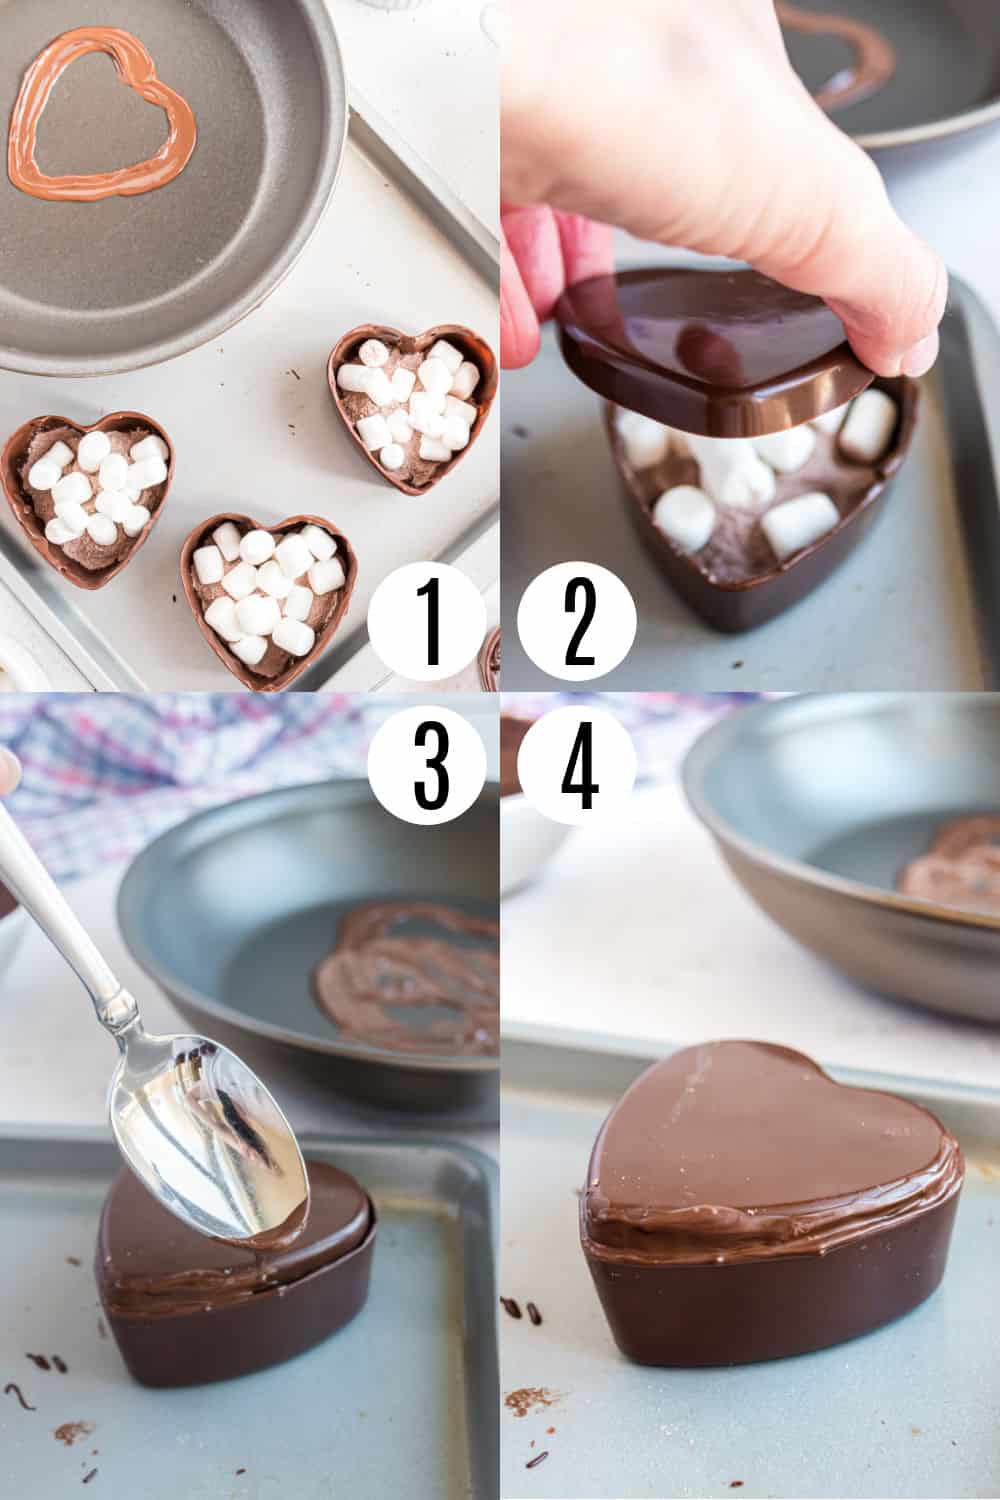
Set your silicone molds on a cookie sheet or other sturdy pan. Use the back of a spoon or a food safe brush to coat the insides of each mold cavity with the melted chocolate.
If you’re using a heart shaped mold, start at the curved top of the mold and work your way downward toward the point.
STEP 3. Chill
Transfer the baking sheet holding the molds to the freezer. Let chill for 10 minutes or until the chocolate hardens.
STEP 4. Second chocolate layer
Now, double check that all the surfaces of the molds are covered with a smooth layer of chocolate. If it looks thin around the edges, add a little more chocolate.
STEP 4. Make the lids
Let the shells chill for another 5 minutes. Remove from the freezer.
Flip the molds over so the round side is facing up. Gentle peel back the silicone to remove the hardened shells of chocolate.
Use another set of silicone molds to make the “lids” for the heart shaped cocoa bombs. Put enough melted chocolate in the molds to coat the bottom.
Do not push the chocolate up the edges this time! Freeze these for 10 minutes, then remove the hardened chocolate the same way as before.
STEP 5. Fill and seal the hot cocoa bombs
Transfer all the hardened shells to a clean surface. Get your hot cocoa mix and mini marshmallows ready.
Warm a plate or skillet then remove from heat. Place one of the larger shells (flat side down) on the warm surface, until the edges begin to soften.
Immediately transfer to a cookie sheet and fill with a spoonful of the hot chocolate mix and mini marshmallows.
Press one of the smaller shell halves onto the top to seal. The melted chocolate will act as a “glue” that holds them together!
Repeat with all the remaining shell halves and fillings. Smooth any remaining dark chocolate over the seams of the bombs with a spoon. This creates a smooth “seal” to lock all the fillings in.
STEP 6. Decorate
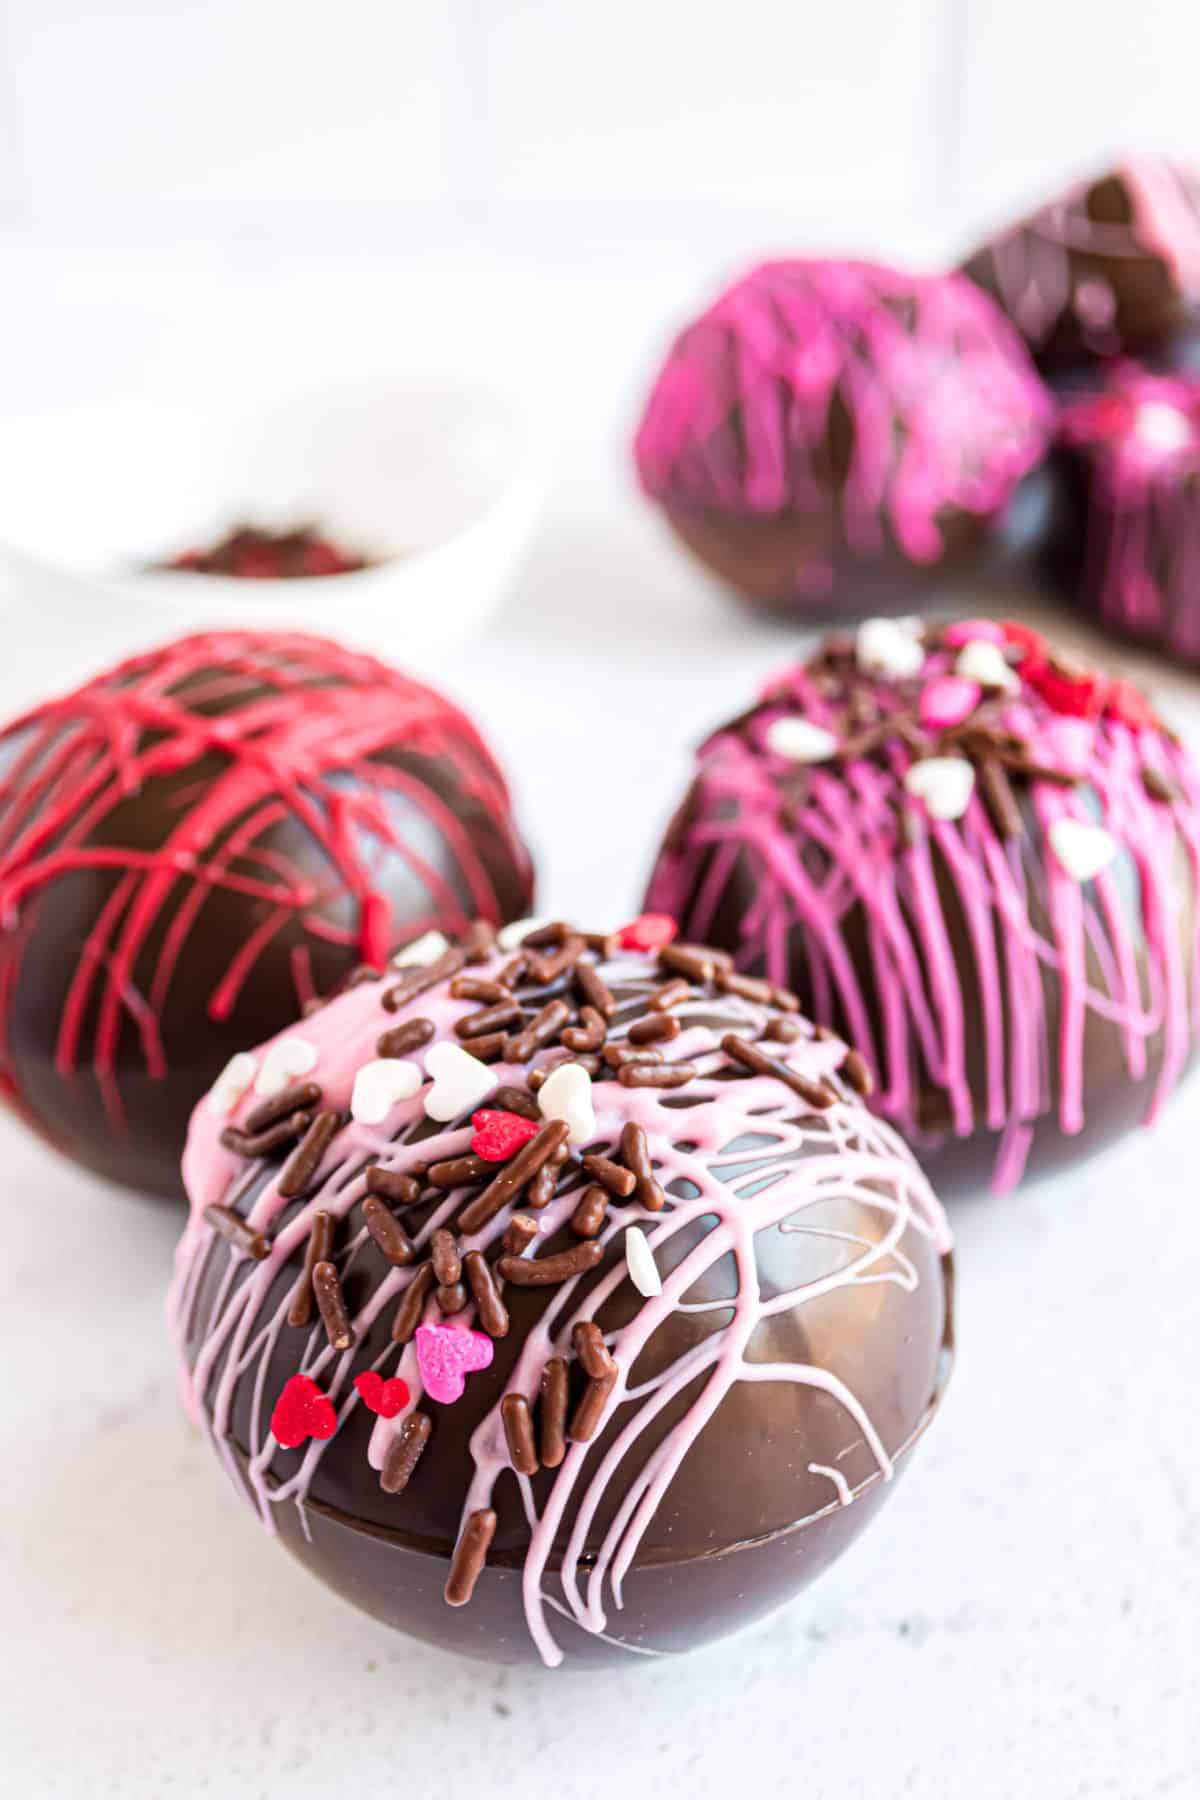
Flip the hot chocolate bombs so the rounder side is facing up. Melt the white chocolate wafers or candy melts according to package directions. Drizzle over the outsides of the cocoa bombs and add sprinkles for a colorful finishing touch.
STEP 7. Serve
Once the chocolate drizzle is set, you can transfer them to an airtight container to store or serve them right away.
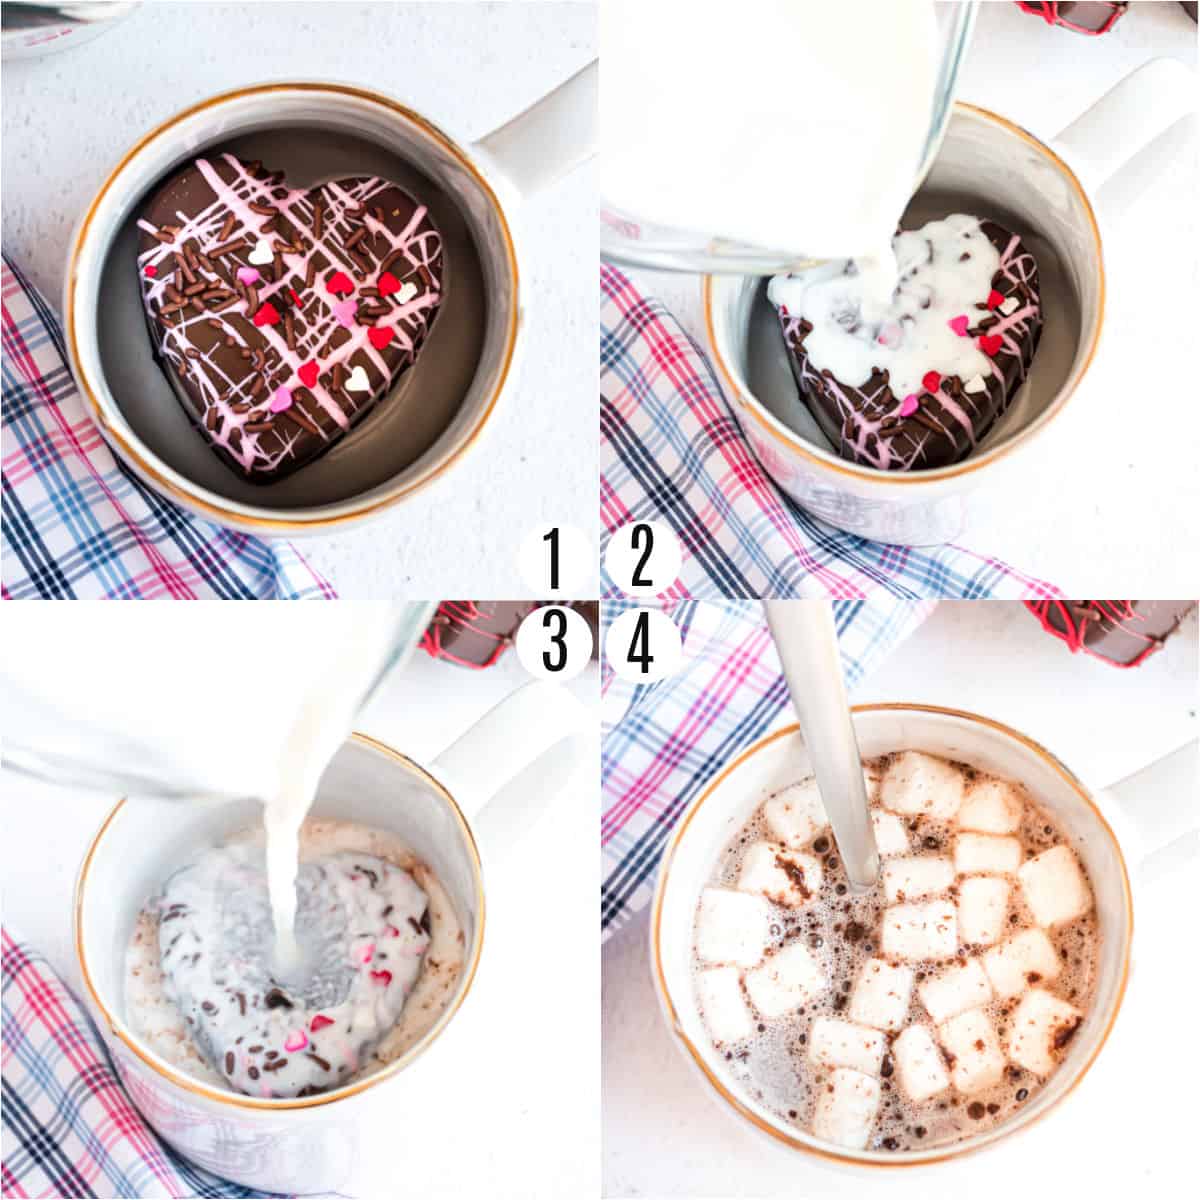
Make hot chocolate by placing one cocoa bomb at the bottom of a mug. Pour warmed milk over top and let the chocolate dissolve. Stir to incorporate the cocoa mix and enjoy!
Tips and Tricks
- Best heart shaped mold: This mold from Amazon works best. Don’t use the heart molds that have a lip on the edge.
- Sealing. The “lid” portion of the bomb is slightly smaller than the deeper shell in this style of bomb. It will rest on top of the fillings and make light contact with the melted chocolate edges. Add additional chocolate can be added to the seam to fill in the gap and keep the mix in and make sure the lid stays on.
- Two thin coats of chocolate are better than one thick coat. You want to make sure that the whole surface of your first mold is covered with chocolate. However, be sure not to make the coating too thick. When in doubt, add a second thin layer of chocolate after the first coat hardens.

Recipe FAQs
You CAN make them round molds with this Hot Cocoa Bomb recipe. Just decorate with Valentine’s sprinkles and voila!
No, you should not use white chocolate for the heart shaped shells. It doesn’t spread well in the heart shaped molds, making it difficult to coat the whole thing.
No, chocolate chips will not work in this recipe. They’re filled with additives that prevent the chocolate from melting and hardening smoothly.
No, the sprinkles will not float in your cocoa and ruin the texture. The hot milk dissolves them beautifully!
Store hot cocoa bombs in an airtight container. Do not chill or freeze, this causes condensation to form on the surface.
More Delicious Holiday Treats
- These Cherry Almond Hand Pies are filled with those warm holiday flavors! Try out this festive Christmas Tree Hand Pies recipe too!
- Make picture perfect Red Velvet Cookies for the holiday party to impress all the guests!
- These creamy Peanut Butter Blossoms are delicious! Especially covered in cinnamon sugar!
- Make this light and fresh Cherry Margarita Pound Cake at your next holiday function!
- These Red Velvet Cupcakes are rich, decadent and topped with a tangy and delicious Cream Cheese Frosting!
Pin this now to find it later
Pin It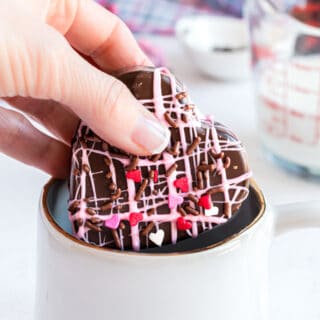
Valentine’s Hot Cocoa Bomb
Equipment
Ingredients
- 2 packages Ghirardelli dark melting wafers 10 oz each
- 6 Tablespoons hot cocoa mix
- 1 cup mini marshmallows
- 6 cups hot milk
- White or Additional melting wafers for decorating as desired
- Valentine’s sprinkles optional
Instructions
- In a microwave safe bowl, melt chocolate wafers according to the package. Stir until smooth.
- Place the silicone mold on a cookie sheet, jelly roll pan, or something that will support your mold and can be placed into the freezer.
- Put about 1-2 Tablespoons of melted chocolate into the well of the silicone mold. Using the back of a spoon, push the chocolate up the sides until the entire mold is covered with a layer of chocolate. Start with the top of the heart, pushing a large amount of chocolate into the top curved parts and then work down to the point at the bottom. Pay special attention to the sides making sure the chocolate completely covers the mold. You can even tilt the mold slightly as you are using the back of the spoon to coat the mold, it helps with the visibility of the mold.
- Transfer the baking sheet to the freezer for about 10 minutes.
- Remove the tray from the freezer and make sure there is chocolate going all the way up the side of the mold. If the chocolate layer seems thin at the edge, add a little more chocolate to thicken the edge using a spoon, small spatula or food-safe paint brush. Don’t worry about how the shell looks from the inside – it won’t be visible when the bomb is complete. Return to the freezer for 5 minutes.
- Remove the mold from the freezer and flip the mold over, rounded side facing up.
- Gently press the center of each well and peel the silicone mold back from the edge of the chocolate sphere to remove the hardened chocolate. If you press too hard on the center of the mold, it can cause the shell to crack on the edges.
- With the second mold, put about 1 Tablespoon of chocolate in the silicone mold so that it covers only the bottom surface. Don’t push any chocolate up the sides. You should have enough chocolate to create a heart that is ¼” thick. This will act as a “lid” and eventually the bottom when your heart hot cocoa bomb is assembled. (using two full size hearts results in a very large chocolate bomb, and uses way too much chocolate…this is a great fix)!
- Transfer this mold to the freezer for 10 minutes. Remove in the same manner as the first part of the shell.
- Transfer all parts of the heart cocoa bomb shell to a clean surface. The shells tend to pick up any pieces of chocolate that may have hardened during the unmolding process. You don’t want those in your finished shell.
- Prepare everything you’d like to add to the inside of your cocoa bomb (mix, marshmallows and anything else you’d like to add). You will have to work quickly and it’s important to have everything ready.
- Heat a small skillet, saucepan or plate until it is warm. Place the deeper heart shell, rounded side up, on the hot surface, just until the edge begins to melt and creates an even edge for sealing the bomb. Keep your hot surface away from the other shells, as they are very heat sensitive and can begin to soften.
- Place this half of the heart cocoa bomb on a cookie sheet and quickly fill with 1 Tablespoon of hot chocolate mix and 10-12 mini marshmallows.
- Place the shallow heart shaped chocolate gently on the filled shell, making a “lid.” Hold it in place for a few seconds so that the melted chocolate edges will meet and act as a “glue” to hold the 2 halves together. Since the “lid” is slightly smaller than the filled heart, it won’t meet seamlessly. You just want enough melted chocolate to hold them together.
- Using a spoon, add some melted chocolate from the skillet or saucepan to fill in the gaps and smooth it to create a seal. Once the chocolate has hardened, flip the bomb over so that the “lid” is now on the bottom.
- Decorate by drizzling melted chocolate that matches the shell or contrasting melted chocolate to make a pretty design. Add holiday sprinkles for a finishing touch!
Notes
- Silicone Mold- we love this Heart Mold on Amazon! Do NOT purchase the heart mold that has a lip on it, trust me from experience (don’t get THIS one)
- If you prefer to make Valentine’s Hot Cocoa bombs with a sphere mold…follow my guide to making Hot cocoa bombs!
- I do not recommend using the heart shaped mold with white chocolate. It was somewhat challenging to get a second coat on (other than touch ups) and I think it would be hard to coat the entire thing again.
- Because the “lid” portion of the bomb is slightly smaller than the “shell/deeper” portion, the lid is slightly smaller. It will seem as though it’s going to fall into the shell, but when the shell is full of marshmallows and mix, the lid just needs to make contact with some of the melted chocolate in order to stay put. Then, additional chocolate can be added to the seam to fill in the gap and keep the mix in and make sure the lid stays on.
- This recipe used a lot more chocolate than the original recipe using the round molds. The heart molds take a lot more chocolate. You may not use all of the 2 packages of Ghirardelli chocolate, but will need most of it due to closing the seam.
- After the milk was poured over the bomb, the sprinkles completely dissolved. So, don’t be concerned about floating sprinkles or the texture of the drink.
Nutrition
Who can resist a hot chocolate bomb–especially when it’s heart shaped? Everyone swoons for these festive and beautiful Valentine’s Hot Cocoa Bombs!