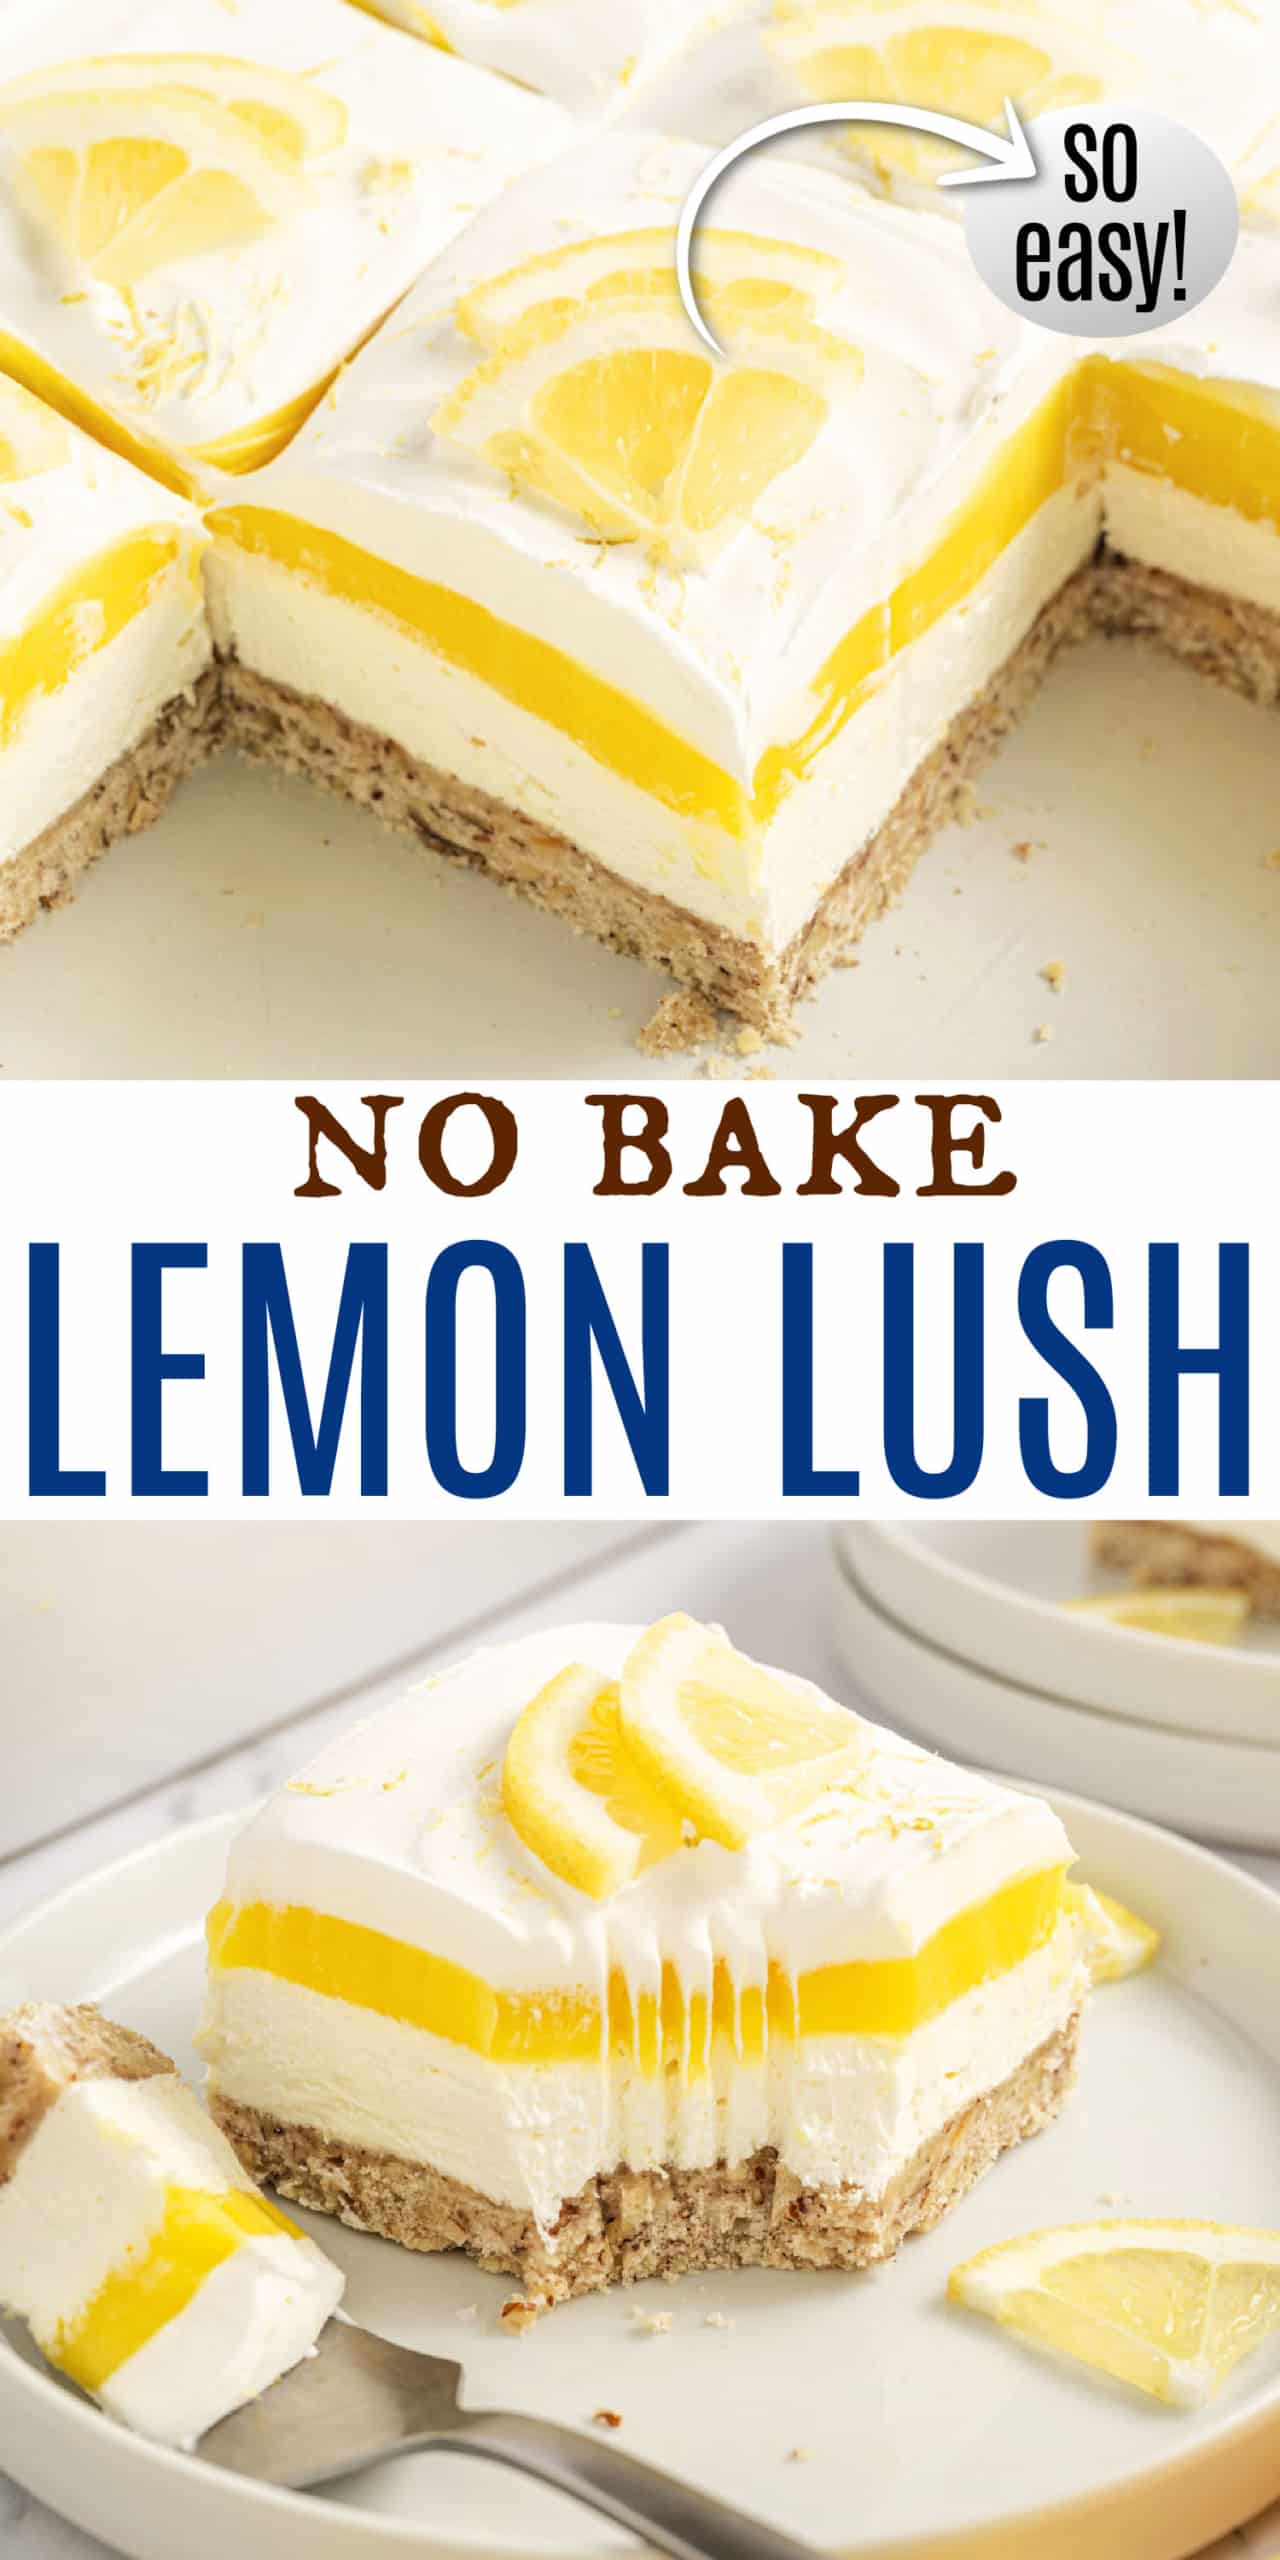
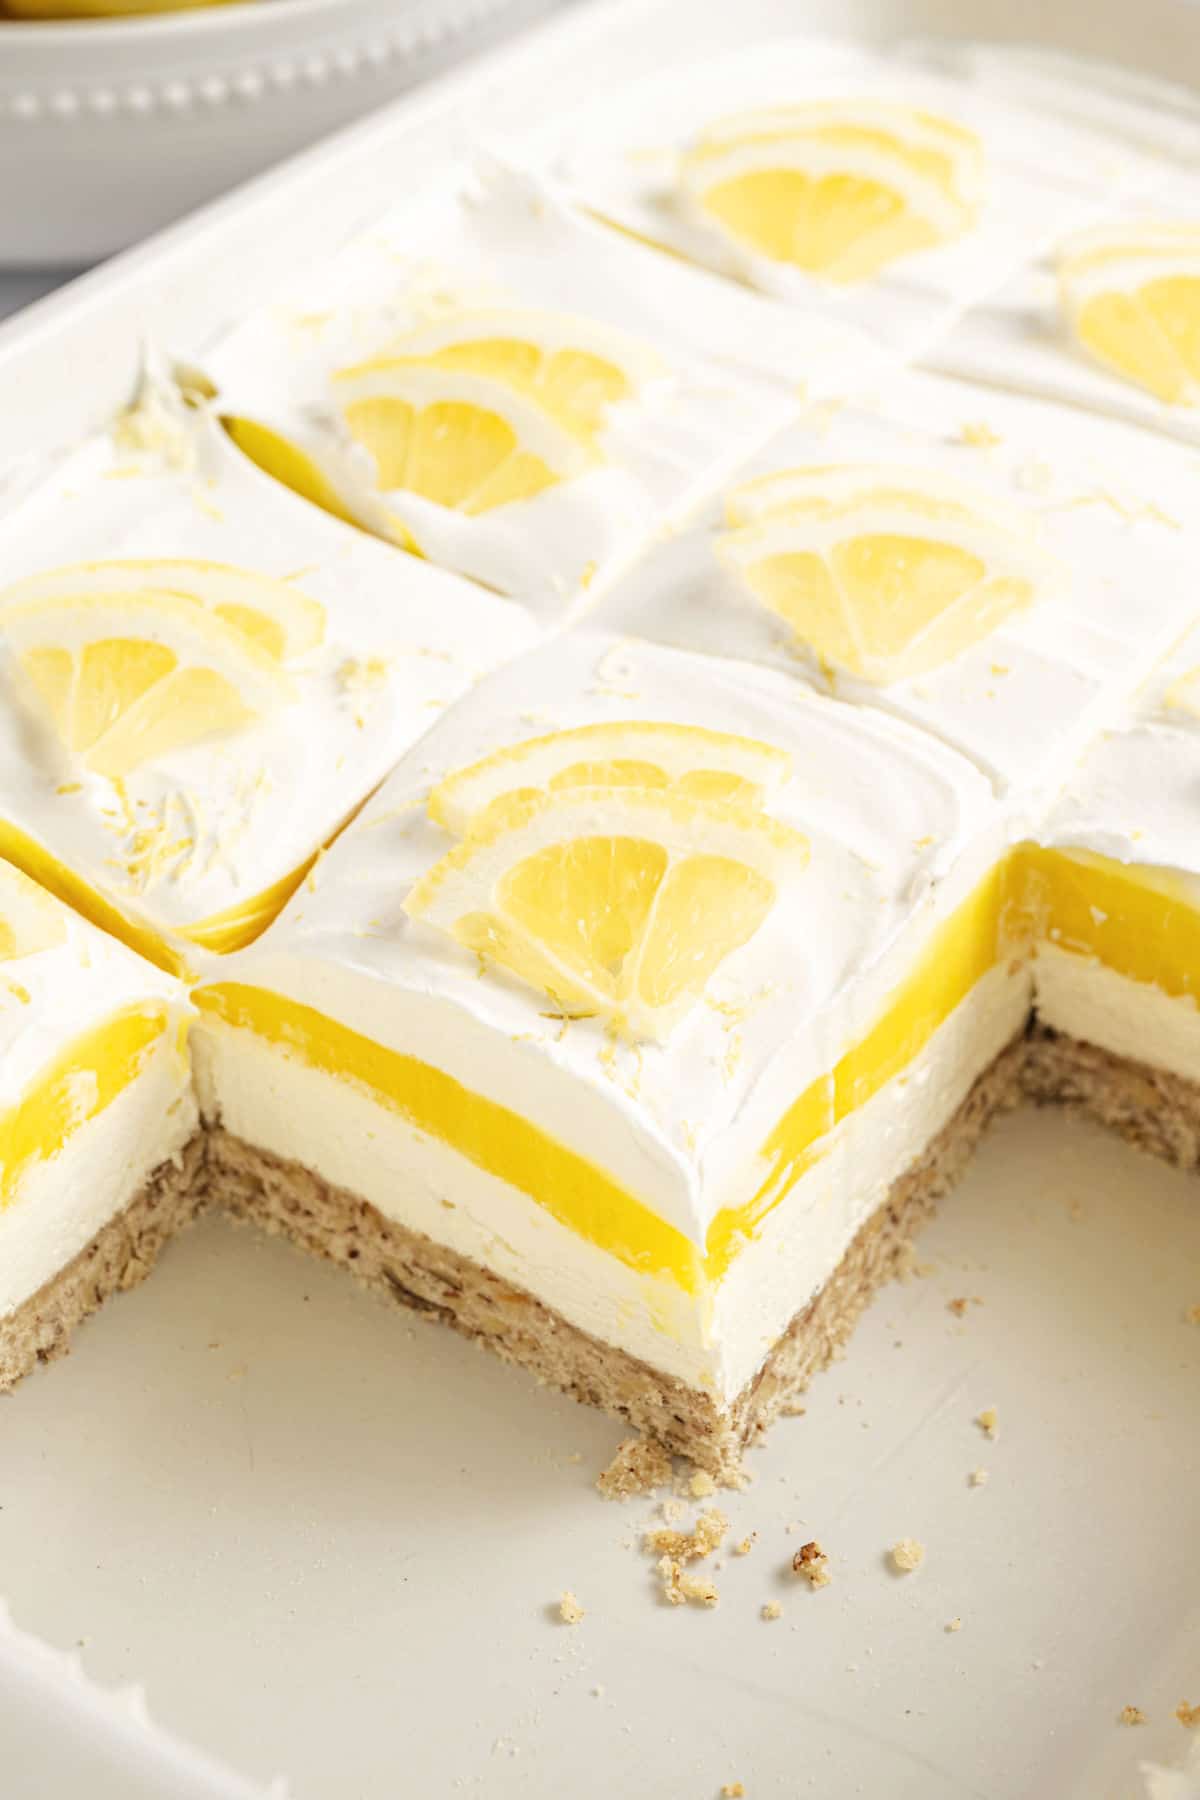
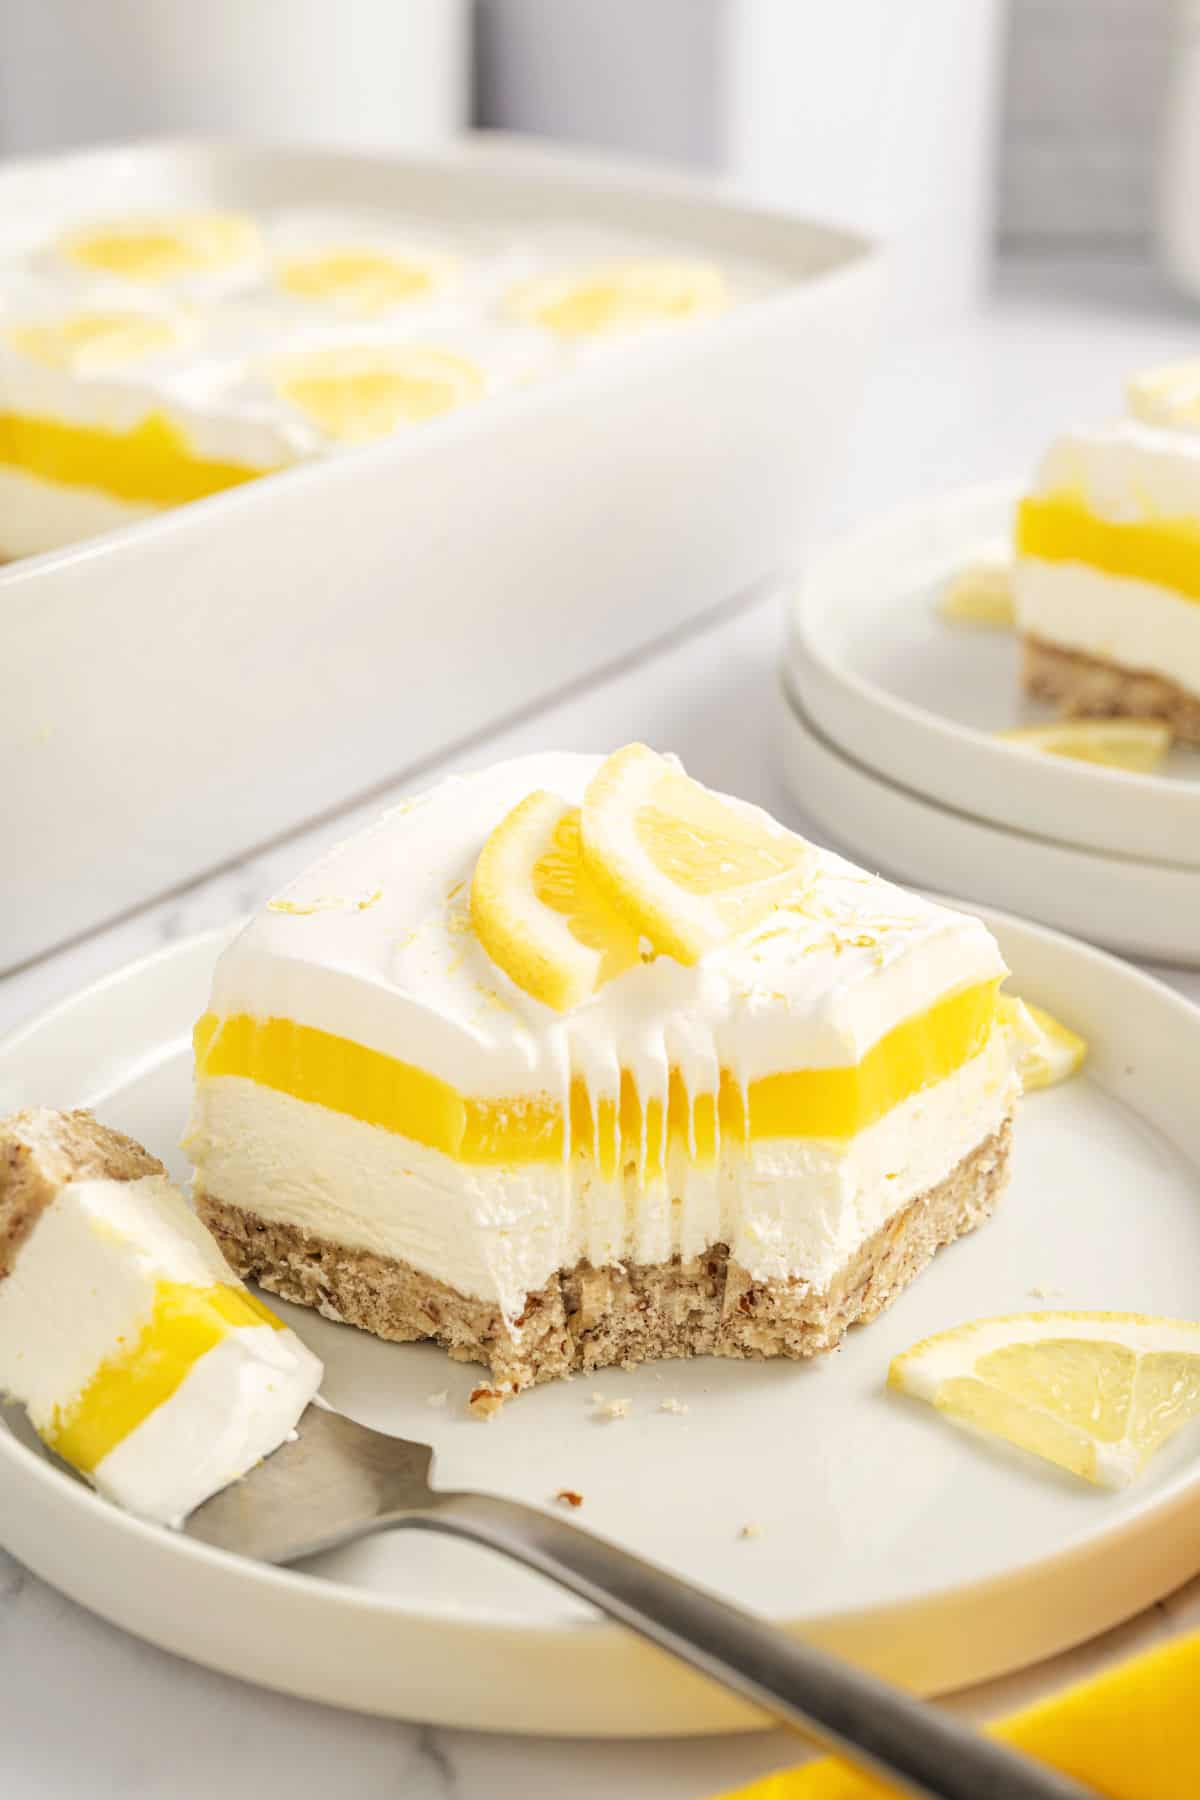
My Lemon Lush dessert packs tangy lemon layers, creamy indulgence, and a nutty crunch. It’s an irresistible treat that’s refreshingly bright, decadent and satisfying.
If you love layered desserts, our strawberry lasagna is a reader favorite! Or give our chocolate chip lasagna recipe a try next, for your chocolate sweet tooth.
Why Lemon Lush Works
If you seeking a treat that is both sweet and refreshing, I think you’ll find that Lemon Lush is always a good choice.
I love it because it’s bursting with vibrant citrus flavor, velvety creaminess, and a satisfying nutty crunch.
Here are a few reasons to try it for yourself,
- Hassle–free. Pre-packaged and instant ingredients mean that this recipe comes together without much effort.
- Good for a crowd. Whether it’s a family dinner, a potluck, or a special occasion, this recipe is always a winner. It’s impressive without being fussy. I’ve found that Lemon Lush is reliable as a crowd-pleaser.
- Make-Ahead. Need a dessert that fits your schedule? You can prepare the Lemon Lush in advance, allowing its flavors to meld and intensify. Serve it up when the time is right, and watch as your creation steals the spotlight.
If you just served mom’s meatloaf or a big plate of chicken tetrazzini for dinner, our lemon lush is the perfect finale. Or whip up this easy lemon chess pie!
Ingredient Notes
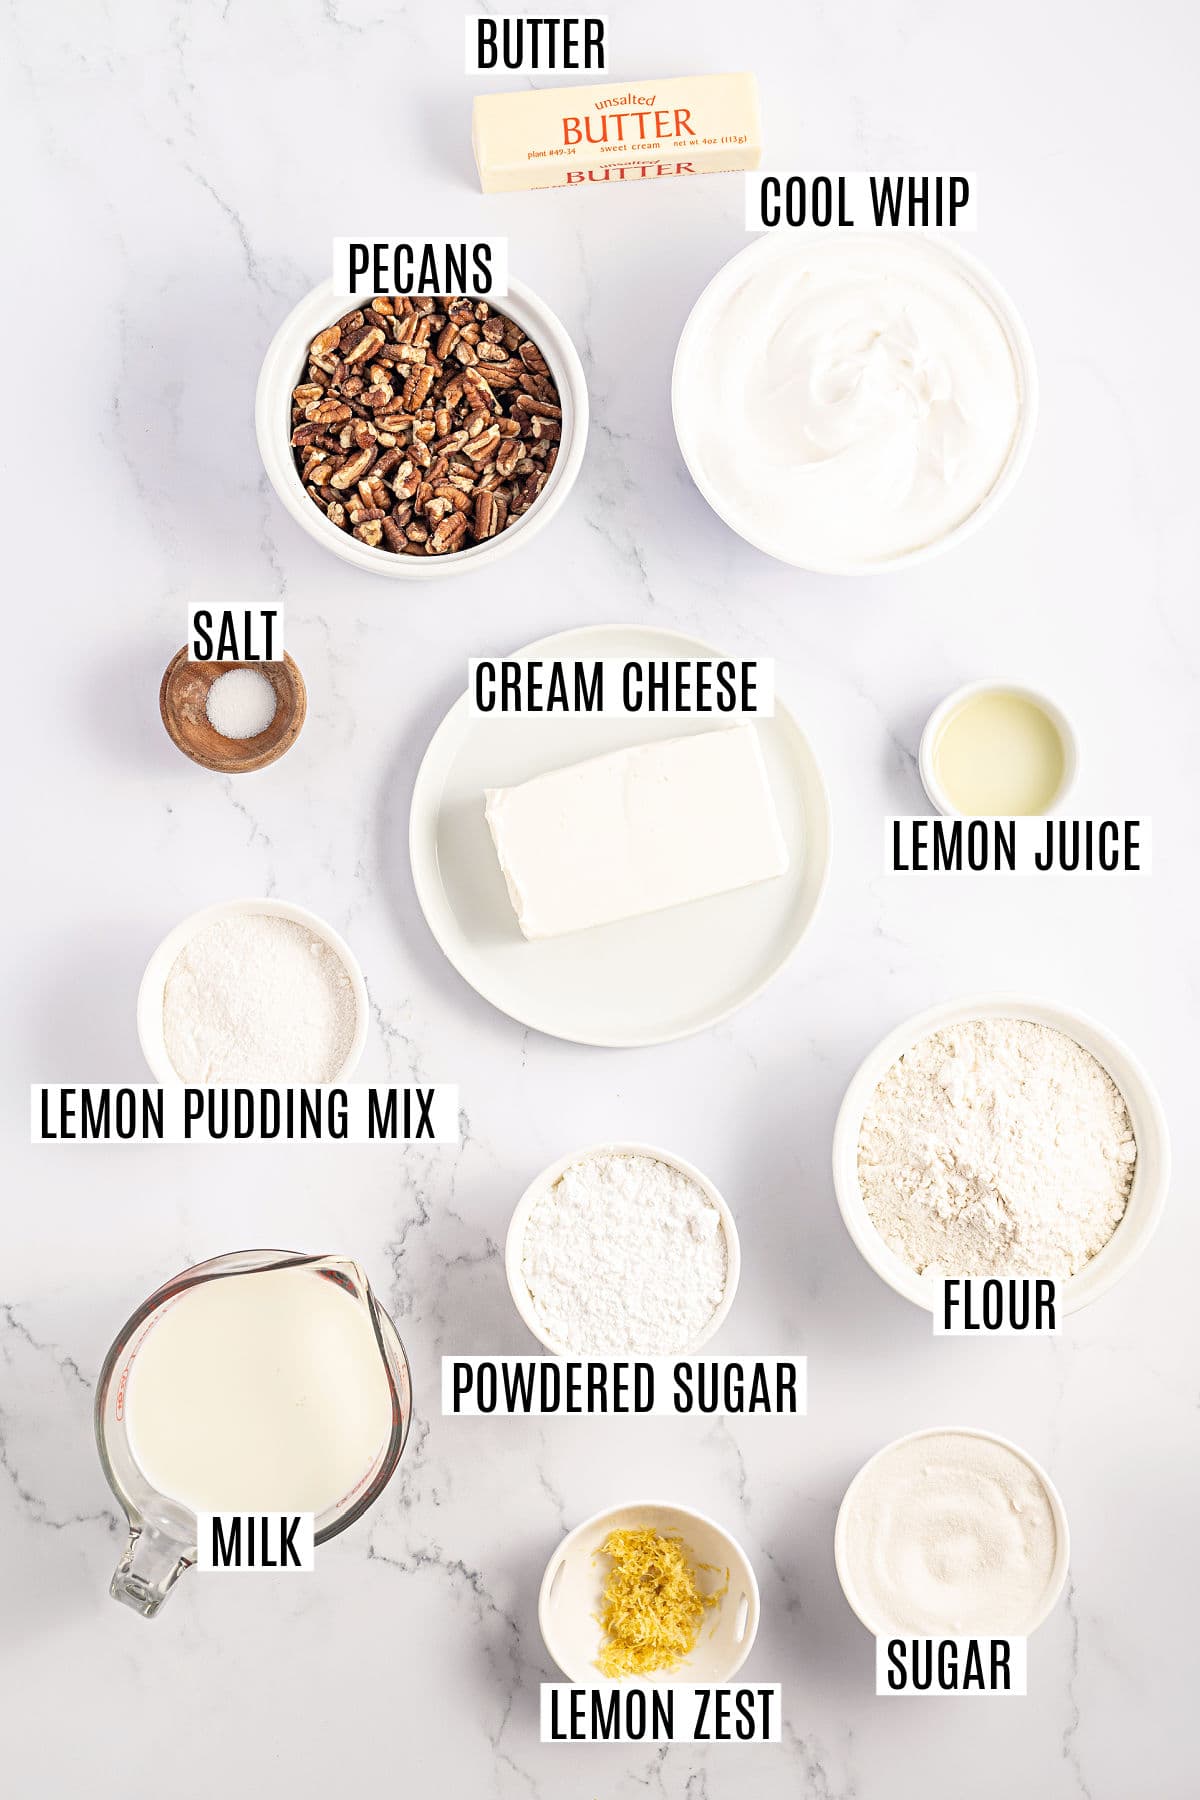
- All-Purpose Flour – You probably already have some in your pantry. All-purpose flour has the perfect protein content to balance the texture and structure of this crust.
- Unsalted Butter – Unsalted butter acts as a binder and adds richness to the crust. If you only have salted butter, omit the added Kosher salt.
- Granulated Sugar – The tiny sugar crystals integrate seamlessly into the crust mixture. It sweetens the crust and aids in browning. You can experiment with alternative sweeteners like brown sugar or coconut sugar for a twist.
- Pecans – Pecans add a nutty crunch to the crust. You can swap it out for walnuts. Or, for a nut-free option, you could substitute toasted oats. Use our tips on how to toast pecans quickly.
- Cream Cheese – Room temperature cream cheese is soft and blends smoothly with the other ingredients. This way, you’ll achieve a creamy, consistent texture throughout the dessert.
- Powdered Sugar – Since we won’t bake the cream cheese layer, powdered sugar is the best option because it will dissolve without heat. The result is an indulgent, velvety, lump-free consistency.
- Lemon Juice & Zest – Lemon adds a bright and zesty flavor to the dessert and compliments the rich, tangy cream cheese. Make sure to use organic, unwaxed lemons for the best zest. Use our guide on how to zest a lemon for best results.
- Cool Whip for Filling- This whipped topping adds a light and airy texture to the cream cheese layer. Substitute with homemade stabilized whipped cream to avoid added oils and preservatives.
- Instant Lemon Pudding Mix– be sure not to use cook and serve pudding.
- Milk – The higher the fat %, the richer the pudding will be.
- Cool Whip Topping- Alternatively, you could whip up this Lemon Whipped Cream Frosting for even more citrusy deliciousness.
Easy Instructions
Prepare the Crust.
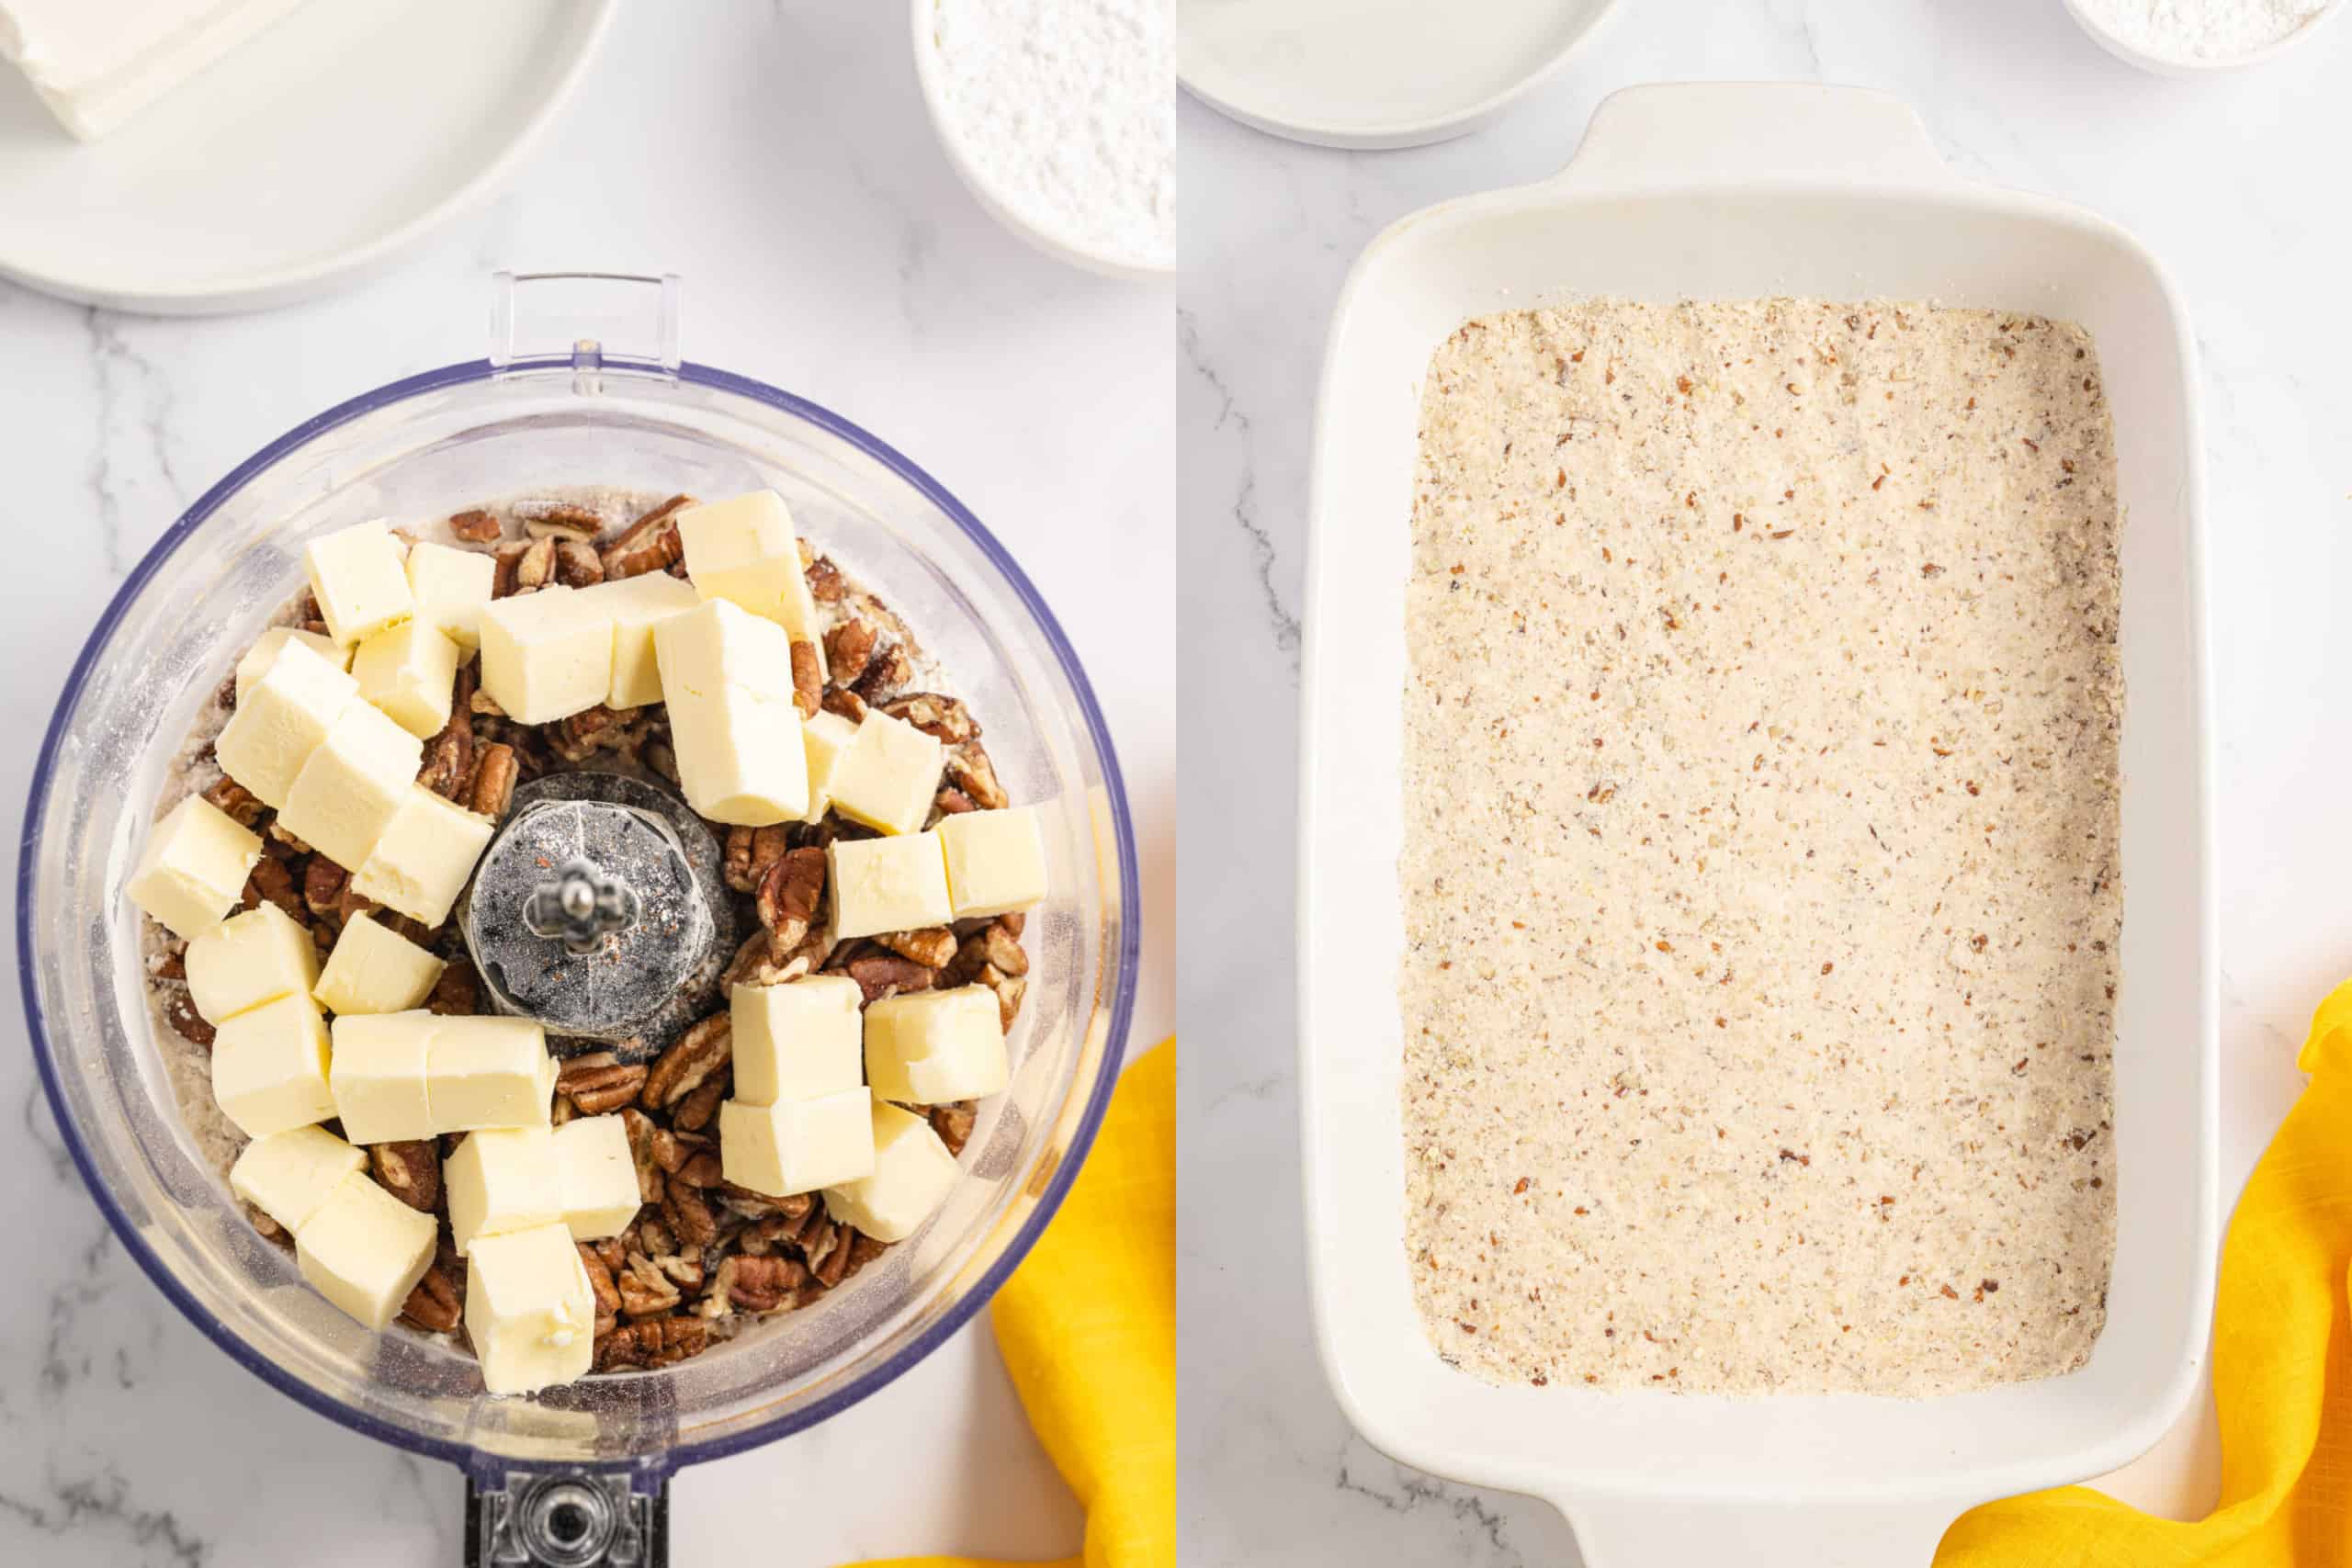
- Preheat your oven to 350°F and grease a 13×9” baking dish. Blend flour, butter, sugar, salt, and pecans in a food processor until they form small crumbs.
- Press the crumbs firmly into the bottom of the baking dish. Bake for 30 minutes until the crust’s edges are lightly brown. Let it cool for 30 minutes before placing it in the freezer while you proceed with the next steps.
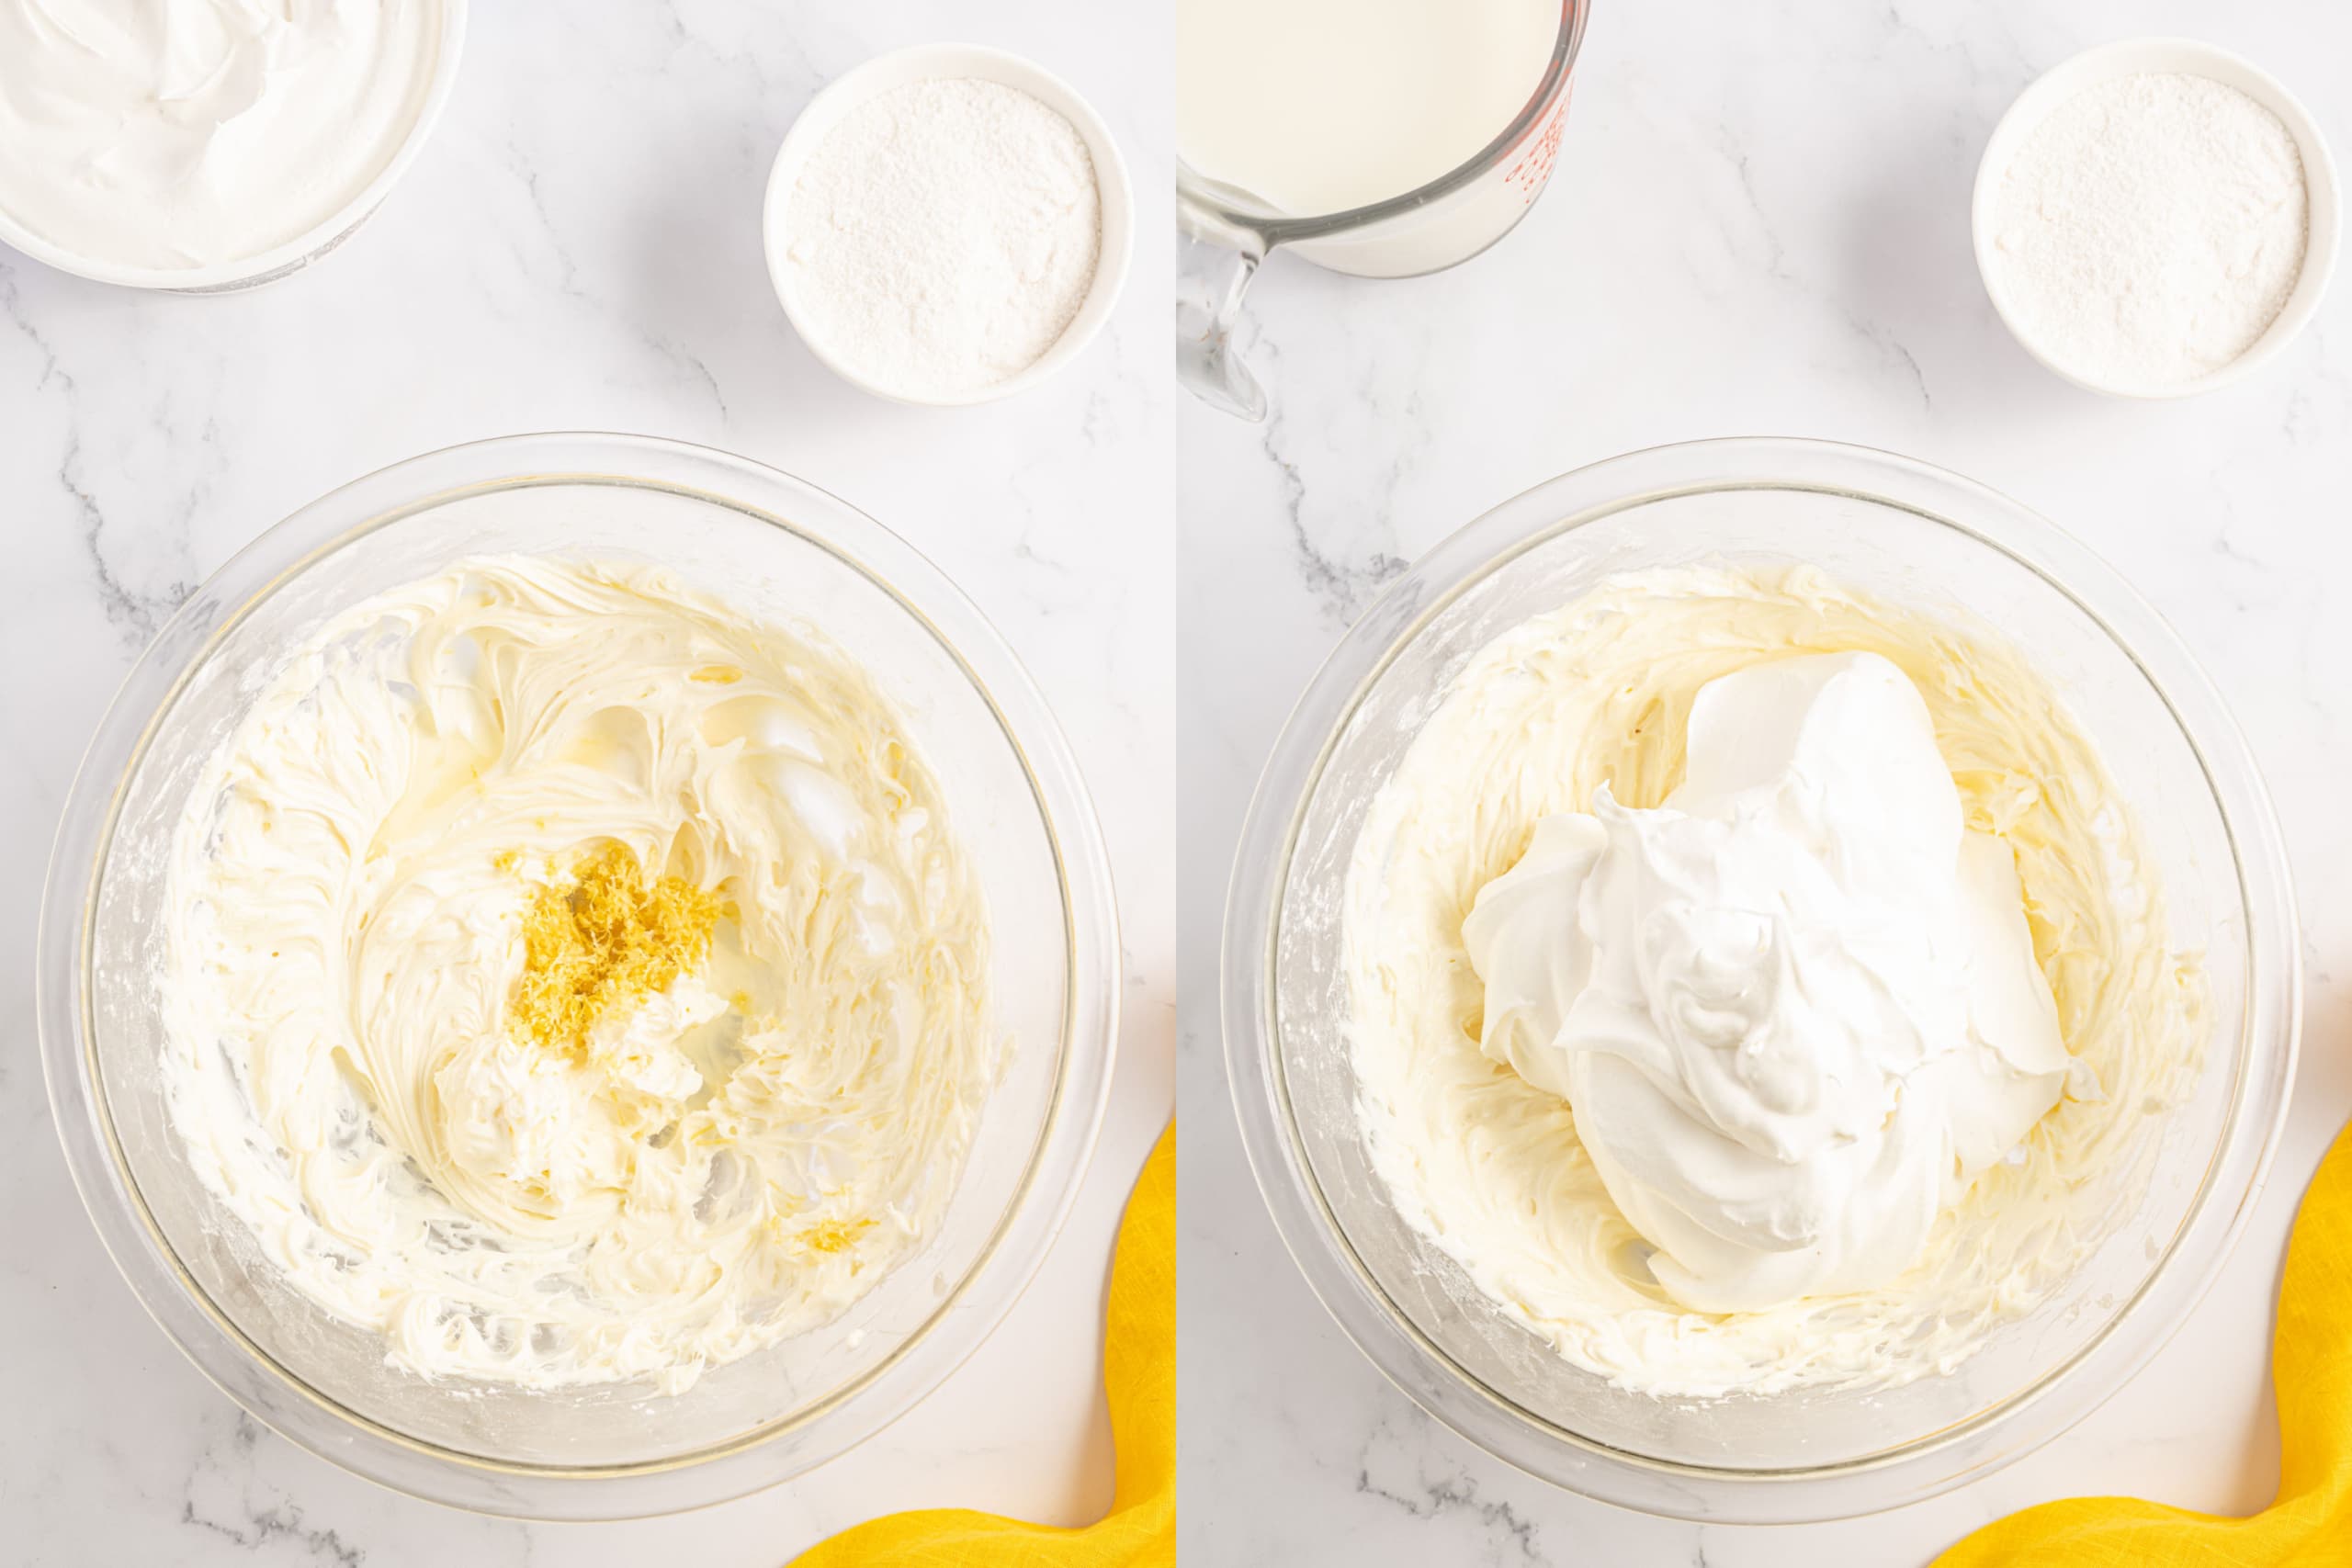
Create the Cream Cheese Layer.
- In a large mixing bowl, beat cream cheese and powdered sugar until smooth. Incorporate lemon juice and zest.
- Fold in Cool Whip until well combined. SPread over cooled crust. Set aside.
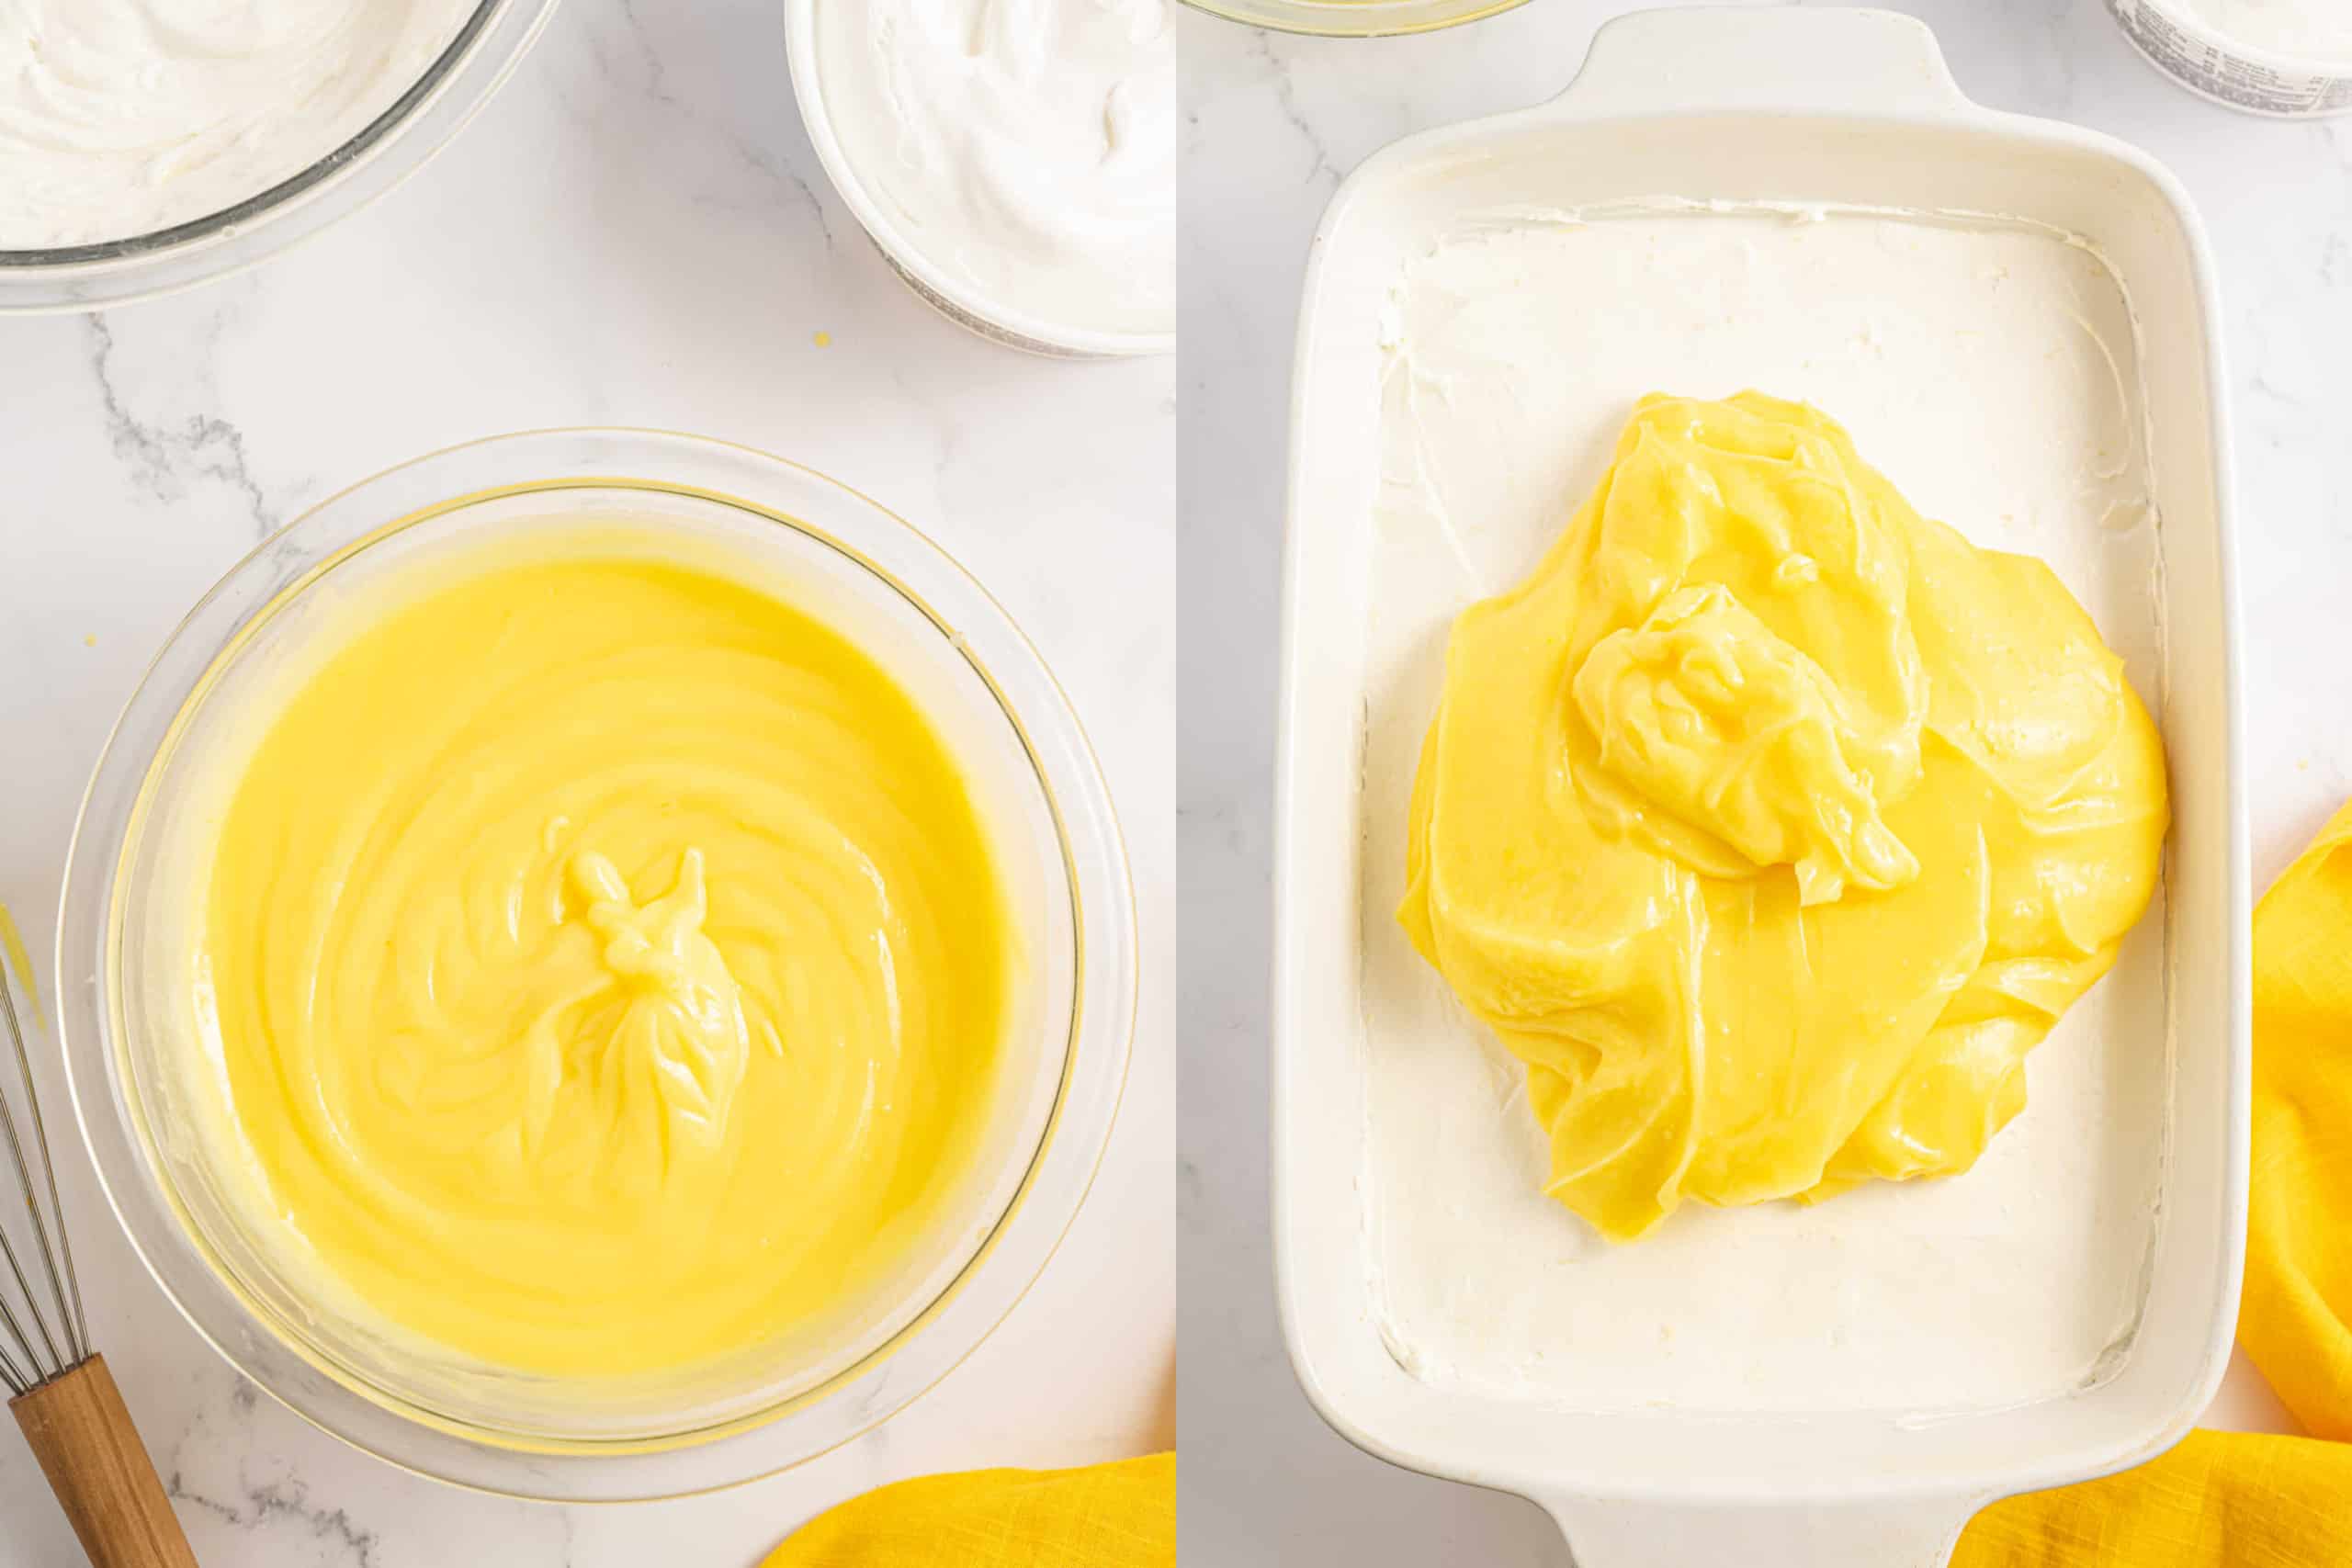
Prepare the Lemon Pudding.
- Combine instant lemon pudding mix with milk in a mixing bowl and whisk for around 2 minutes until it thickens.
- Spread lemon pudding over cheesecake layer. Set aside.
Chill and Serve.
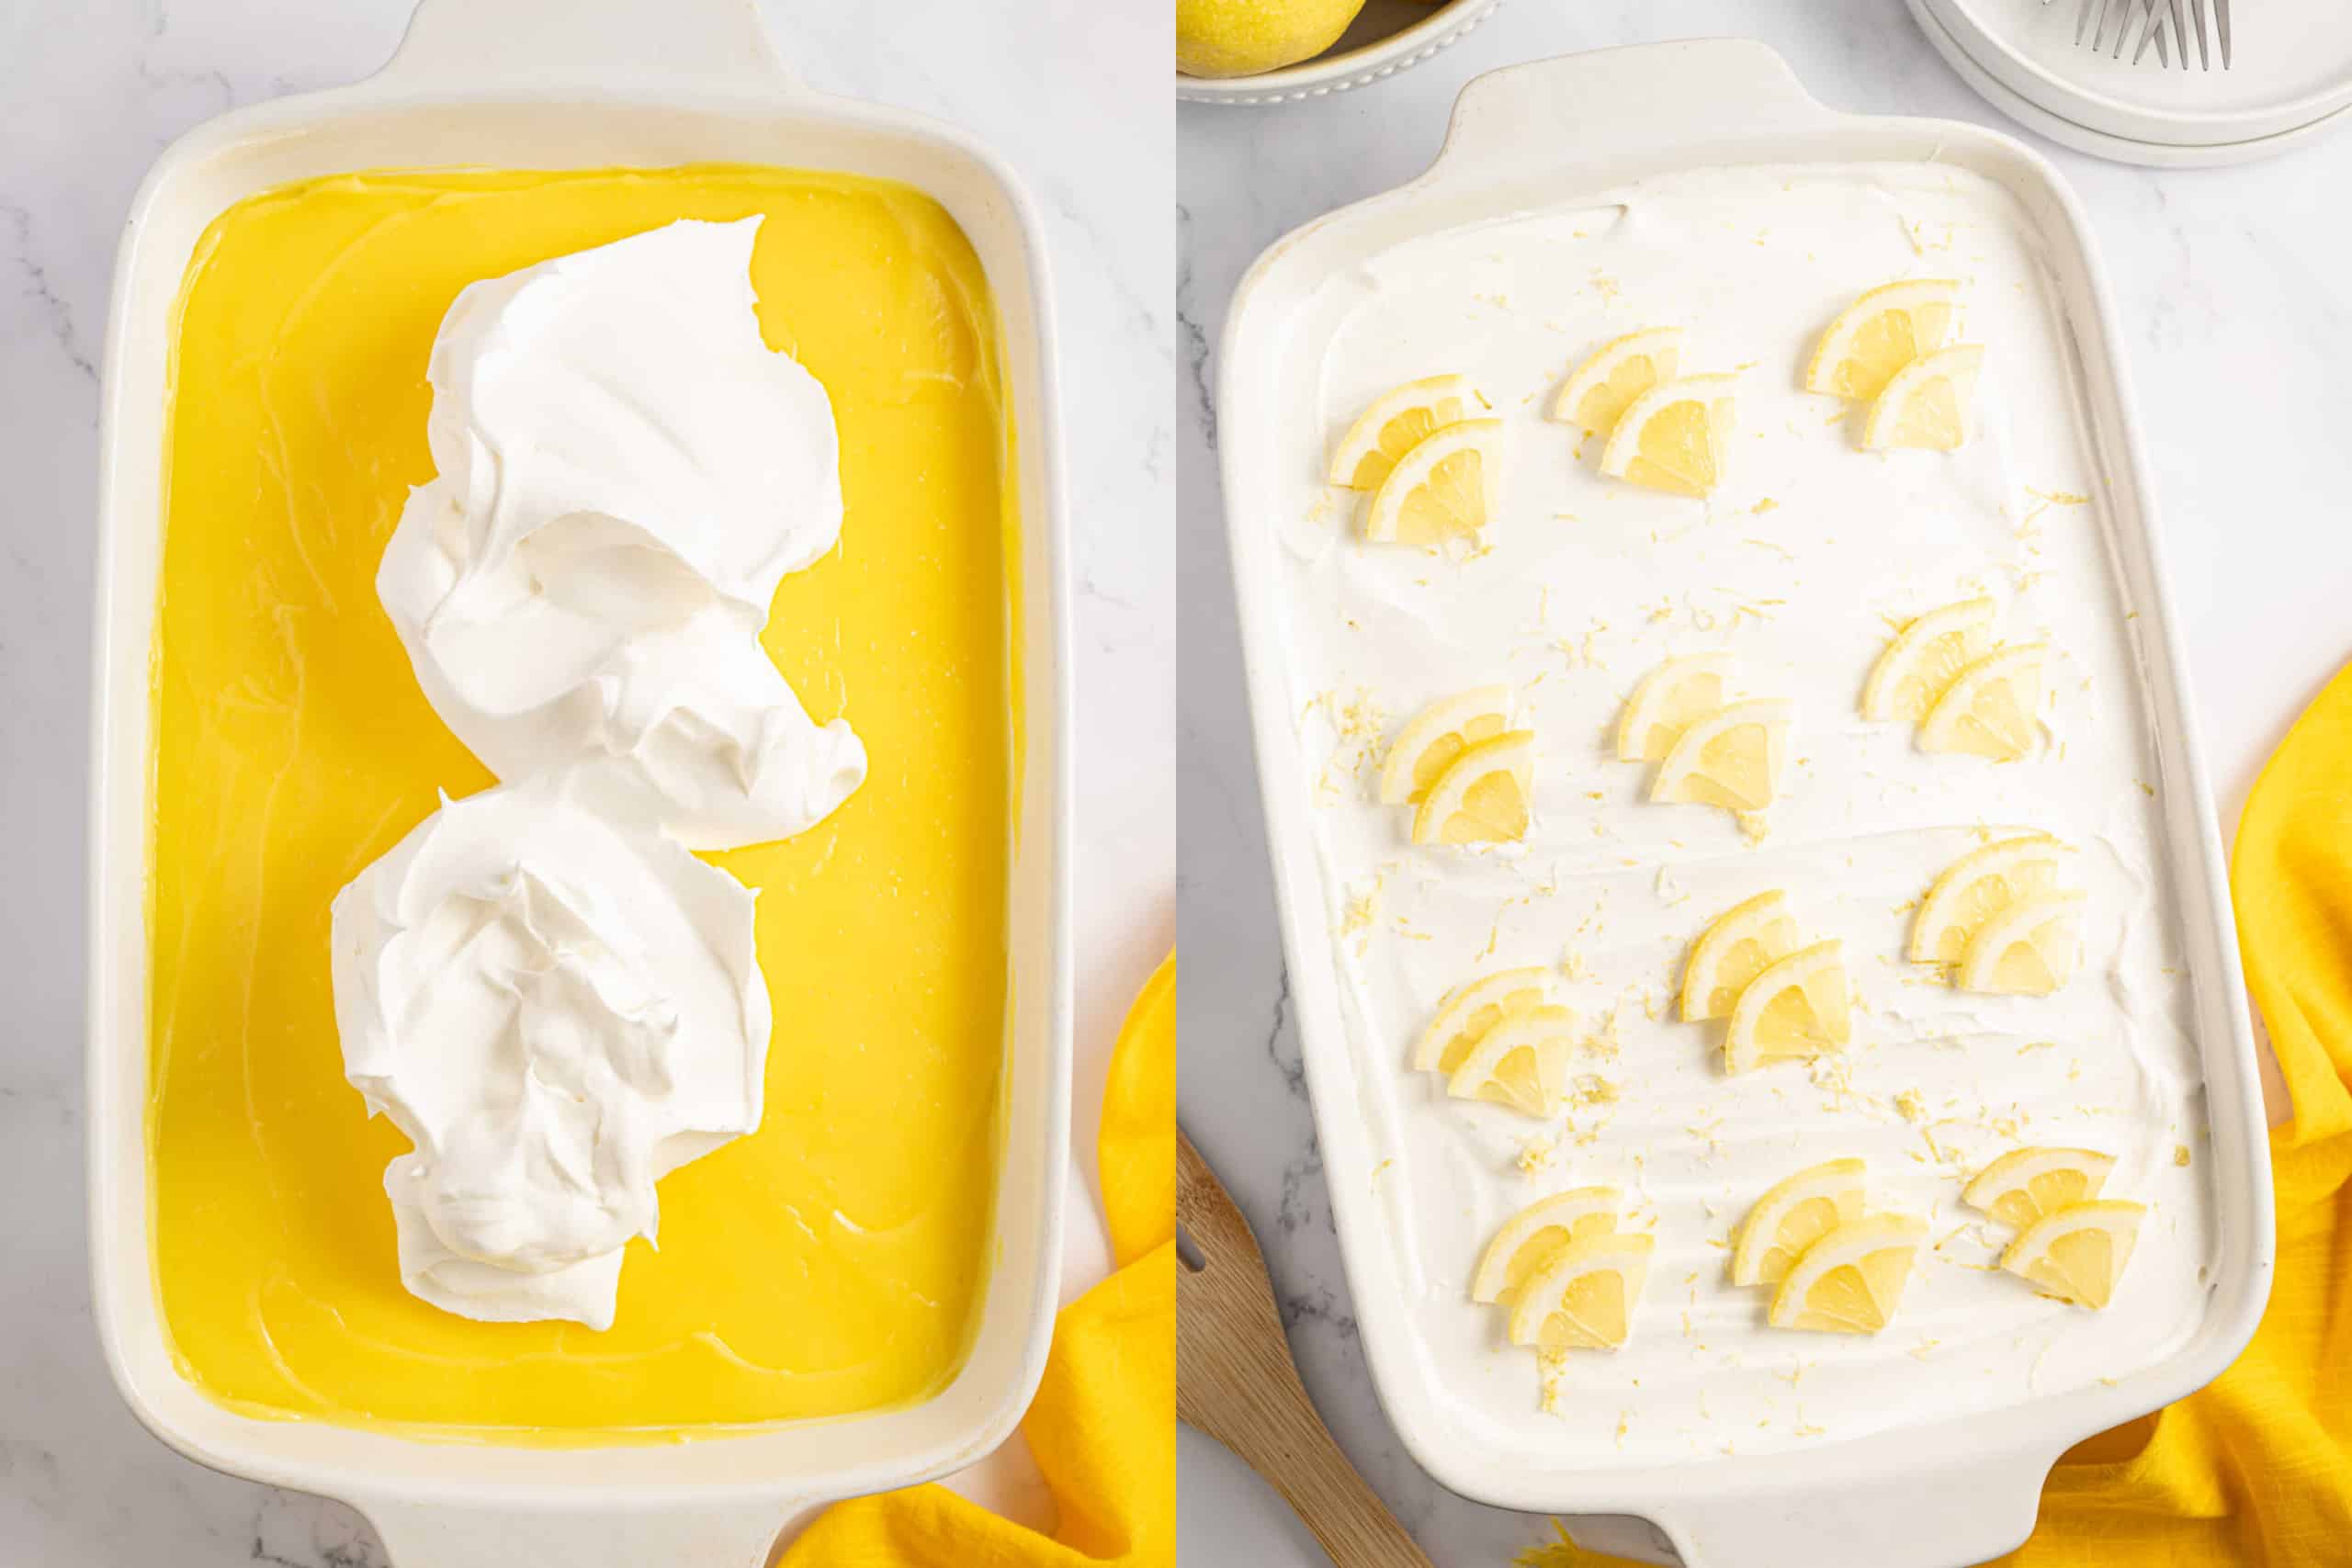
- Finish by spreading the remaining Cool Whip over the dessert.
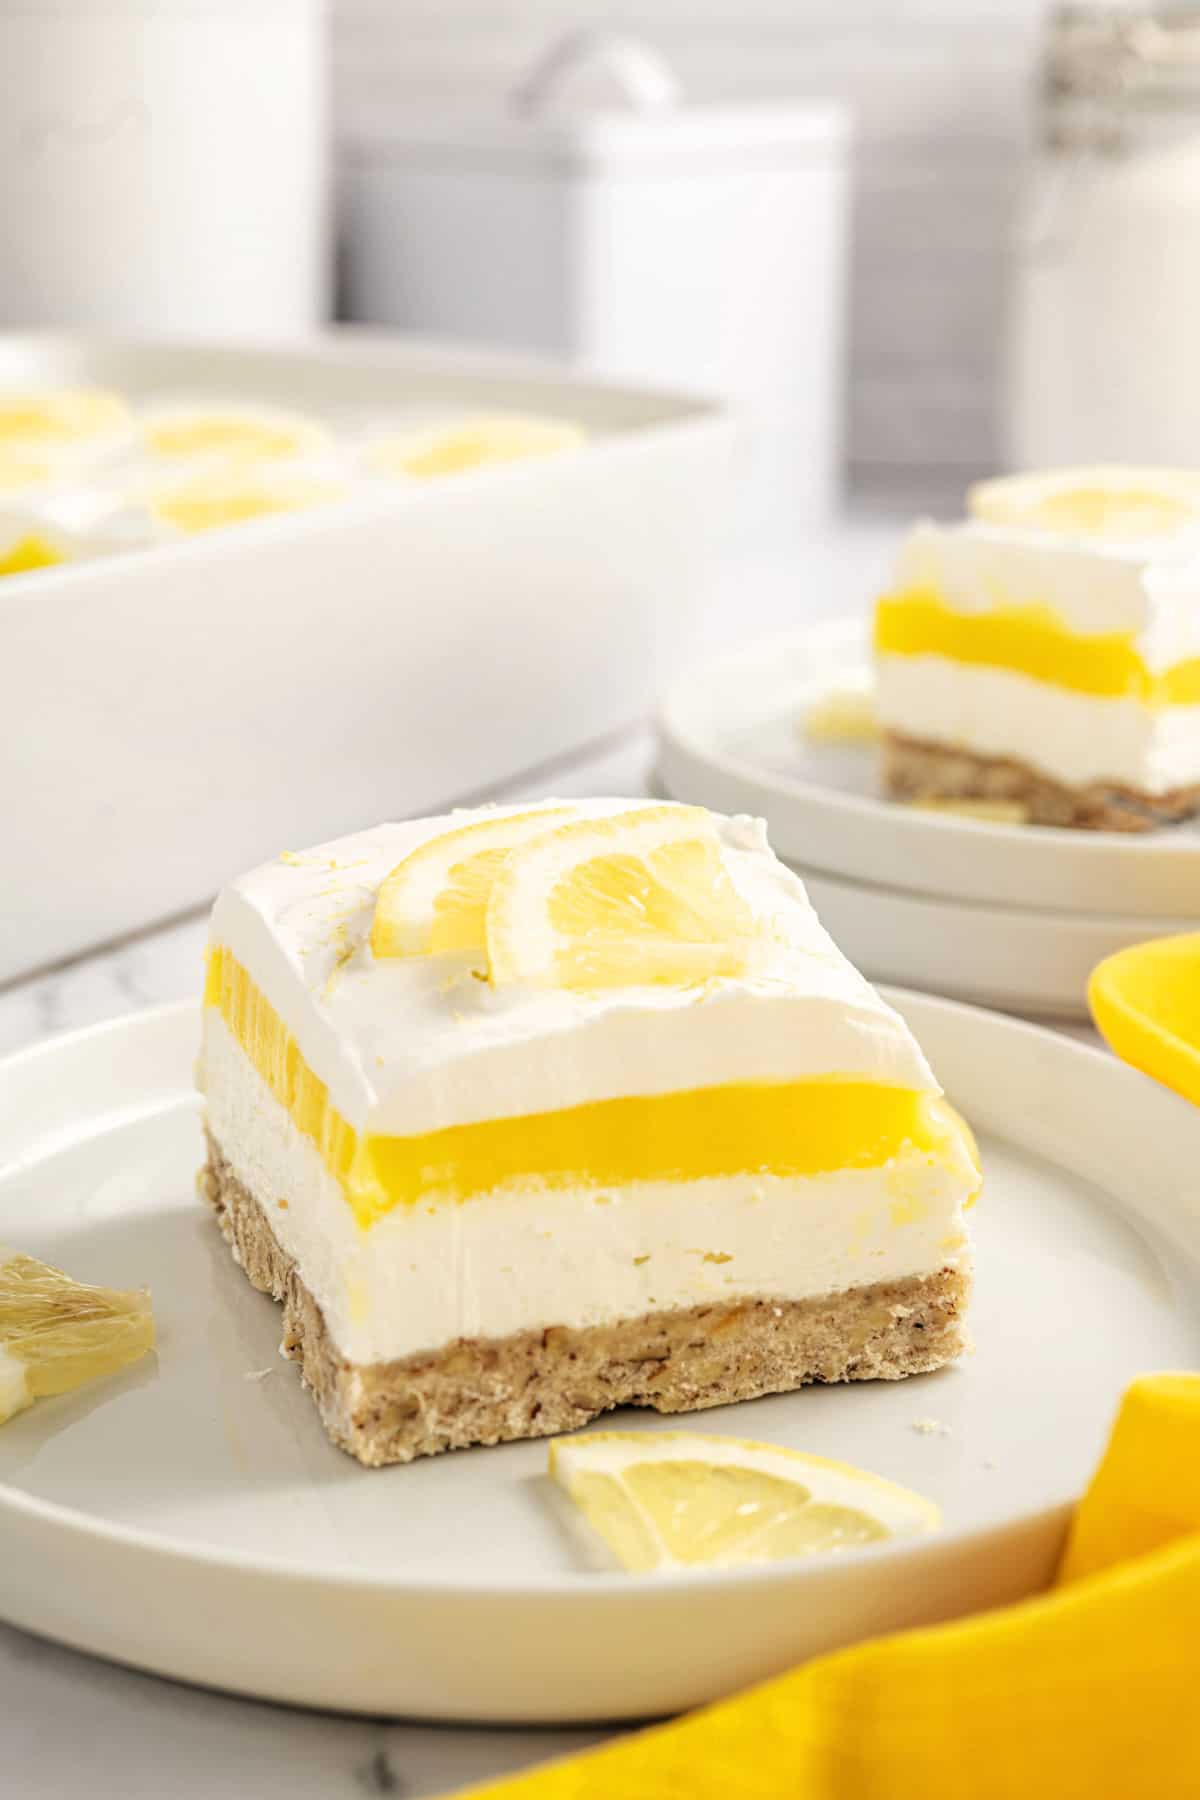
- Cover the pan with plastic wrap and refrigerate for at least 4 hours. Ideally overnight. When ready to serve, cut into slices and garnish with lemon slices or zest for an extra burst of flavor.
Tips and Tricks
- Keep It Cool! For best results, keep this dessert as chilled as possible. I recommend transferring it back to the fridge between servings.
- Can’t get enough lemon? Add a tablespoon of lemon zest to the pudding layer!
- Lactose-Free Twist. Create a dairy-free version by substituting non-dairy alternatives. Try using vegan cream cheese, almond milk, and coconut-based whipped cream. The result is a scrumptious dessert suitable for lactose-intolerant individuals.
- Layer with Fruits. Add thin slices of fresh strawberries or blueberries between the cream cheese and pudding layers.
- Try New Toppings. A drizzle of lemon curd, a sprinkling of toasted pecans, or even Lemon Curd Macarons will take this impressive dessert to the next level.
Recipe FAQs
A Lemon Lush dessert is a layered treat that combines a crumbly crust with creamy and tangy fillings. It typically features a cream cheese mixture, lemon-flavored pudding or custard, and whipped topping. The dessert is full of contrasting flavors and textures, which makes it an easy and impressive option.
Cover the leftover dessert with plastic wrap and store it in the fridge for up to 3 days. For longer storage, ensure the Lemon Lush is well-covered with plastic wrap and foil to prevent freezer burn. Then, store it in the freezer for up to 3 months. Allow it to thaw in the fridge overnight before serving.
Yes, you can! Prepare the dessert, cover it with plastic wrap, and store it in the refrigerator overnight.
Desserts You'll Love
See all Desserts recipes

Pin this now to find it later
Pin It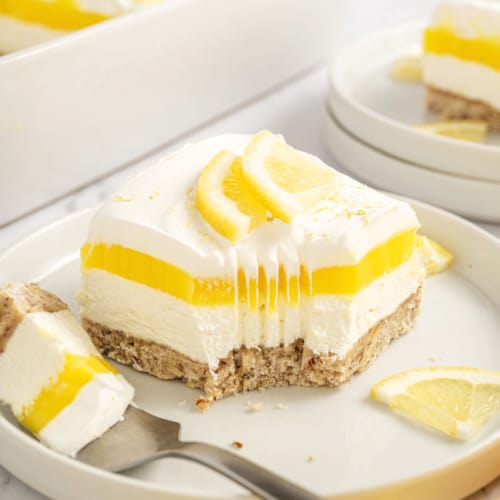
Lemon Lush
Ingredients
For the Crust
- 1 ½ cups all-purpose flour
- ½ cup unsalted butter, cold and cut into cubes
- ½ cup granulated sugar
- ½ teaspoon kosher salt
- 1 cup chopped pecans
Cream Cheese Layer
- 8 ounce cream cheese, softened
- ¾ cup powdered sugar
- 1 Tablespoon lemon juice
- 1 Tablespoon lemon zest
- 8 ounces Cool Whip, thawed
Pudding Layer
- 2 boxes Instant lemon pudding mix, 3.4 ounce each
- 3 cups milk, cold
Topping
- 8 ounces Cool Whip, thawed
- 1 whole lemon, sliced and quartered
Instructions
For the crust
- Preheat oven to 350 degrees F. Grease a 13×9 baking dish with butter (or shortening). Set aside.
- In a food processor, combine flour, butter, sugar, salt, and pecans. Process ntil small crumbs.
- Pour crumbs into bottom of baking dish. Press firmly. Bake for 30 minutes, until the edges of the crust are lightly browned. Cool for 30 minutes, then place in freezer while you make the filling.
For the cream cheese layer
- In a large mxing bowl, beat the cream cheese and powdered sugar together until smooth. Mix in lemon juice and lemon zest, then fold in the Cool Whip. Set aside.
For the pudding layer
- Combine the Instant lemon pudding mix with the milk in a mixing bowl. Whisk until it starts to thicken, about 2 minutes. Set aside.
Assembly
- Spread the cream cheese layer on top of the cooled crust. Spoon lemon pudding over the cream cheese layer. Finally spread the remaining 8 ounces of Cool Whip over the top.
- Cover the pan with plastic wrap and refrigerate for at least 4 hours, or overnight.
- Cut into slices and serve with lemon slices, or zest.
Notes
- Use homemade whipped cream instead of whipped topping for the cream cheese layer and topping. Whip 4 cups of cold heavy whipping cream and 1 cup of powdered sugar at high speed until stiff.
- Top with chopped pecans instead of lemon slices and zest.
- You’ll want to keep this dessert chilled as much as possible. Place it back in the fridge in between servings.
- Refrigerator: Cover the Lemon Lush with plastic wrap and store it in the refrigerator for up to 3 days.
- Freezer: Cover the dessert with plastic wrap and foil, to prevent freezer burn, and store it in the freezer for up to 3 months. Thaw overnight in the fridge before serving.
- You’ll want to make sure the crust is fully baked and cooled before adding the other layers. If the crust is still too warm, the layers may get melty.
- Make sure the cream cheese and powdered sugar are smooth and lump-free after mixing them.
- For more lemon flavor, add another tablespoon of lemon zest to the pudding layer.
- See blog post for more recipe tips and tricks.

I love deserts