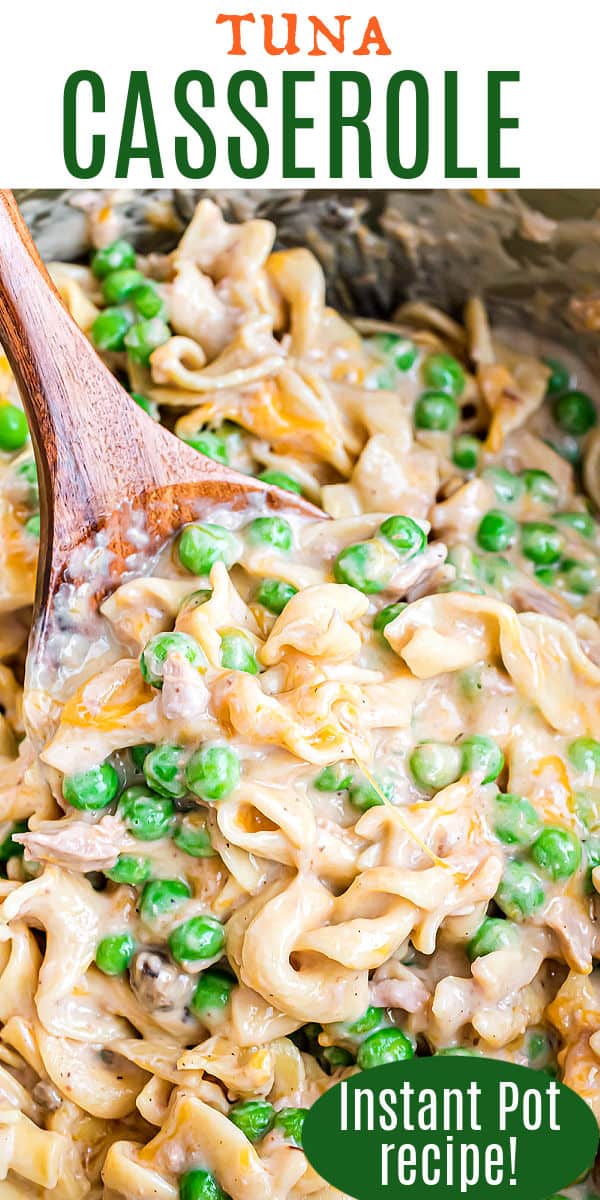
Instant Pot Tuna Casserole delivers a ton of home-cooked, delicious flavor. Even better, it’s super low effort. Layer the ingredients, and let your Instant Pot do the rest! In 20 minutes, you can have a filling, tasty, creamy tuna pasta that’s ready to serve.
Why this Pasta Works
I’ve always loved the mild and salty flavor of tuna casserole. Combine that with a creamy sauce and hearty noodles, and you’ve got a satisfying dinner.
In my view, the main problems with the classic family recipe have everything to do with the time, effort, and mess.
With this recipe, I wanted to capture that traditional American flavor while also eliminating the hassle and dirty dishes. The end result has been a great success.
Here are a few reasons why I think you’ll love my Instant Pot Tuna Casserole even more than the original:
- Fewer dishes! The whole dish comes together in stages right in the Instant Pot insert. So you can cook, assemble, and serve dinner right from the same bowl.
- Low hassle prep. You can use boxed chicken broth, frozen peas, canned tuna, and cream of mushroom soup. Purchase already prepped and prepared ingredients. This way, the recipe will be as effortless as possible without compromising taste.
- Kid-friendly! The tuna in this recipe is mild and not overly fishy. The creamy condensed mushroom soup also helps disguise the protein. It’s so good that even your tiny picky eater will finish their plate.
- It’s lightning fast. This recipe only takes 20 minutes. It’s so easy because you’re just layering prepared ingredients into the pot and allowing the device to do the rest. Set dinner to cook, and it’s ready to be served by the time you’ve set the table.
If you’re looking for more easy Instant Pot recipes, be sure to try our family favorite Instant Pot Hamburger Helper next!
Ingredient Notes
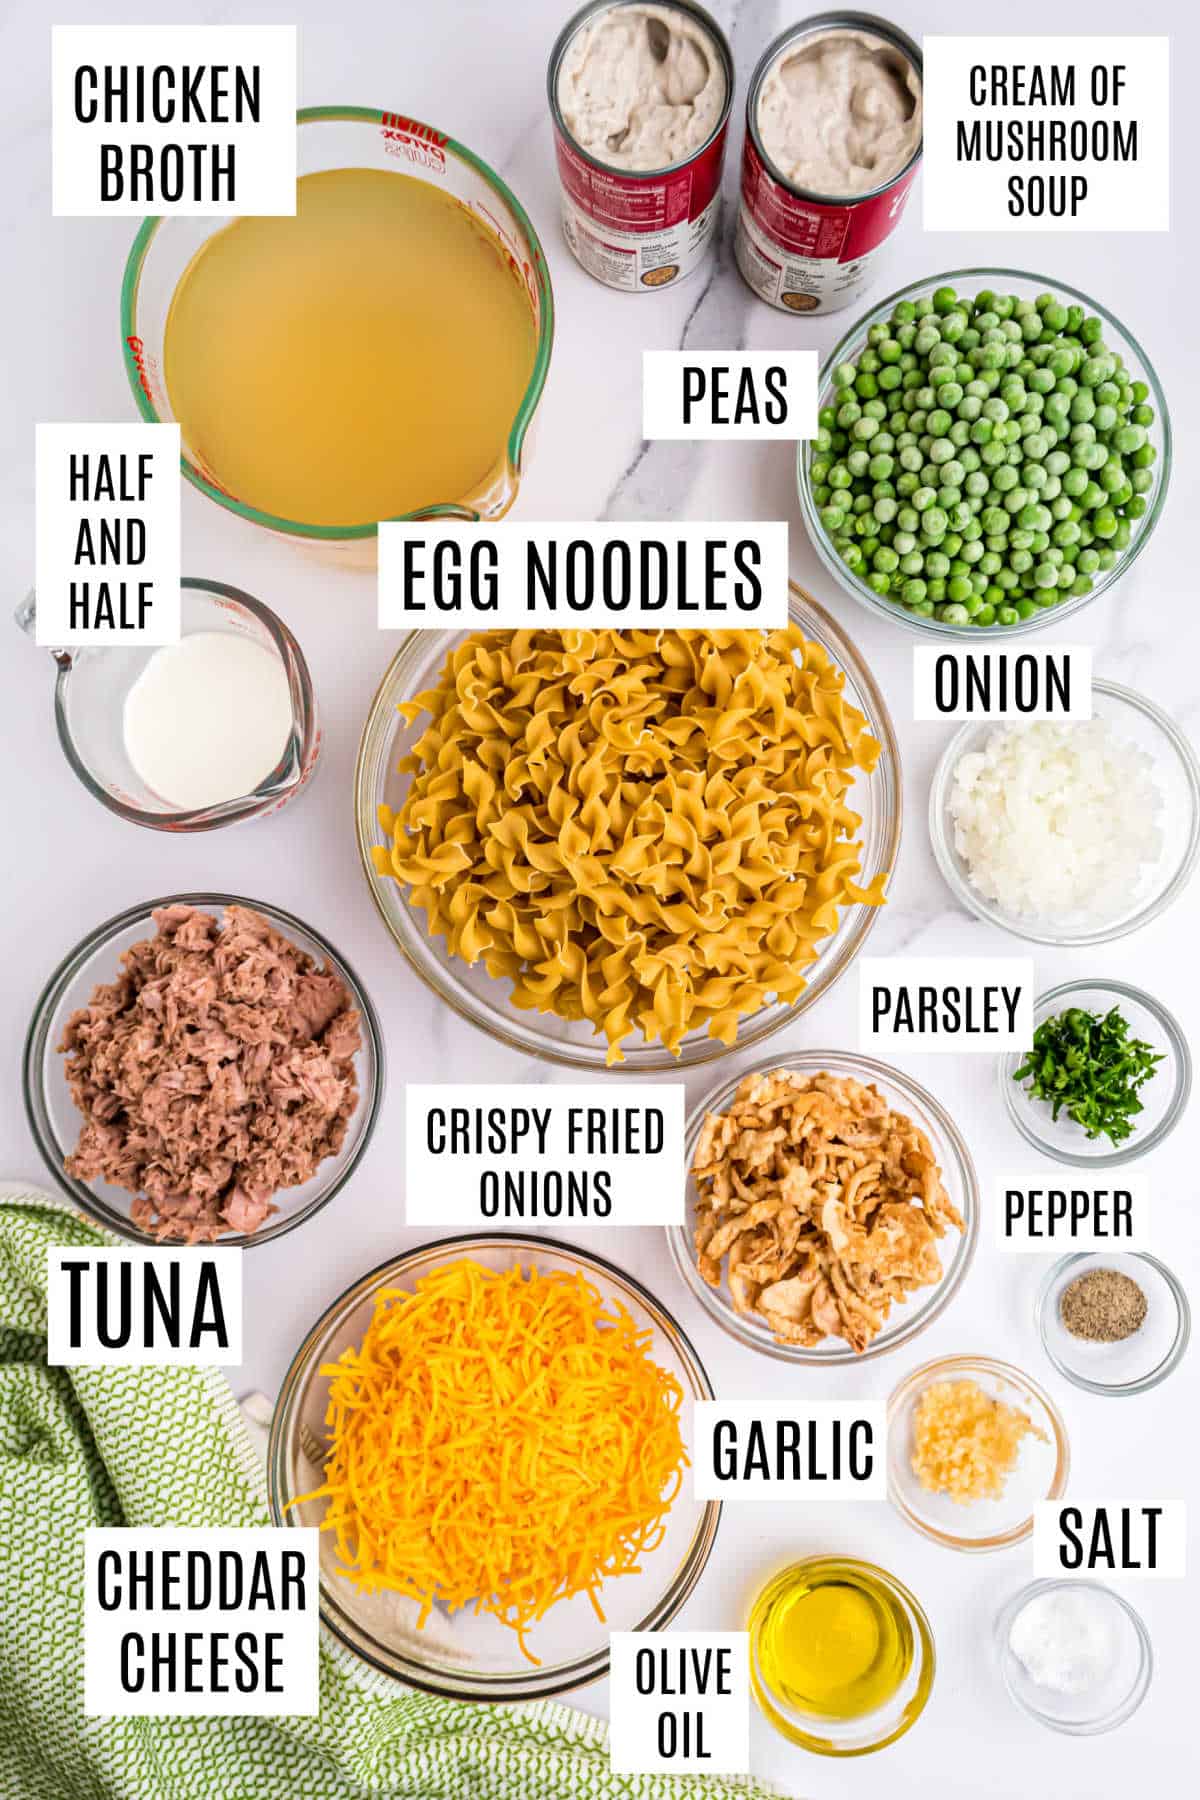
- Olive Oil
- Onion – Any variety of yellow or white onions works in this recipe.
- Garlic – Mincing fresh cloves yourself will give you the best flavor. But for the sake of convenience, you can use 3-tsp of the jarred, pre-minced kind.
- Salt & Pepper – I prefer Kosher salt since it’s less salty than iodized. And fresh-cracked black pepper adds a bold, spicy flavor. But if you only have table salt and ground pepper on hand, you can use that, too.
- Chicken Broth – To lighten the recipe, you could use 99% fat-free or sodium-free broth.
- Egg Noodles – I use wide egg noodles, but medium or extra wide will work, too.
- Cream of Mushroom Soup – Make sure that you grab condensed soup. The chicken broth will thin out the consistency with just enough liquid to cook the noodles.
- Canned Tuna – choose ‘in water’ vs ‘in oil’ for best flavor.
- Half-and-Half – could also use heavy whipping cream if desired.
- Peas – Using frozen sweet peas will cut down on your prep time.
- Cheddar Cheese – You can shred it yourself or buy the pre-shredded version for convenience.
- Crispy Fried Onions – My family loves the French’s brand, but you can use whichever kind you prefer. Trader Joe’s has an excellent alternative.
- Parsley – optional garnish, leave it out if preferred.
PRO TIP: Our family loves to swap out the crispy fried onions for a bag of crushed potato chips. Salty and crunchy and an affordable alternative.
Easy Instructions

This isn’t a super hands-on recipe. You’ll be building layers, not incorporating all of the ingredients together.
- Sauté your aromatics until they’re fragrant. Right in the Instant Pot, cook the onion and garlic in some oil until they’re soft and translucent. You know they’re releasing their flavors when you can smell the mouth-watering aroma.
- Deglaze the pot. Season with salt and pepper, and use the chicken broth to scrape up all the brown bits on the bottom of the pot. That’s where all the flavor is that you’ll want to incorporate into the dish.
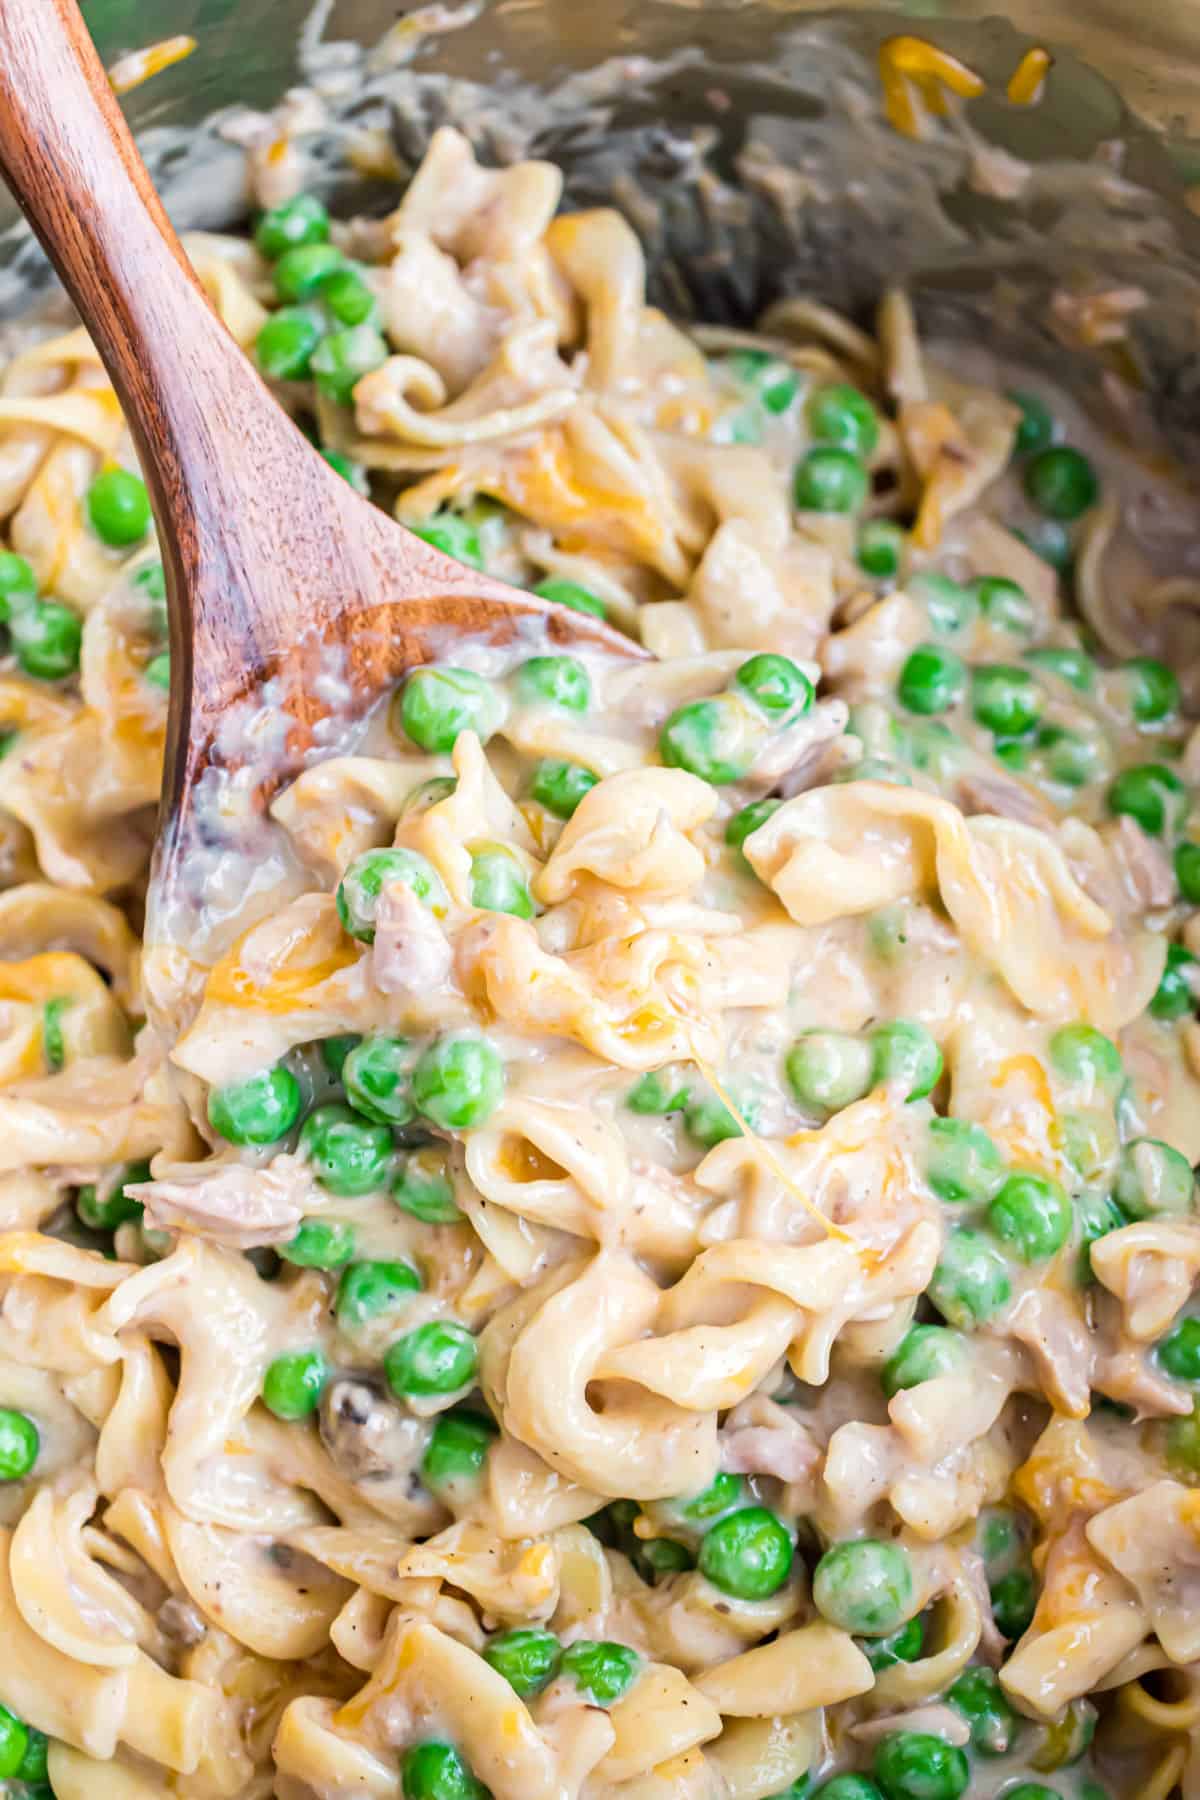
- Layer the casserole. The key to this step is to resist the urge to stir all the ingredients together. I know it’s tempting, but don’t do it! Start with a layer of uncooked noodles. Then, gently spread the condensed soup on top. Follow that with a layer of tuna, and slowly pour the half-and-half over top of everything.
- Set the Instant Pot and let it cook. Seal the device and set it manually to high pressure for 3 minutes. Once it’s finished cooking, you can perform a quick release.
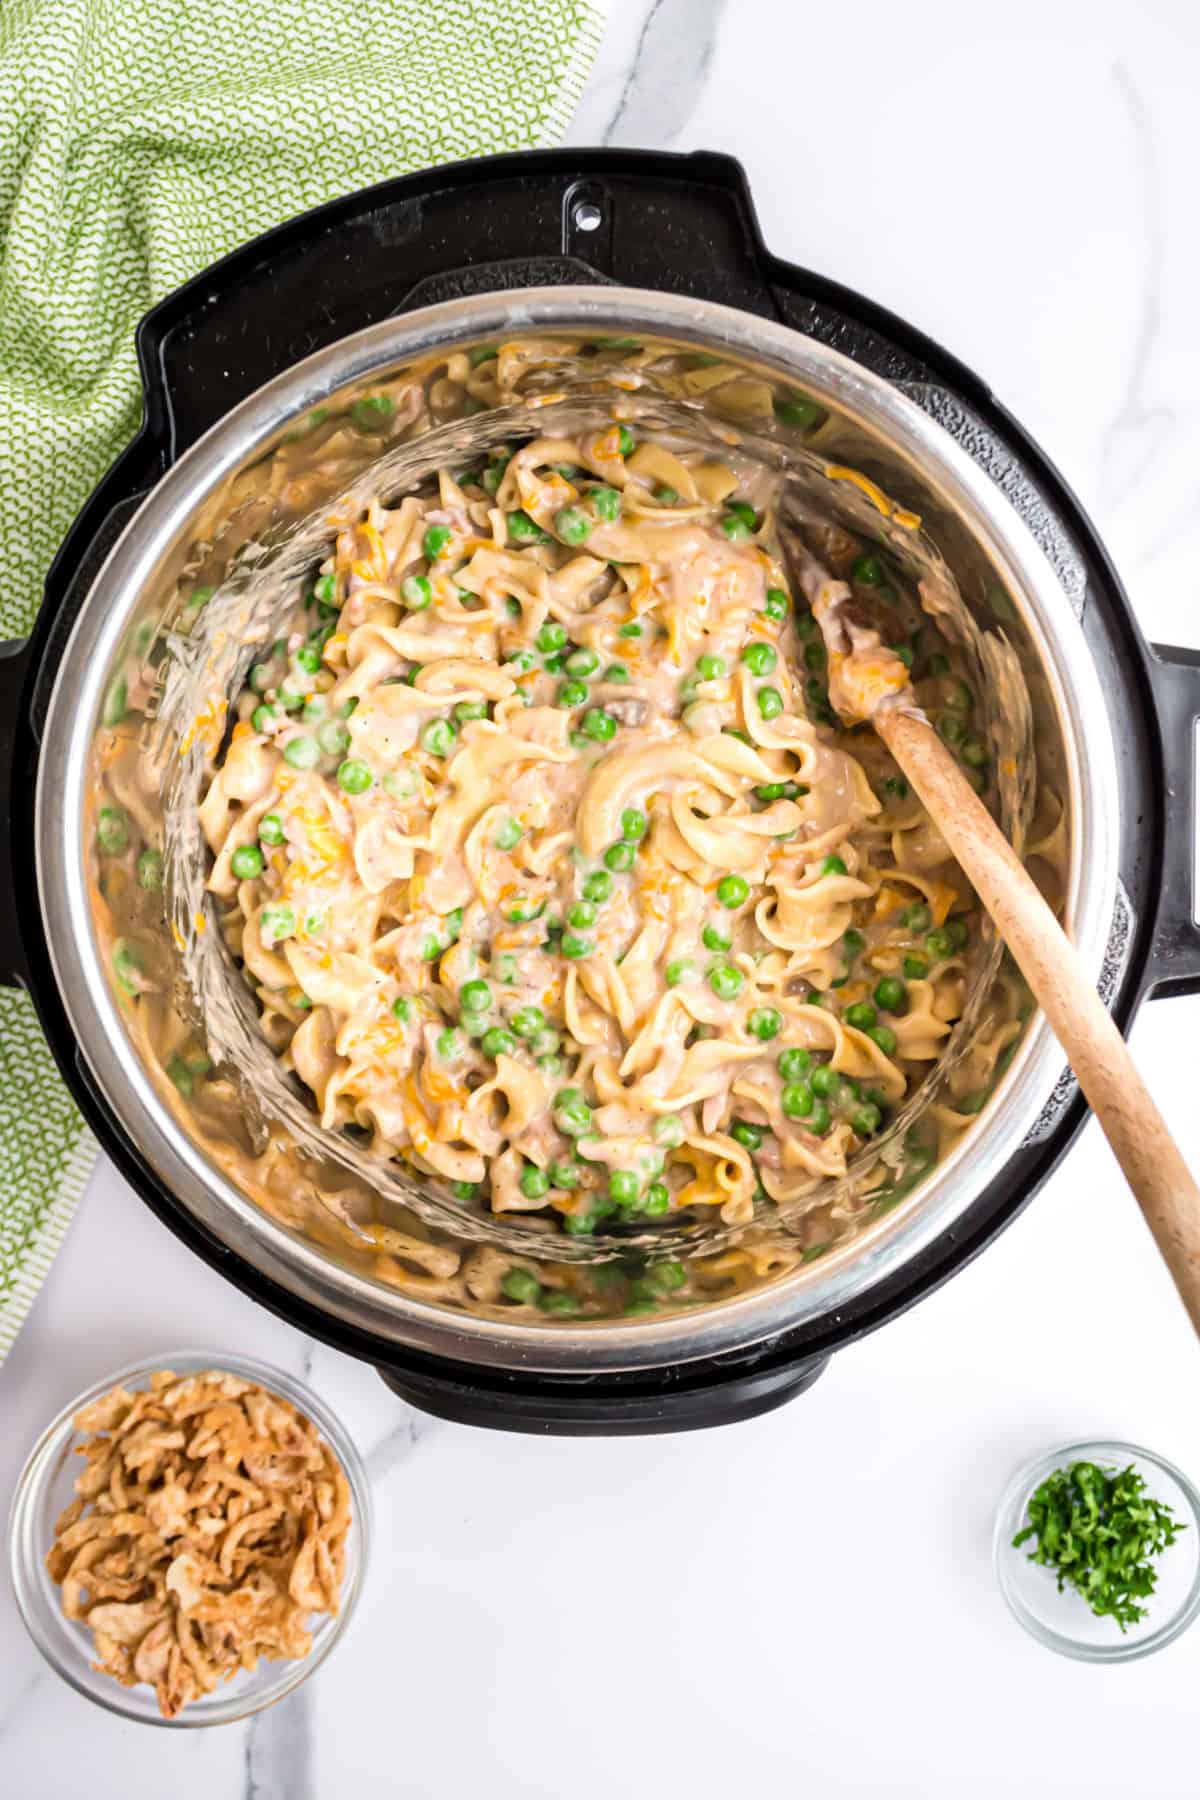
- Garnish and serve. Open up the lid, and add in the peas and shredded cheese. Give it all a thorough mix. Garnish with fried onions (or crushed potato chips) and parsley, and get ready to dig in!
Tips and Tricks
- Crispy fried onions add a rich, salty flavor and crunchy texture to the dish. If you want a more traditional flavor, use crushed Ritz crackers instead. Or try adding potato chip crumbles!
- Place a kitchen towel over the valve (tent it above the valve so it doesn’t actually touch or hinder the release). This helps to avoid tuna liquid from spraying all over your kitchen during the quick release.
- Let the casserole sit for 5 minutes or so before serving it to give the peas enough time to heat up.

Recipe FAQs
Store any leftover tuna casserole in an airtight container in the fridge for up to 3 days. Otherwise, you could freeze it, and it’ll keep for 3 months.
Tuna in water is the best choice for this recipe because it’s lighter and will easily flake into the pasta. Tuna in oil is heavier and will add too much greasiness and fishy flavor to the dish.
This recipe was tested and created in a 6quart Instant Pot. With all the layering there is no room to double the recipe.
With a few tweaks, yes you can. First, elimate the broth and cook the noodles before assembling. When assembling, thin the cream of mushroom soup with a little water. Add the peas to the soup mixture, layer and cover with foil. Bake in a 350 degree oven for about 30 minutes. Remove foil, add crispy onions, bake an additional 10 minutes.
More Instant Pot Dinners
- Juicy, and fork tender, these Instant Pot Pork Chops are delicious! Serve them with a mushroom gravy for some added flavor!
- Instant Pot Chicken Tacos are simple, spicy, and scrumptious! Made with salsa, the shredded chicken is juicy perfection!
- This low carb Instant Pot Crack Chicken Pasta dinner is packed with creamy cheese, ranch, and bacon!
- Instant Pot Bourbon Chicken is ready in under 30 minutes! Packed with flavor and faster than going to the mall food court!
- This creamy, chunky Instant Pot Broccoli Cheddar Soup is ready to eat in just 20 minutes!
Pin this now to find it later
Pin It
Instant Pot Tuna Casserole
Ingredients
- 2 Tablespoons olive oil
- 1 small yellow onion diced (about 1/2 cup)
- 3 cloves garlic minced
- 1 teaspoon kosher salt
- ½ teaspoon black pepper
- 32 ounce chicken broth about 4 cups
- 1 bag wide egg noodles, uncooked 12 ounce
- 2 cans cream of mushroom soup 10.5 ounce each
- 3 cans tuna (in water, drained) 6 ounce each
- ½ cup half and half
- 1 bag frozen sweet peas 12 ounce
- 2 cups shredded cheddar cheese
- 1 cup French’s crispy fried onions see notes
- 1 Tablespoon fresh parsley
Instructions
- Turn the Instant Pot on "SAUTE." Add olive oil and let it get hot (about 1-2 minutes). Add onion and garlic and cook for about 2-3 minutes, stirring with a wooden spoon.
- Turn Instant Pot off. Add in salt, pepper, and chicken broth. Stir and scrape the bottom of the pot with the wooden spoon to get all the cooked bits off (this is called deglazing and will help prevent a burn notice).
- Add the egg noodles on top and DO NOT STIR.
- Dump the cream of mushroom soup on top and DO NOT STIR, just spread gently over the top of the noodles.
- Top the soup with the tuna and DO NOT STIR. Pour the half and half over the tuna slowly and DO NOT STIR.
- Put the lid on the Instant Pot and make sure the valve is set to "SEALING." Turn on high pressure (manual) and a cook time of 3 minutes. The pot will take at least 10 minutes to come to pressure.
- When the cook time ends, you will do a quick release of the pressure by turning the valve to "VENTING." To prevent liquid from spraying all over my kitchen, I hold a kitchen towel about the valve, tenting it so there is enough room for the release of air.
- When the pin drops, open the lid and stir the contents inside. Stir in the peas and shredded cheese. Allow to sit for 5 minutes before serving (this gives the peas a few minutes to heat up).
- Serve with fried onions and fresh parsley.
Notes
- For the topping, we loved the flavor the crispy fried onions gave this dish. If you want a more traditional version, swap it out for about 10 crushed Ritz crackers. My family will also use crushed potato chips to add a salty finish.
- The key to not getting a burn notice is to NOT STIR where directed. This will ensure even cooking.
- Place a kitchen towel over the valve (tent it above the valve so it doesn’t actually touch or hinder the release). This helps to avoid tuna liquid from spraying all over your kitchen during the quick release.
- Let the casserole sit for 5 minutes or so before serving it to give the peas enough time to heat up.


Could this be made in an old fashioned pressure cooker? It sounds delicious, but I don’t have an instant pot, and really don’t want one. My kitchen is TOO small for any more gadgets. If not, I’ll try the oven method.
Where are you still finding 6 oz cans of tuna?
Was wondering the same.