
Rich and elegant, Creme Brulee is a crowd-pleasing dessert. A crunchy caramelized sugar topping with a silky vanilla custard and only 6 ingredients.

Aimee’s Best Tips
- Cover the top of the creme brulee COMPLETELY with sugar or you may result in curdled custard after heating with a torch.
- Add liqueur. Adding a Tablespoon of a citrusy liqueur like Cointreau or Grand marnier is a delicious touch!
- Save the leftover vanilla bean when you remove it from the cream. Use it to make vanilla sugar!
- Don’t forget the garnish. Feel free to experiment with different flavors. From a sprinkles of espresso powder to fresh berries, mint sprigs, and whipped cream.
If there’s any dessert that will make you feel fancy, it’s creme brulee. It’s truly one of my favorite desserts to order in a restaurant.
But don’t be intimidated by this recipe, because it looks and tastes far more complicated than it is!
Here’s why my creme brulee recipe is a keeper,
- Easy to follow recipe. In contrast with the fancy outcome, the instructions for this one are exceptionally clear and easy to follow.
- Basic Ingredients. You only need 6 ingredients to make this elegant dessert.
- Stunning. The presentation of the crunchy caramelized sugar topping is hard to beat. It’s the perfect “statement” piece for special occasions, date nights, or dinner parties.
Only 6 Ingredients
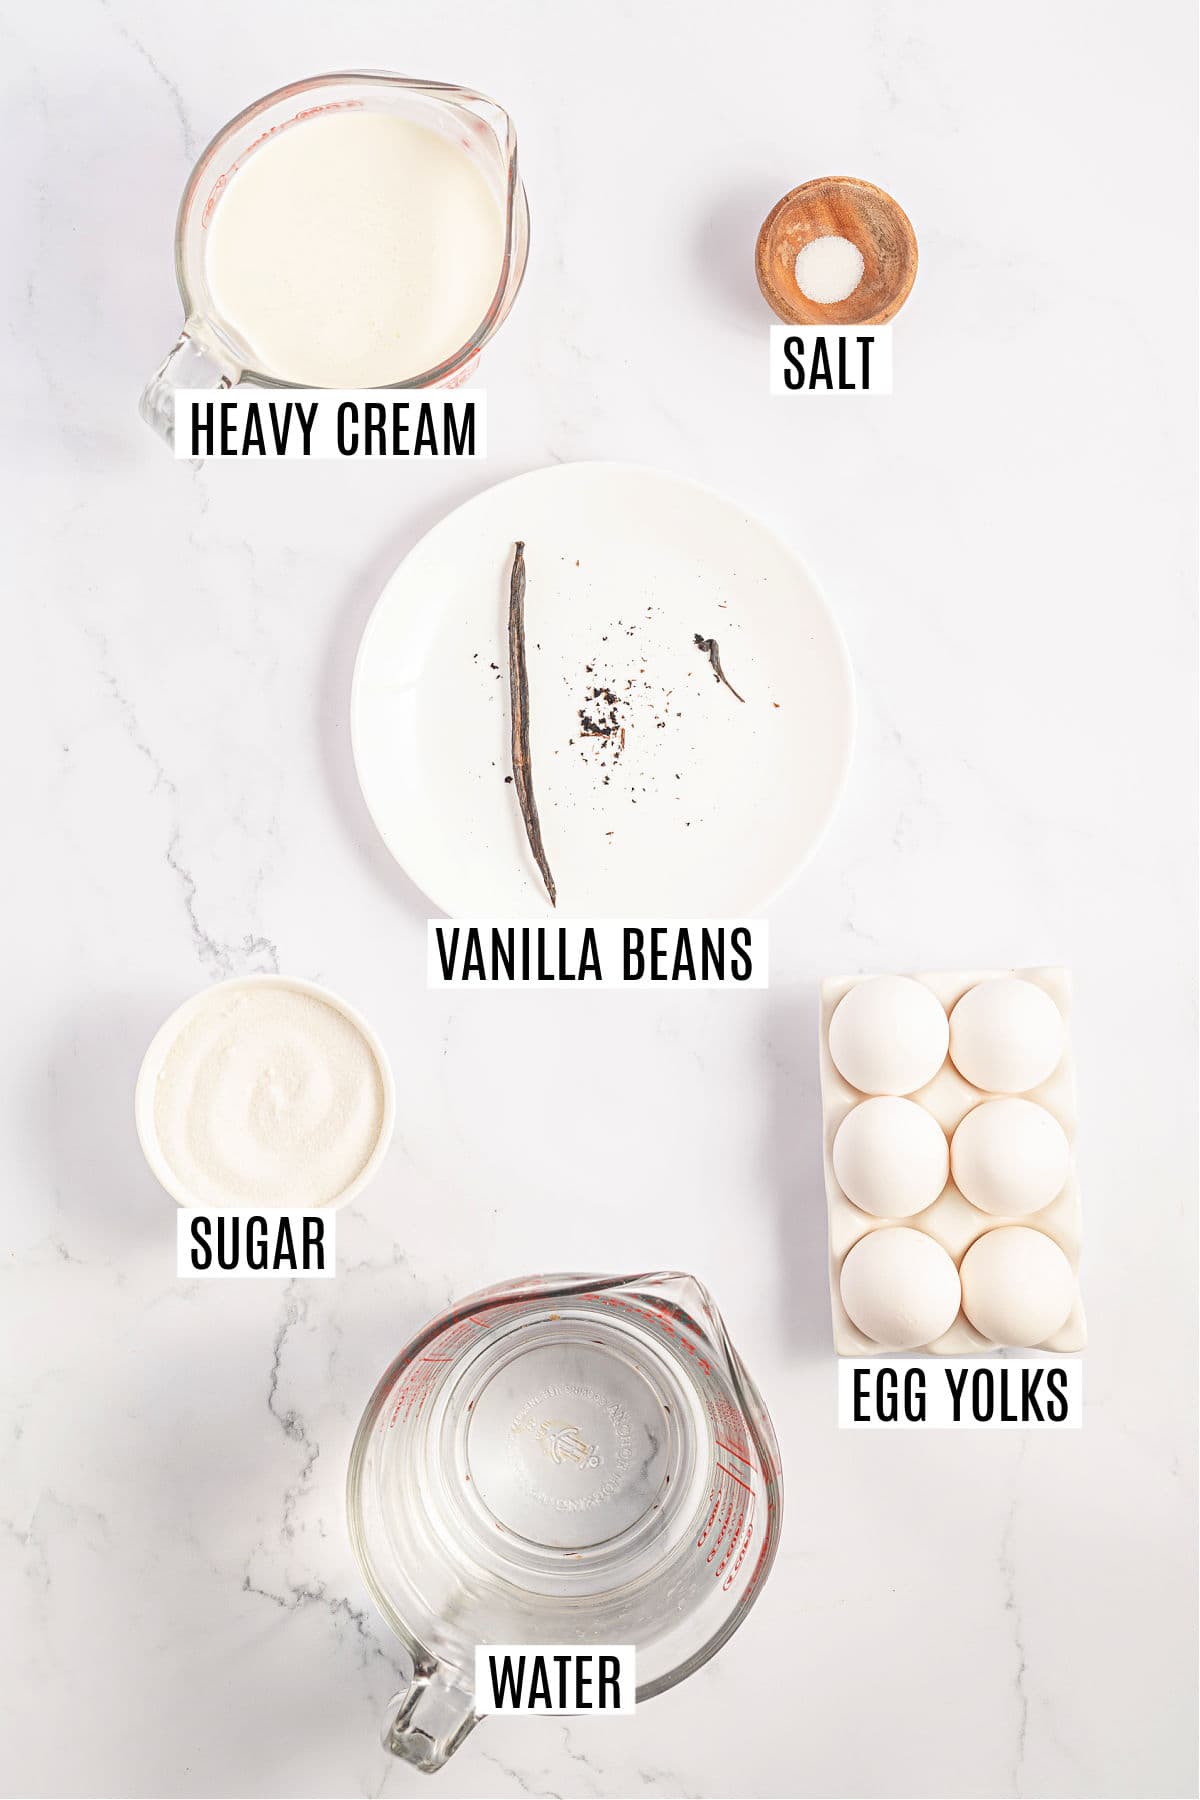
Six ingredients is all you need to make creme brulee at home. You’ll also want to pick up our favorite kitchen torch too on Amazon!
- Heavy Whipping Cream – Creates the first half of the custard base. Be sure to use heavy cream. Regular milk simply won’t deliver the result you want.
- Vanilla Bean – Real vanilla beans make this custard extra flavorful. Save the beans along with the scraped filling to steep with the cream. You could also use vanilla bean paste. In a pinch, vanilla extract will work, but it won’t give you that richness you crave.
- Egg Yolks – These add richness and a golden color, in addition to helping the custard to thicken up and set properly. Save the egg whites to make meringue cookies or a batch of white cupcakes!
- Granulated Sugar – Sweetens the creme brulee and is also used for the crunchy sugar topping.
- Kosher Salt – Brings out all the flavors and balances the sweetness.
- Boiling Water – This is for the water bath that the custards get baked in, making sure it stays soft and creamy as it cooks through.
How to Make Creme Brulee
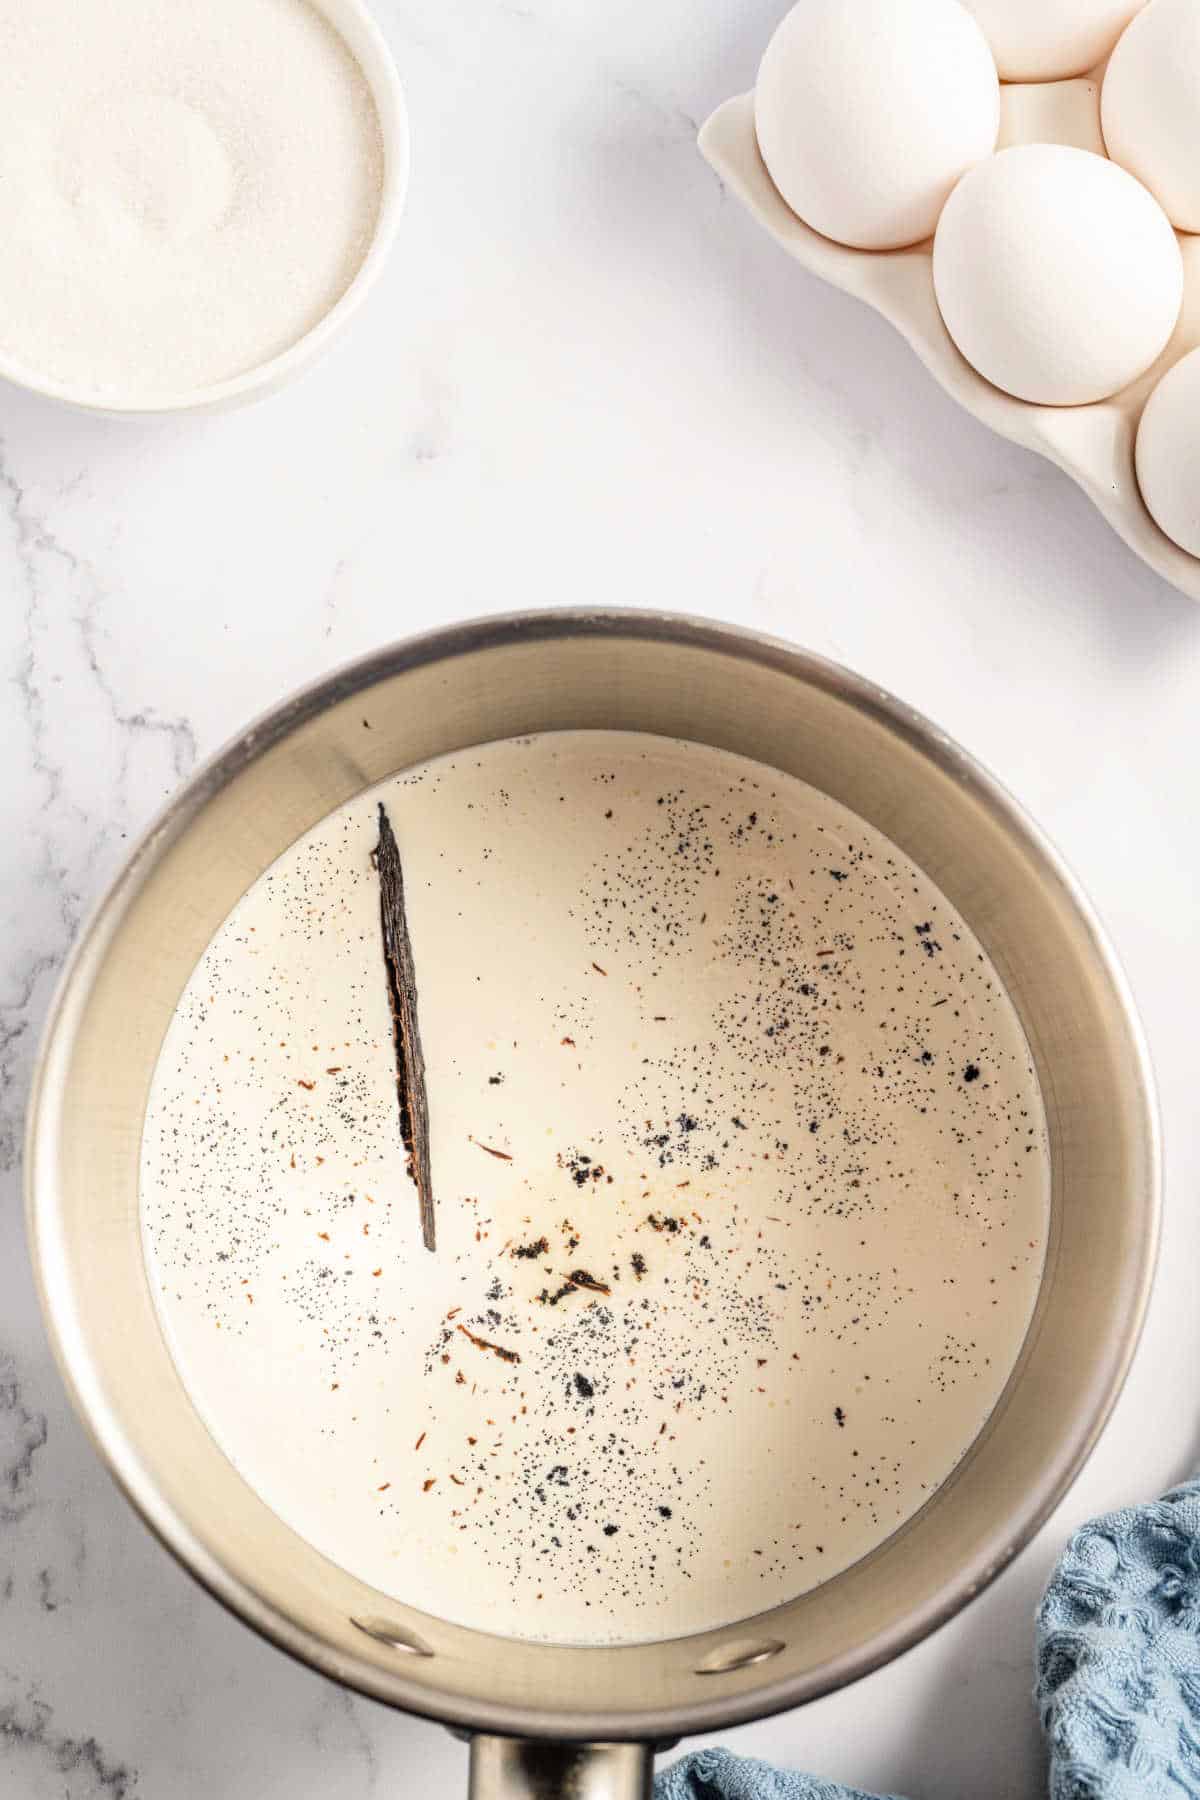
Scald and steep the cream.
- In a small saucepan on medium heat, warm the heavy cream, vanilla beans, and vanilla pulp.
- Heat until the cream bubbles just around the edges, then turn off the heat and cover.
- Let sit for 5 minutes, then remove the vanilla bean.
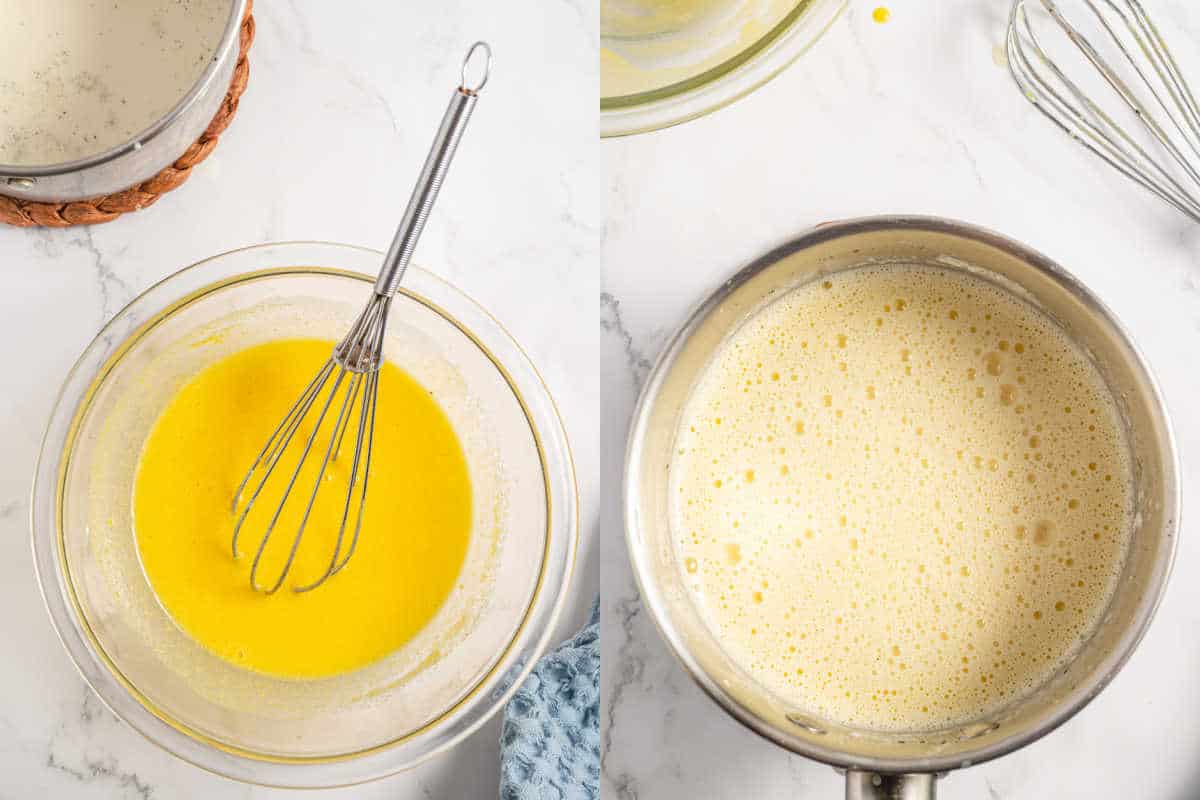
Temper the eggs.
- This process is easy, and is done so the end result isn’t a bunch of scrampble eggs.
- By tempering the eggs you raise the temperature of the egg yolks slowly by adding in the warm cream (slowly).
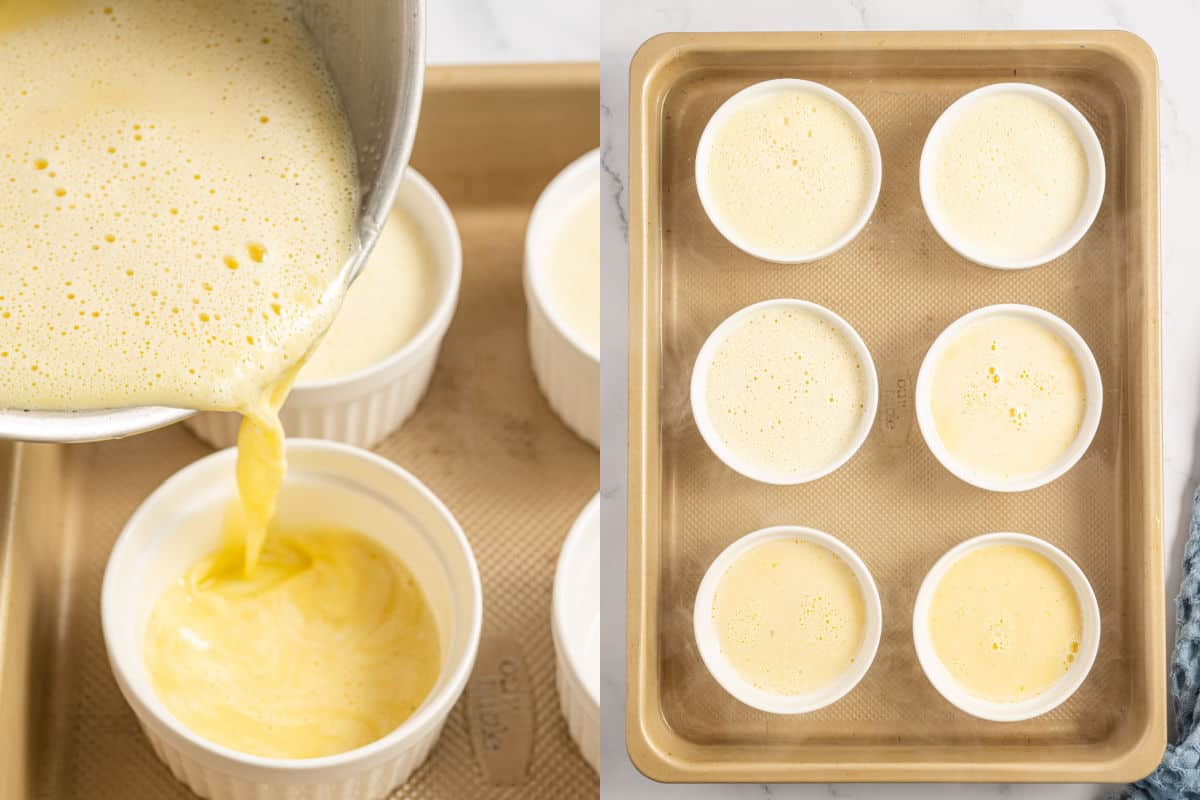
Fill the ramekins.
- Divide the custard base between the ramekins. Choose shallow ramekins for even baking.
- Carefully pour boiling water into the baking dish until it comes halfway up the outsides of the ramekins.
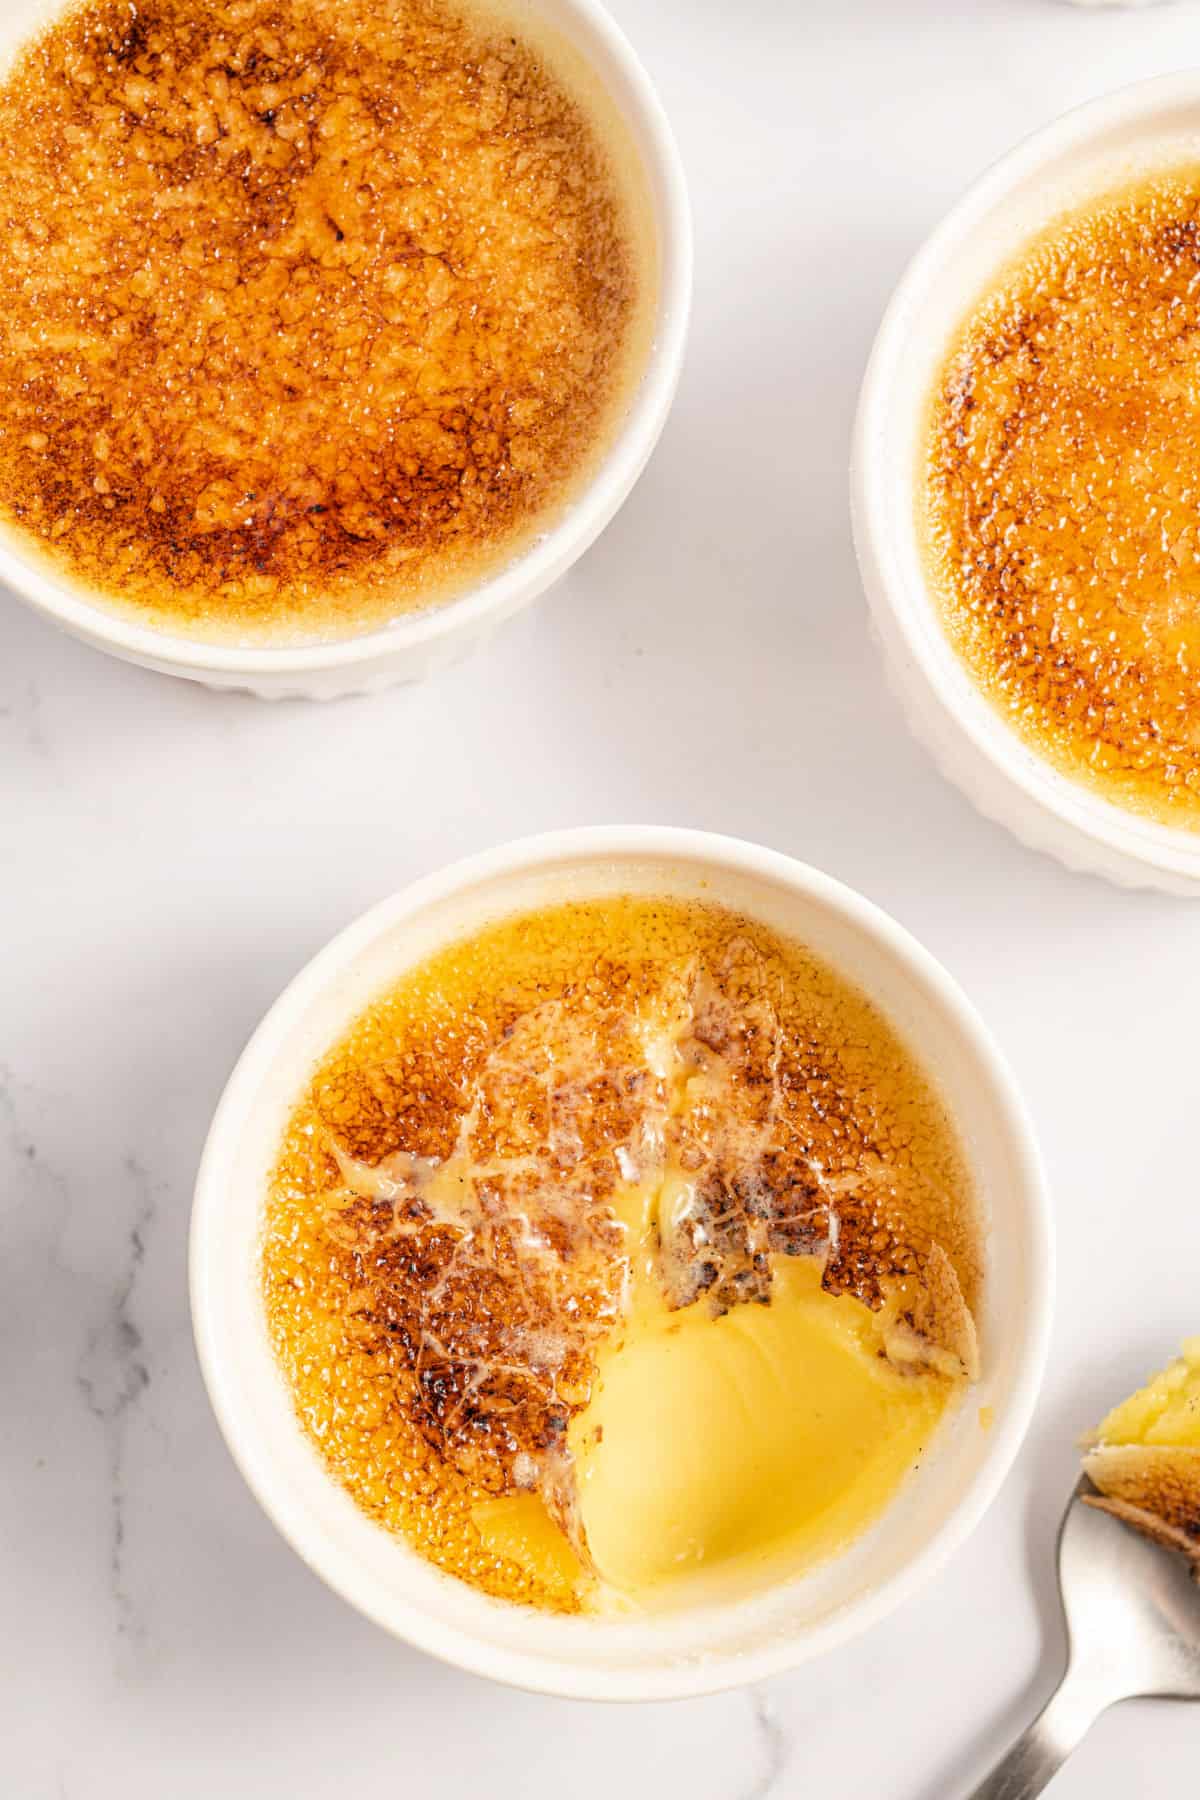
Bake and cool. Bake the creme brulee for 40-45 minutes. Look for golden edges and slightly jiggly centers. Let cool to room temperature, then cover with plastic and chill for at least 4 hours or overnight.
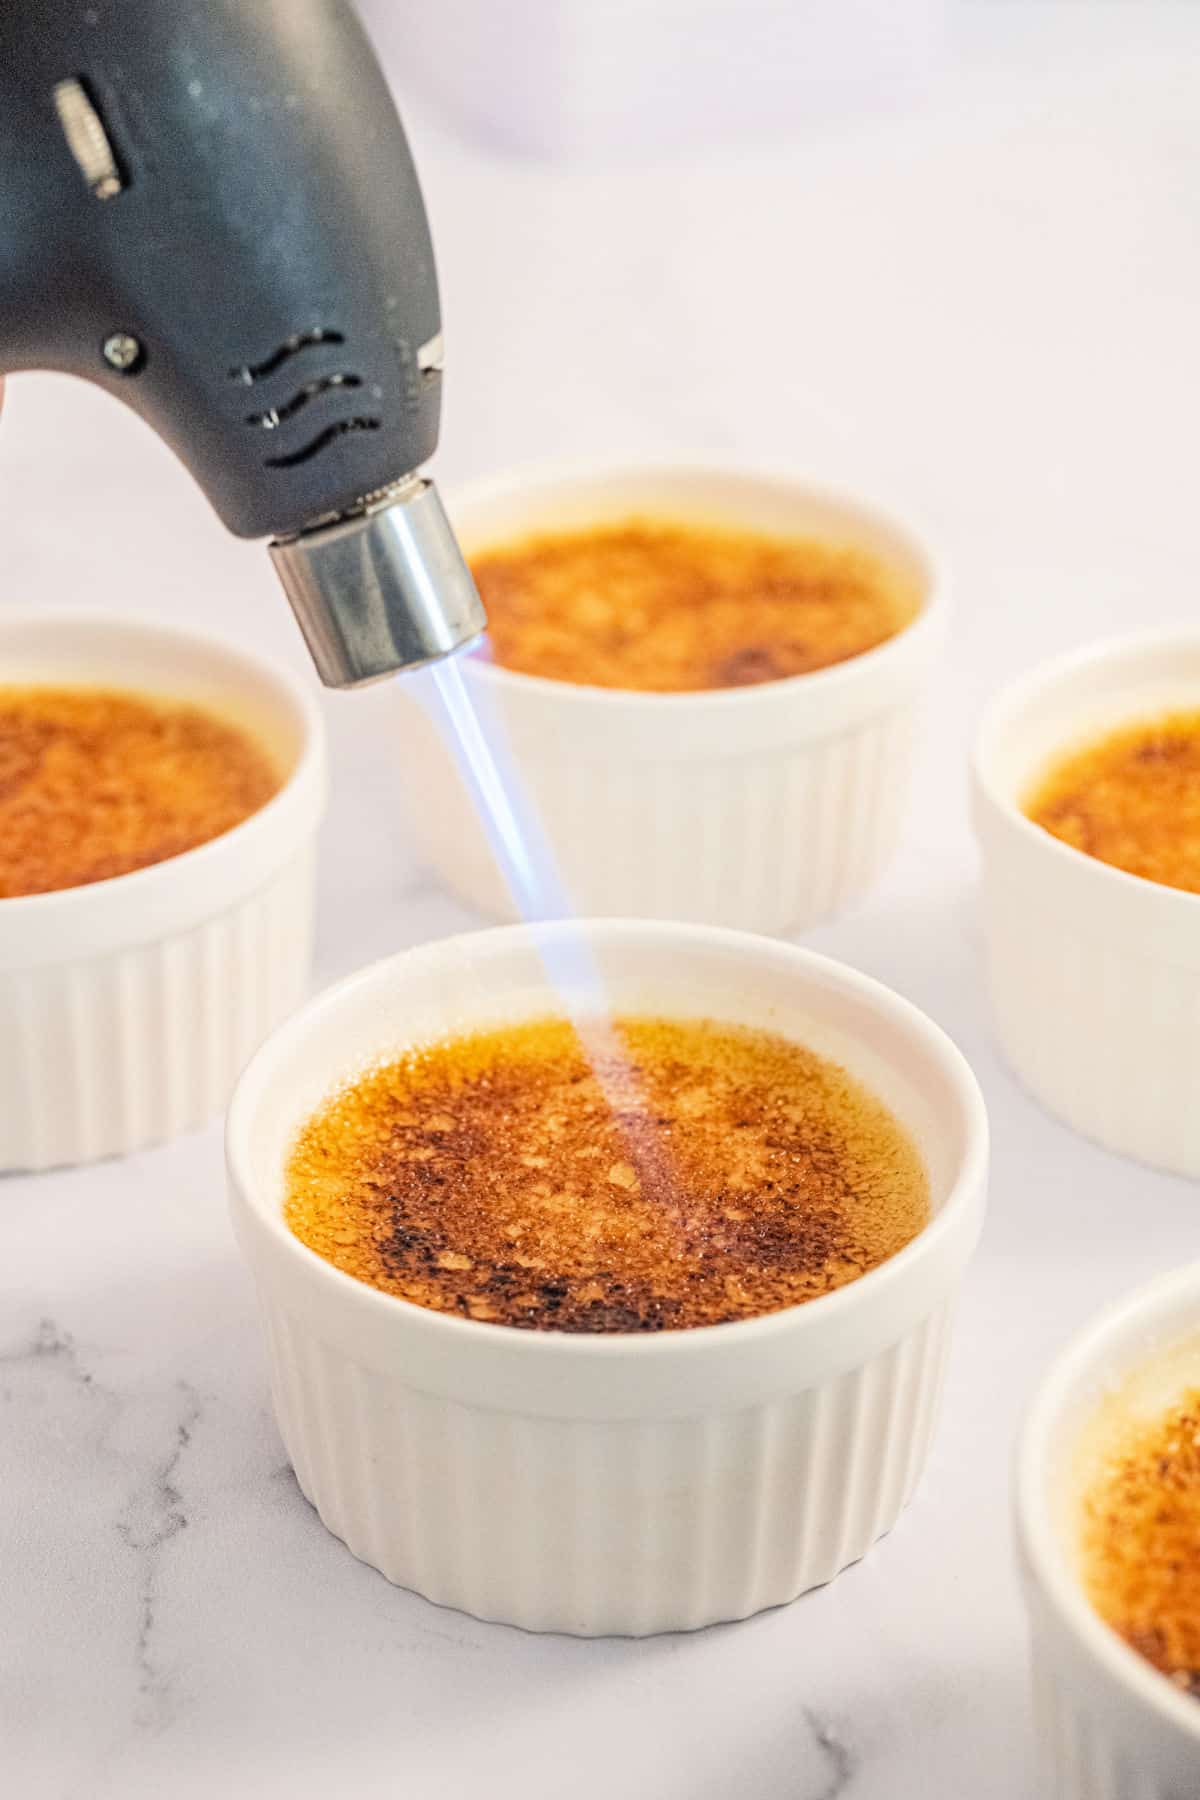
Torch. Before serving, sprinkle sugar evenly on top of the custard. Use a kitchen torch to caramelize the sugar. Let sit for 2-3 minutes, then garnish and serve immediately.
Recipe FAQs
Yes. If you don’t have a kitchen torch, you can use your oven’s broiler instead. Place the sugared ramekins on a sheet tray and place under the broiler, turning every 20-30 seconds until they’re caramelized.
Yes. Be aware that vanilla extract may make the custard slightly less thick, and it won’t give those beautiful flecks of vanilla in your creme brulee. Use 1 teaspoon of vanilla extract to replace 1 inch of vanilla bean (for a 4-inch vanilla bean, use about 1 Tablespoon of extract).
If your custard has clumps in it, that may be because the hot cream was added too quickly to the eggs. If this happens, run the custard through a fine-mesh sieve to remove the chunks. This ensures you’ll have a nice, smooth texture.
More Easy Desserts
- I love creamy custard desserts. And readers can’t get enough of my easy rice pudding with it’s creamy texture.
- Or try this lemon chiffon pie for an old fashioned pie treat.
- My coconut cream pie recipe is a classic, and packed with flavor.
- Be sure to whip up a batch of my easy drop sugar cookies, and for extra flavor try these red hot cookies loaded with chewy cinnamon candies.
Pin this now to find it later
Pin It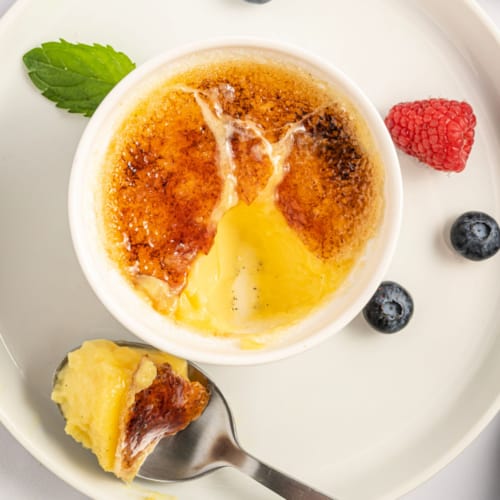
Creme Brulee Recipe
Ingredients
- 2 cups heavy whipping cream
- 1 vanilla bean, scraped
- 6 large egg yolks room temperature
- ¾ cup granulated sugar, plus 4 Tablespoons for topping
- ¼ teaspoon kosher salt
- 4 cups boiling water
Instructions
- Preheat oven to 325 degrees F. Place 6 (4-ounce) ramekins in a 13×9 baking dish (or deep lasagna pan). Set aside. Boil the water needed for after making the custard (keep it boiling and ready to use).
- Pour heavy whipping cream into a small saucepan along with the vanilla bean and the scrapings. Heat over medium heat until the cream starts to simmer around the edges of the pan.
- Turn off heat and cover the saucepan with a lid. Let the cream sit for 5 minutes. Remove the vanilla bean (and discard).
- In a mixing bowl, whisk the egg yolks, sugar, and salt together. Pour in about 1/4 cup of the hot cream, whisking the entire time (this is called tempering the eggs).
- Pour the egg mixture into the saucepan, whisking the entire time.
- Divide the custard mixture between the six ramekins. Pour the boiling water into the baking dish, without getting water into the ramekins. The water should come up about halfway up the ramekins.
- Bake creme brulee for 40-45 minutes, until golden around the edes, but still a little jiggly in the middle. Let the creme brulee cool to room temperature, then cover with plastic wrap and chill for at least 4 hours (or overnight).
- When ready to serve, sprinkle 2 teaspoons of granulated sugar evenly on top of each ramekin. Use a kitchen blow torch to caramelize the topping. Let rest for about 2-3 minutes, then garnish with berries, if desired, and whipped cream. Serve immediately.
Notes
- Swap out granulated sugar with our homemade vanilla sugar for an even richer treat.
- If using vanilla extract, you’ll need about 1 Tablespoon. Mix it into the cream AFTER heating.
- Storage: cover creme brulee with plastic wrap and keep in the refrigerator for up to 3 days. Serve within 2 hours after caramelizing the top.
- Freeze: be sure to freeze BEFORE adding the caramelized topping. Cover with plastic wrap, then foil. Freeze for up to 1 month. Thaw overnight in the refrigerator.
- Creme brulee can be made in advance (without the topping) about 48 hours ahead of time. This makes it the perfect party dessert!
- Pick up our favorite kitchen torch on Amazon for under $20!
- See blog post for more recipe tips and tricks.

Fantastic, so creamy. I have never used a vanilla bean before, and what a difference it makes in taste. Thank you so much.
How much bean paste do you use instead of pod?
I would do 1 Tablespoon.
I want to make small ones for my tea party tray. How long would I bake in small ramekins?
Depending on the size, you could cut baking time in half and then keep an eye on them!
How can I still achieve the browned sugar topping without a kitchen torch?
As noted in the blog post you could use an oven broiler 🙂