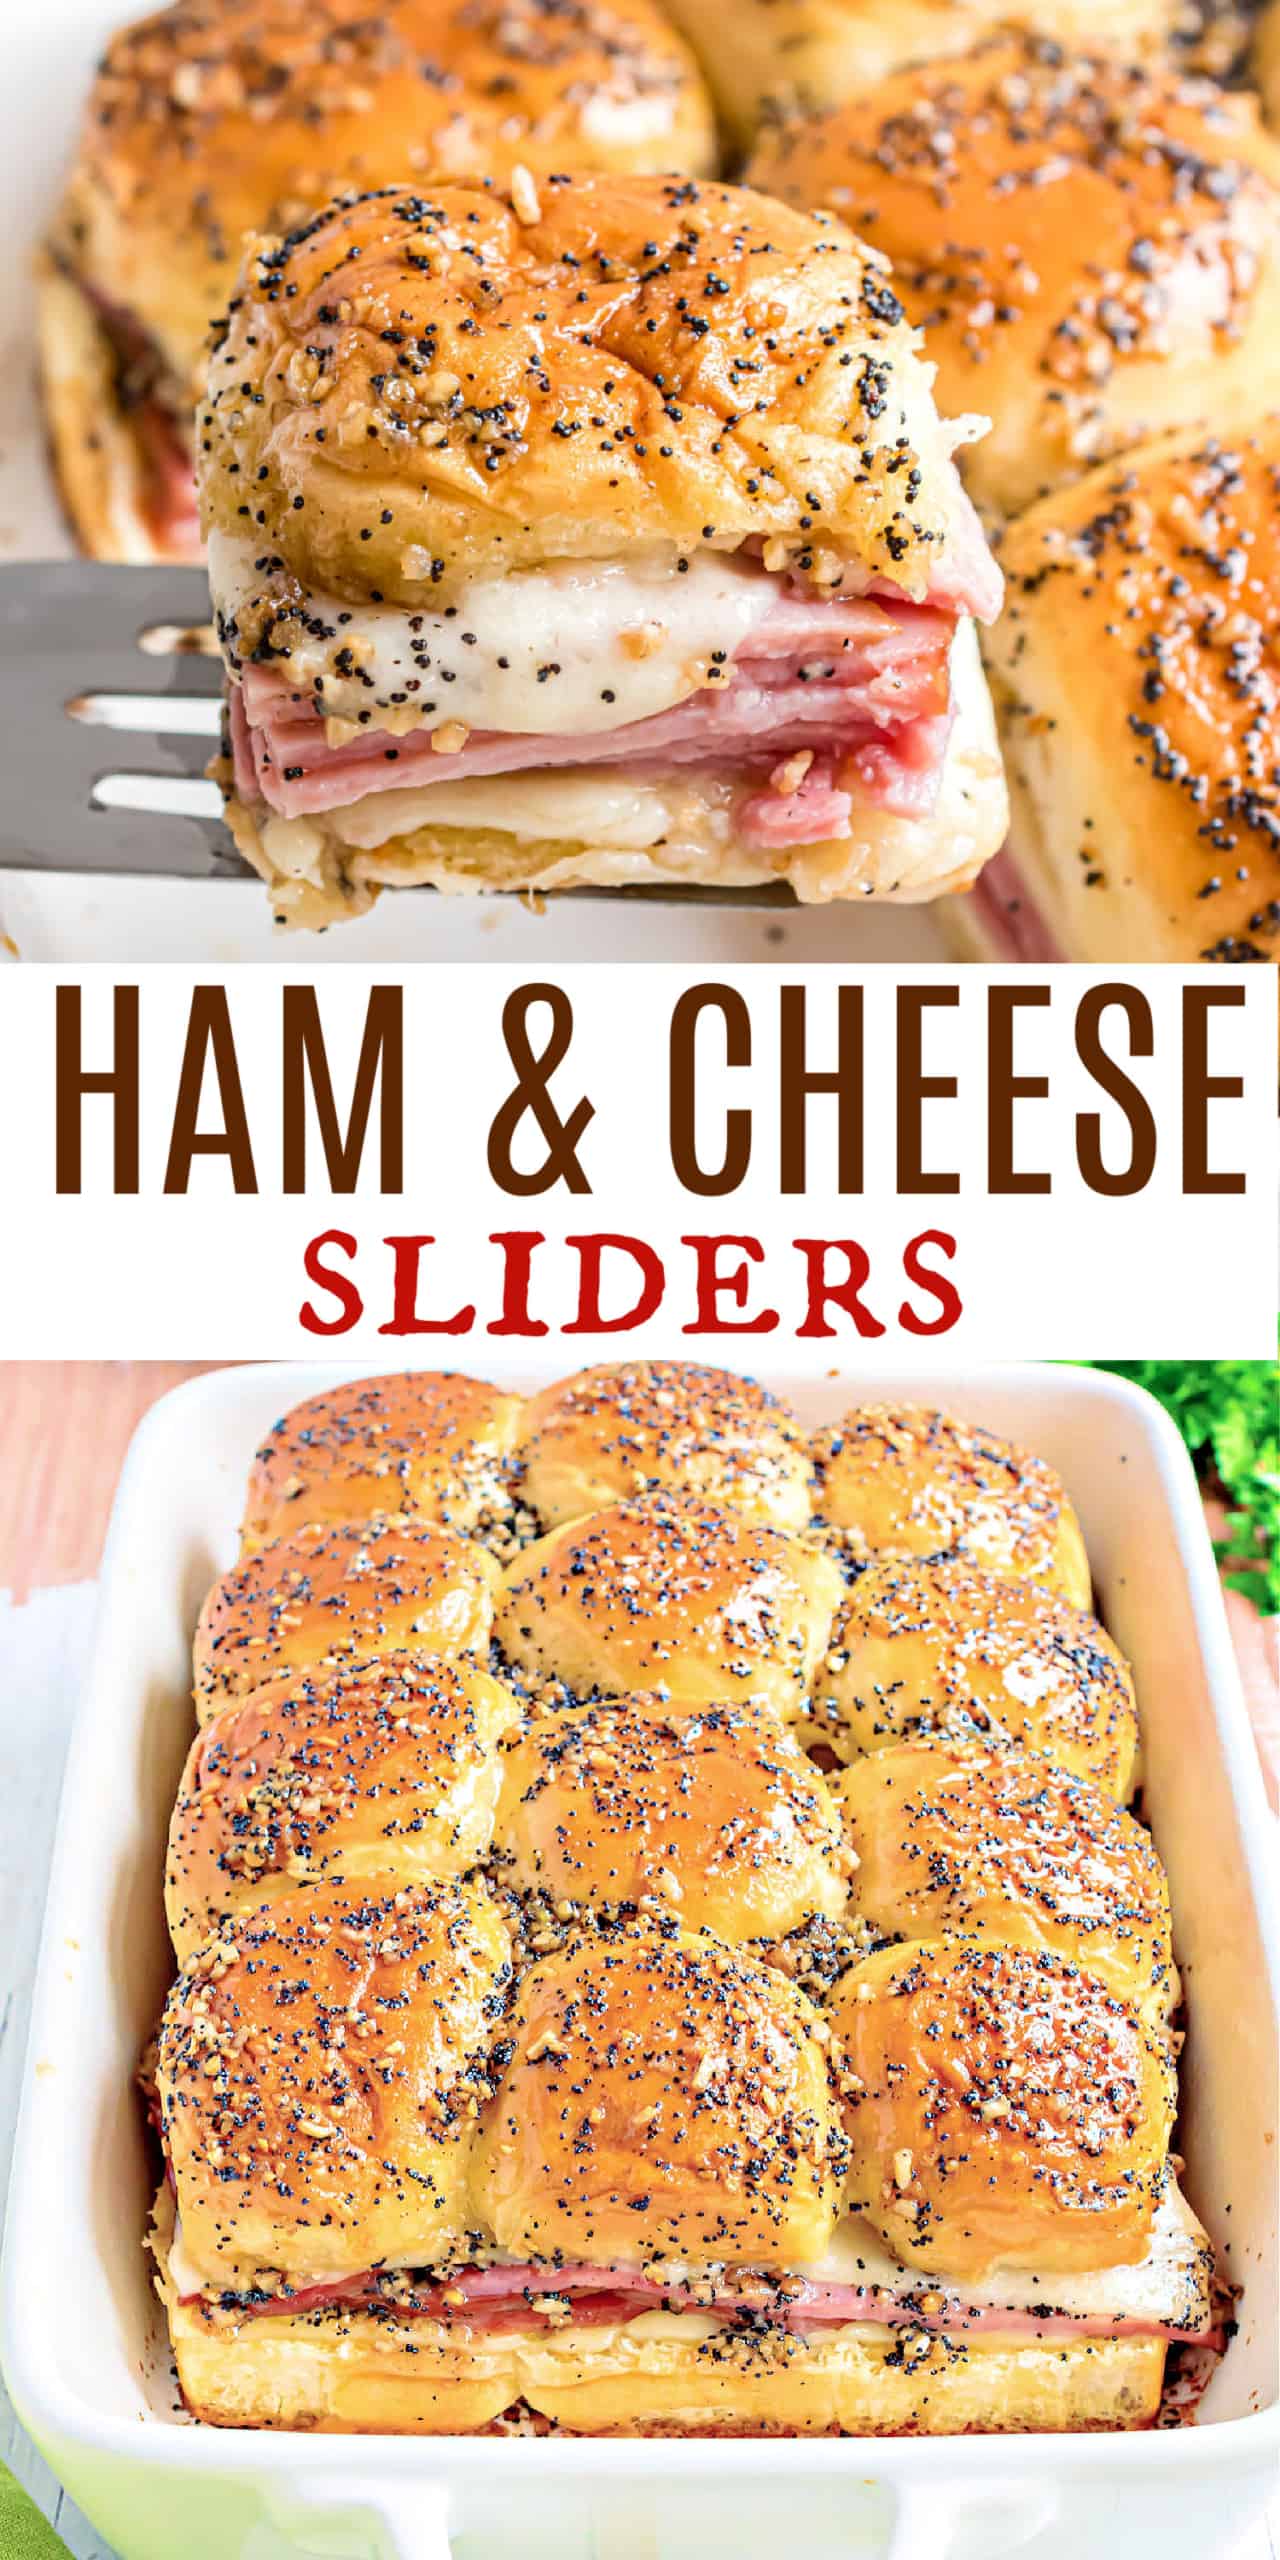
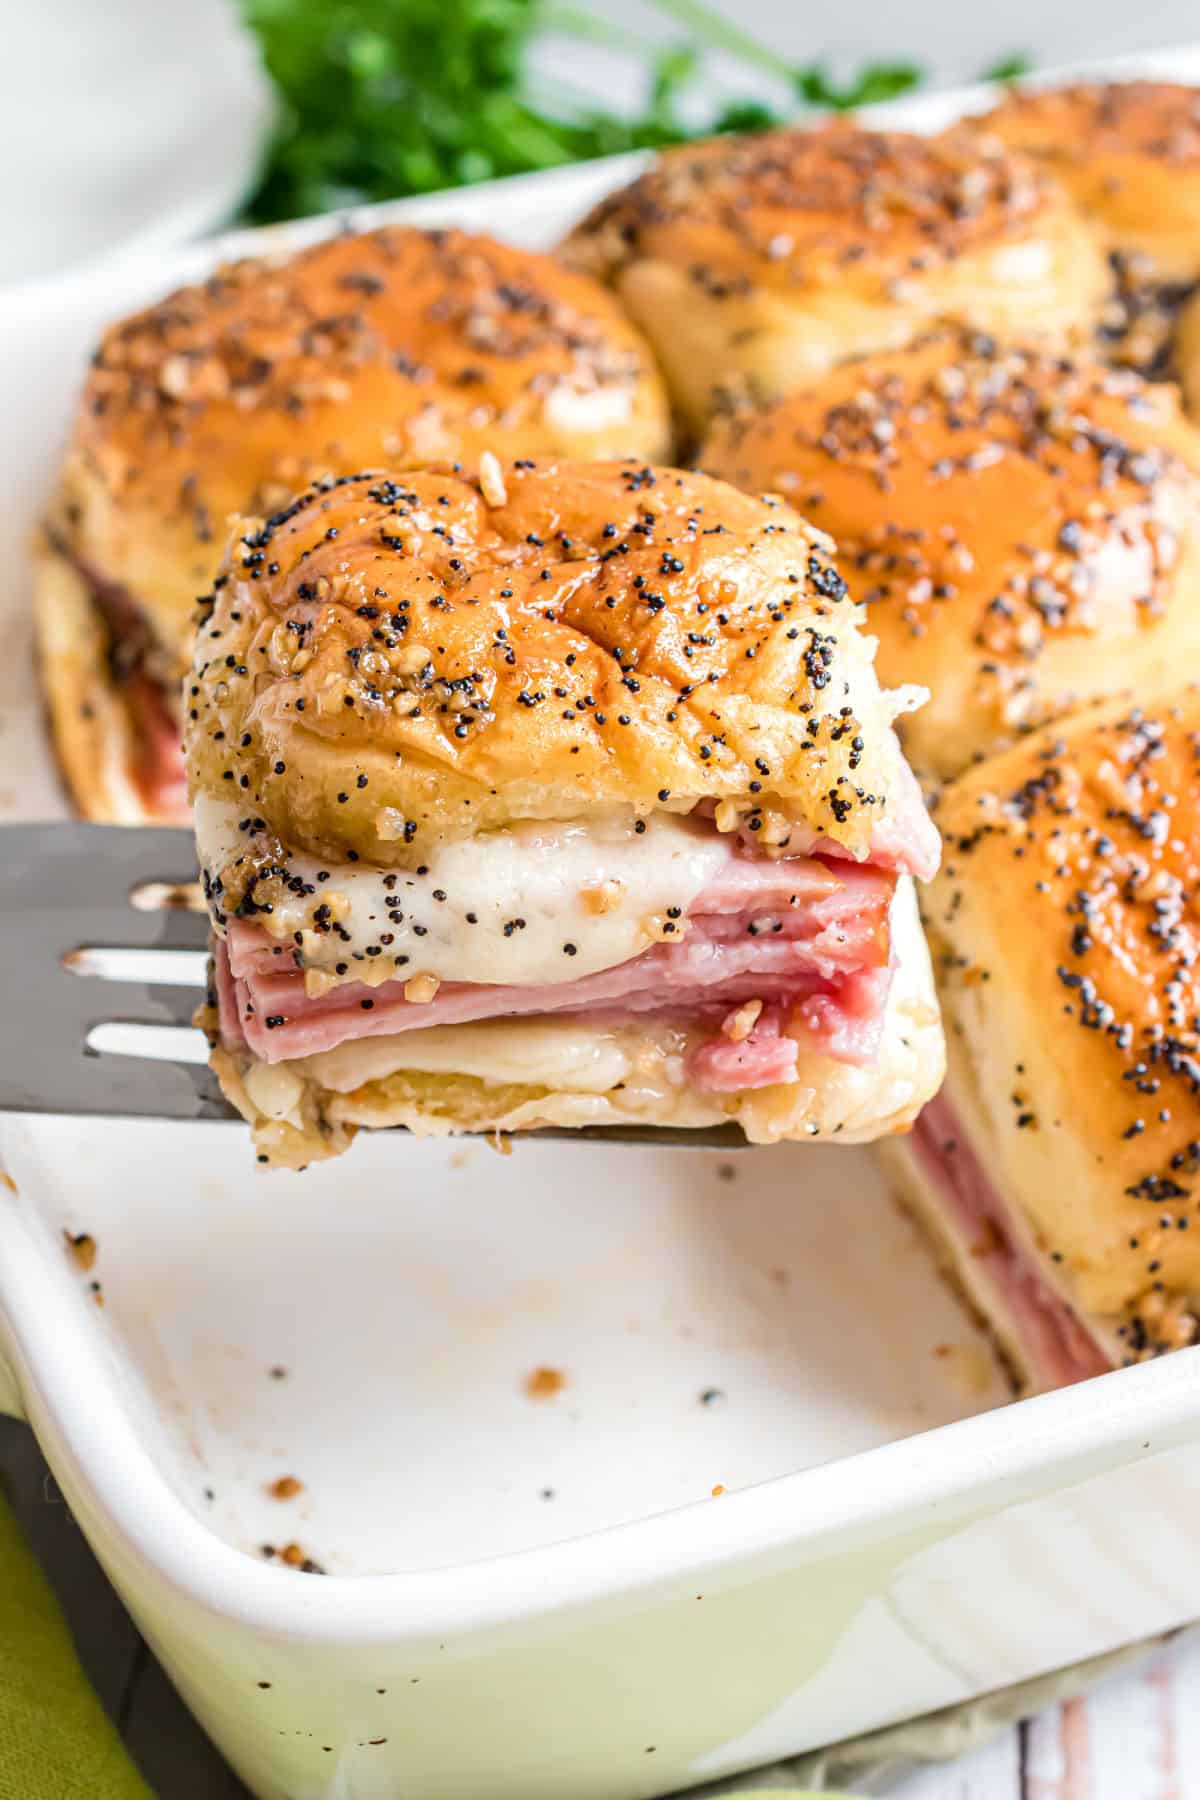
Ham and Cheese Sliders are perfect for game day or any day of the week! Savory ham and Swiss cheese are piled onto fluffy Hawaiian rolls for an irresistible handheld snack.
Putting together sliders for dinner is my super power. It’s something my kids request often and I love them too. Experiment with the cheese and meat for an easy twist.
Aimee’s Recipe Notes
- Taste: Savory with layers of melted cheese, smoky ham, and buttery sweet rolls.
- Texture: Soft, gooey, and buttery with slightly crisp edges from baking.
- Ease to Make: Quick and easy, perfect for parties or a simple dinner.
- Cooking Method: Baked in the oven until golden and bubbly.
- Top Tip: Brush the rolls with the butter mixture for added flavor and a golden finish.
What is it about sliders that makes them so much more fun than a regular-sized sandwich? Whenever I make a tray of these ham and cheese sliders for a party, they disappear within minutes!
I know these ham and cheese sliders are going to become one of your favorites too!
Here’s what makes them so good:
- I love that sliders are great as a party appetizer, but also an easy weeknight dinner. Kids love them and you can give little ones a single slider and older kids (and adults!) two or more for their bigger appetites.
- SO easy! No need to cook anything on the stovetop—you don’t even have to take out a cutting board! This means minimal cleanup, too.
- Most importantly, these ham and cheese sliders taste amazing! Ham and cheese is always a delicious combo, but it’s even better tucked into sweet Hawaiian rolls brushed with a savory, buttery glaze. That’s what takes these sliders over the top!
Important Ingredient Notes
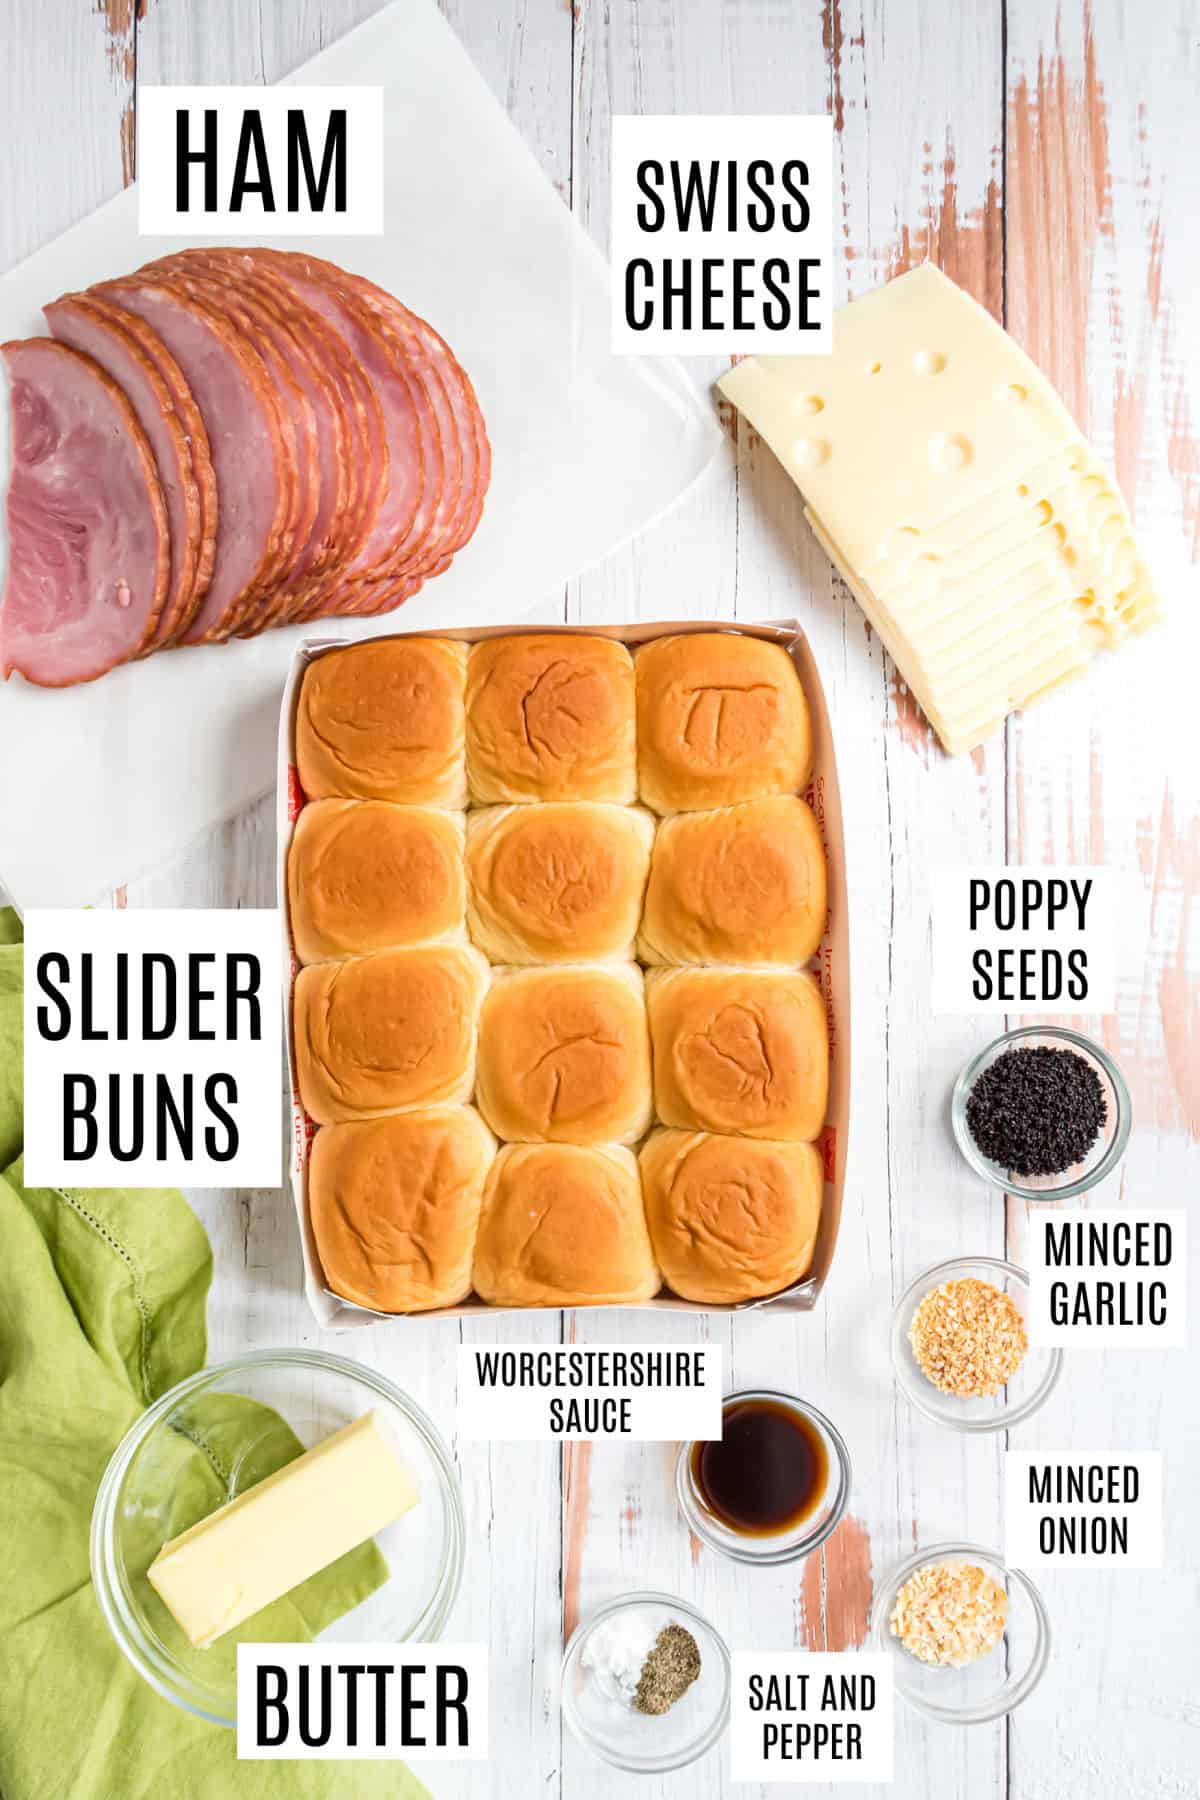
- Hawaiian sweet rolls – You could use standard dinner rolls instead, but I think the sweetness of Hawaiian rolls pairs really well with ham.
- Sliced ham – Any kind you like, whether it’s glazed, smoked, uncured, etc.
- Swiss cheese – Swiss is the classic choice for pairing with ham, but you can use another cheese if you’d like, or a combination of cheeses.
- Unsalted butter – Between the ham, cheese, and the topping for the rolls, there’s plenty of salt in this recipe—you don’t want it in the butter too!
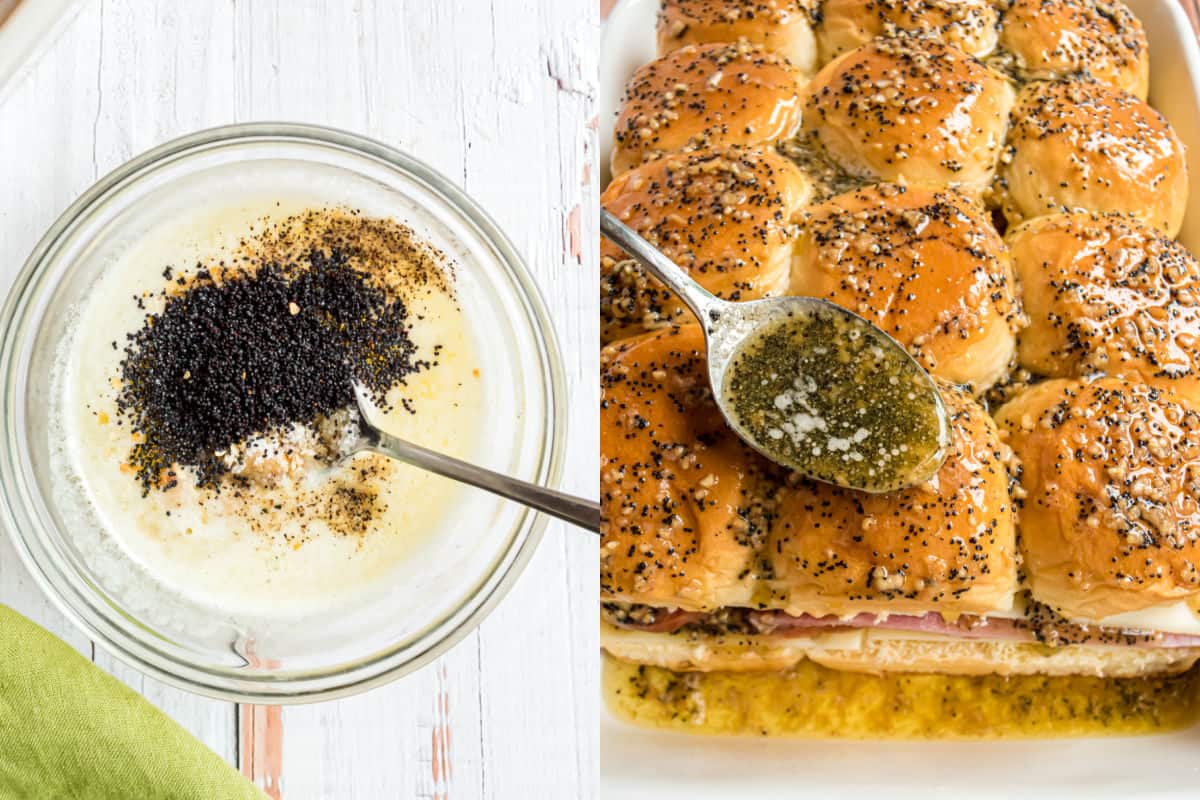
- Seasonings – You’ll use a combination of poppy seeds, dried minced onion, Worcestershire sauce, minced garlic, kosher salt, and black pepper to add flavor to the rolls, along with a little crunch. It’s so good!
For a delicious finish, whip up one of these flavors of dipping sauce for sweet potato fries. You’ll love the smoky chipotle flavor on today’s slider!
How to Make Ham and Cheese Sliders
What I love about this dish is just how easy it is to make. If you can make a sandwich, you can make these sliders in minutes!
Prepare:
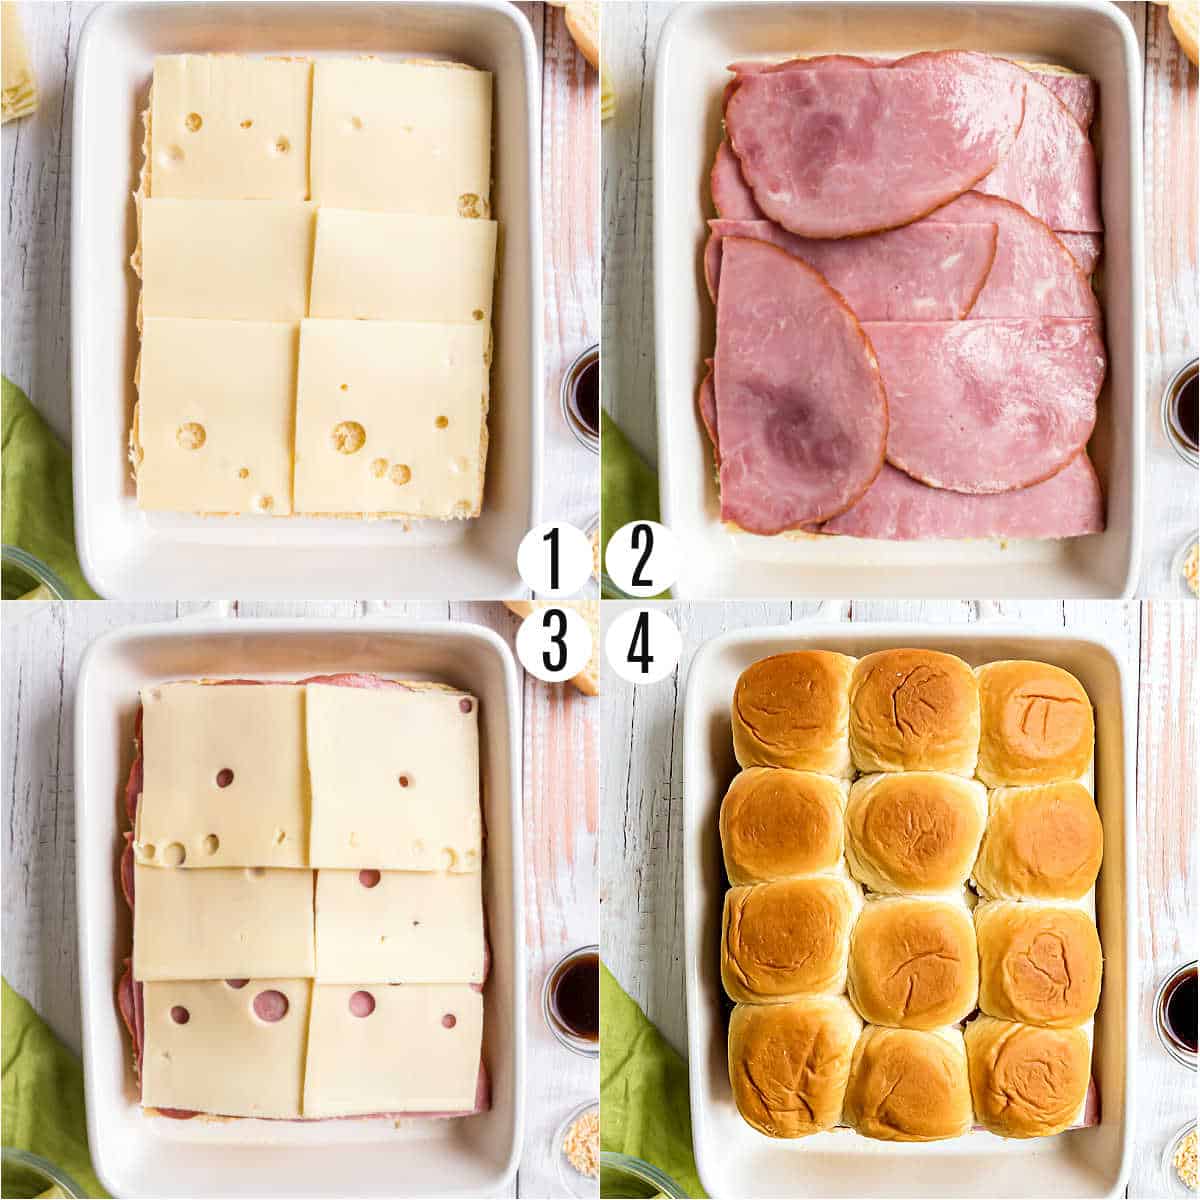
- Preheat your oven to 350ºF and coat a 13×9 baking dish with cooking spray.
- Slice the rolls horizontally, but don’t separate them into individual rolls. (Basically, you want them to be like a whole sheet.)
Assemble:
- Place 6 slices of cheese in an even layer over bottom layer of rolls.
- Add a layer of ham slices on top of the cheese.
- Add the remaining cheese slices.
- Place the tops of the rolls over the cheese and press down gently.
Glaze the Rolls:
- Heat the butter in a microwave-safe bowl until it melts.
- Stir in the poppy seeds, minced onion, Worcestershire sauce, garlic, salt, and pepper.
- Brush over the tops of the rolls.
Bake:
- Loosely cover the baking dish with foil and bake for 30 minutes.
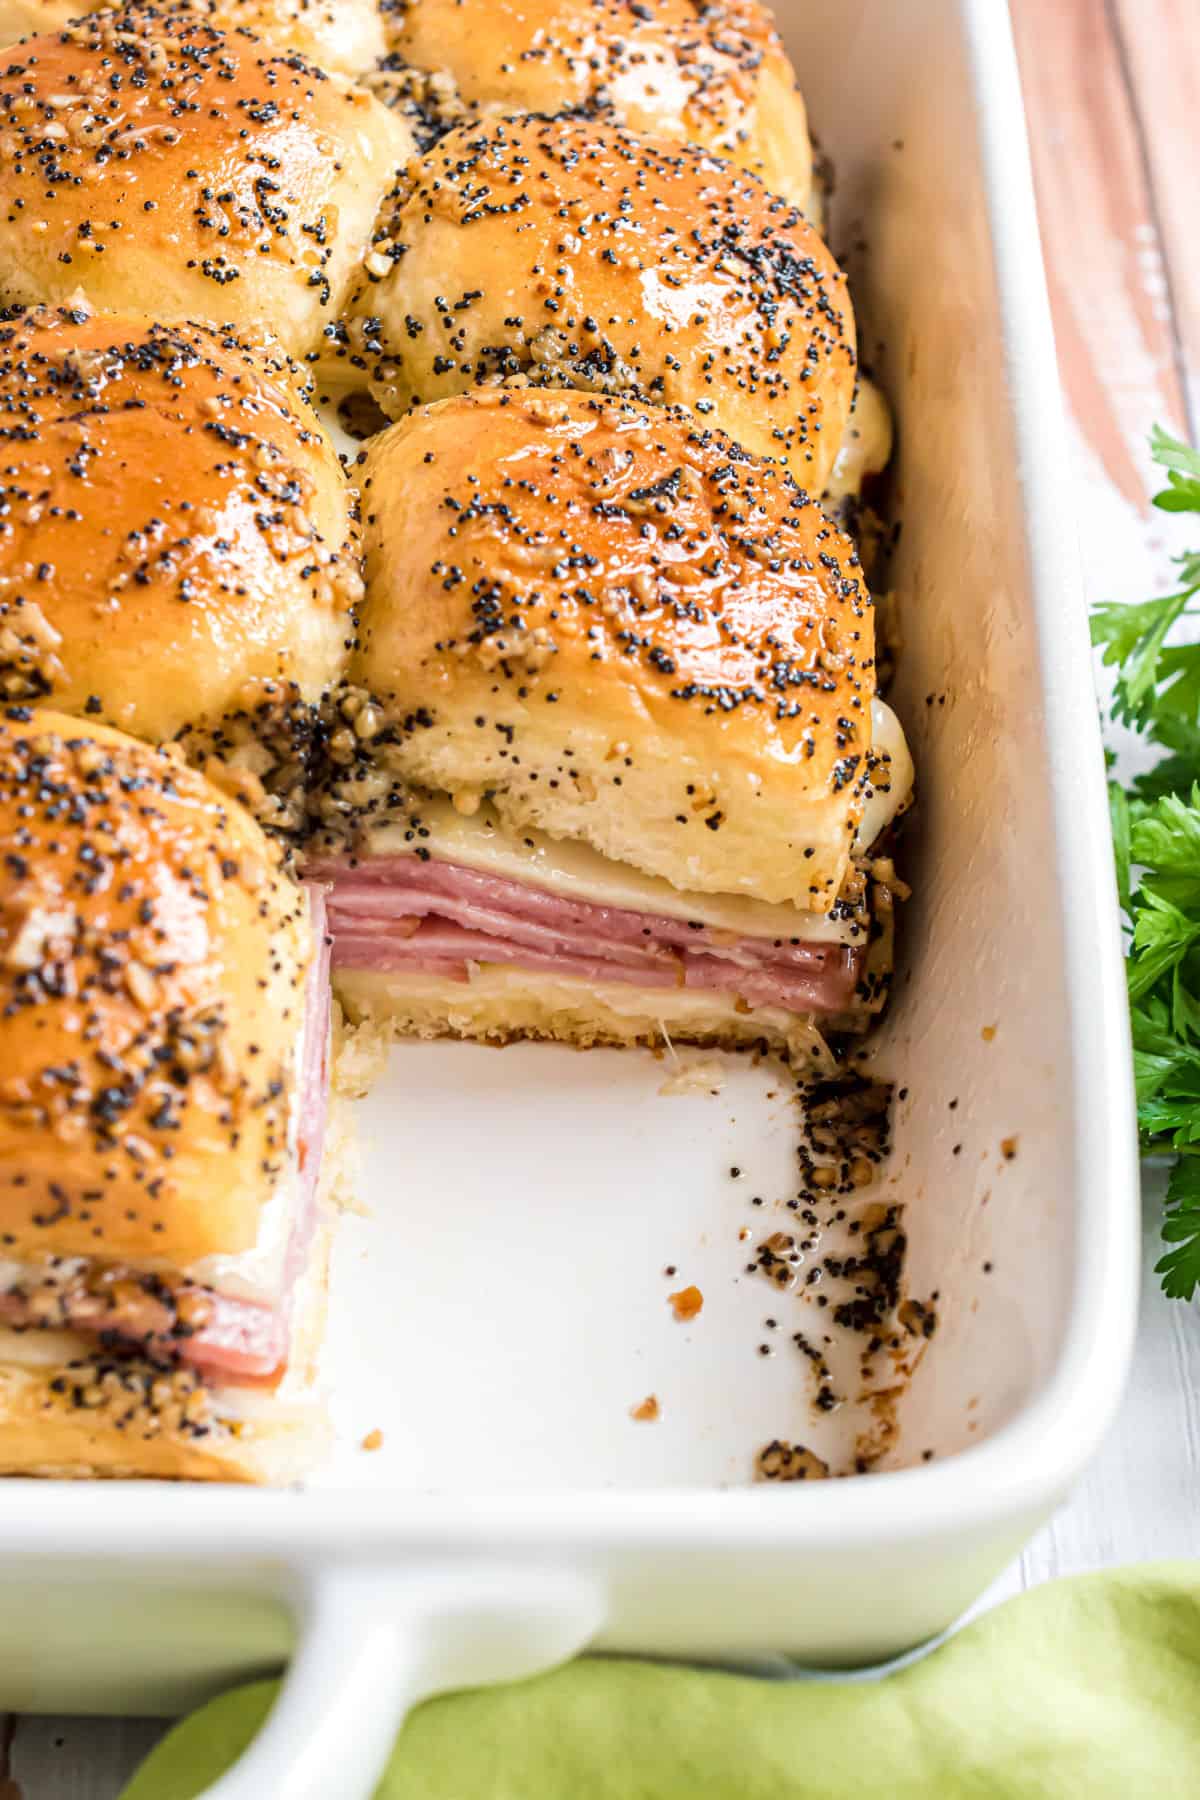
- Uncover and bake an additional 5-10 minutes, until the cheese is melty and the rolls are golden brown.
- Remove from the oven and cut into 12 sliders.
Recipe FAQs
Of course! We love the sweetness of the original Hawaiian roll. But regular dinner rolls or savory butter rolls would work for these ham and cheese sliders too.
Sure! Prepare the sliders up to the point of adding the butter. Wrap the pan well in plastic wrap or tightly cover it with foil, and store it in the refrigerator up to 24 hours before baking. Don’t add the butter mixture until right before you’re ready to bake the sliders.
Uncovering the ham and cheese sliders for the last 5-10 minutes of baking releases the steam and helps toast the buns. Serving the sliders right after baking will help prevent soggy sliders.
More Crowd-Pleasing Slider Recipes
- These beefy, cheesy French Dip Sliders are a great quick weeknight snack or dinner!
- Instant Pot Meatball Sliders are so easy! Have them as an appetizer, party favor, or dinner with your family!
- Leftover Thanksgiving turkey? Make these Turkey Cheddar Sliders for an easy post-holiday meal!
- These vegetarian BBQ Jackfruit Sliders have a burst of flavor and texture! Want another meatless option? Try these Zucchini Meatballs too!
- Sliders are a reader favorite! Once you save this recipe, be sure to check out my copycat White Castle Sliders too, or Buffalo Chicken Sliders for a spicy kick.
- My Italian Grinder sliders are layered with meat and cheeses and topped with an iconic grinder salad!
Pin this now to find it later
Pin It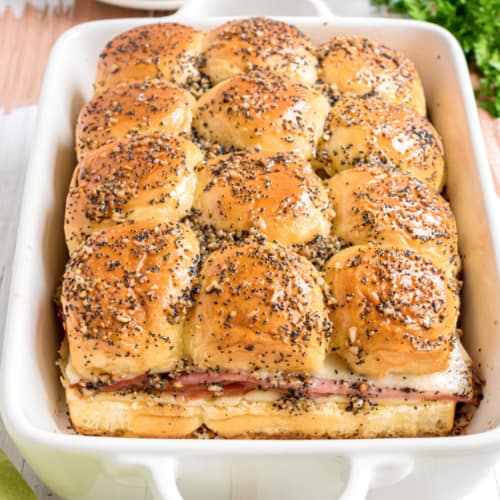
Ham and Cheese Sliders Recipe
Ingredients
- 12 Hawaiian sweet rolls
- 1 pound sliced ham, see notes
- 12 slices Swiss cheese
- 6 Tablespoons unsalted butter
- ½ Tablespoon poppy seeds
- 2 teaspoons dried minced onion
- 1 teaspoon Worcestershire sauce
- 1 teaspoon minced garlic
- ½ teaspoon kosher salt
- ¼ teaspoon black pepper
Instructions
- Preheat oven to 350 degrees F. Spray a 13×9 baking dish with cooking spray. Set aside.
- Slice the rolls horizontally, without separating the rolls. Place the bottom half in the prepared casserole dish. Set the top halves aside for now.
- Place 6 slices of cheese in an even layer on top of the bottom layer of buns. Add a layer of ham slices on top of the cheese. Then add the remaining 6 slices of cheese.
- Place the top of the buns over the cheese, press down slightly.
- In a microwave safe bowl, melt the butter (about 30 seconds). Add the poppy seeds, minced onion, Worcestershire sauce, garlic, salt and pepper. Mix well and brush over the tops of the rolls.
- Loosely cover with foil and bake for 30 minutes. Uncover and bake an additional 5-10 minutes, until the cheese is melty and the rolls are golden brown.
- Remove from oven and slices the rolls into 12 buns.
Notes
- We love using our leftover holiday ham in this recipe. But deli ham would work great too! Because the ham for this recipe will be thicker than sliced deli meat, it takes a little longer for the sliders to heat all the way through and melt the cheese.
- Leftover sandwiches can be stored in an airtight container in the refrigerator for 3 days. Reheat in the microwave for about 15-20 seconds.
- Freezing the baked sliders is a great way to meal prep. Wrap individually in plastic wrap and place in a ziploc freezer bag. Keep in freezer for 3 months. To reheat, place frozen slider in the microwave and heat for 30 seconds until heated through.
- Although packaged Swiss cheese slices will work, we found the Swiss cheese from the deli gave us the best results for ooey, gooey, melty cheese. The taste and quality are better.
- Serving suggestions: Creamy Coleslaw, Potato Salad, Hummus, Soup or Chili (French Onion Soup), Deviled Eggs.
- See blog post for more recipe tips and tricks.


I don’t want to wait for a party! Can I make a pan of these and freez half of them? If so, at what stage would I wrap and freeze? Before or after baking?
I would freeze before baking!
A family favorite, (including grandkids) for lunch or dinner with a salad.
We make these often too!
Thank you for the information
This recipe is really very helpful
especially for those who still want to learn
this makes a very soft impression
I really like this
If you want to know more information, you can visit
https://stampgel.com/