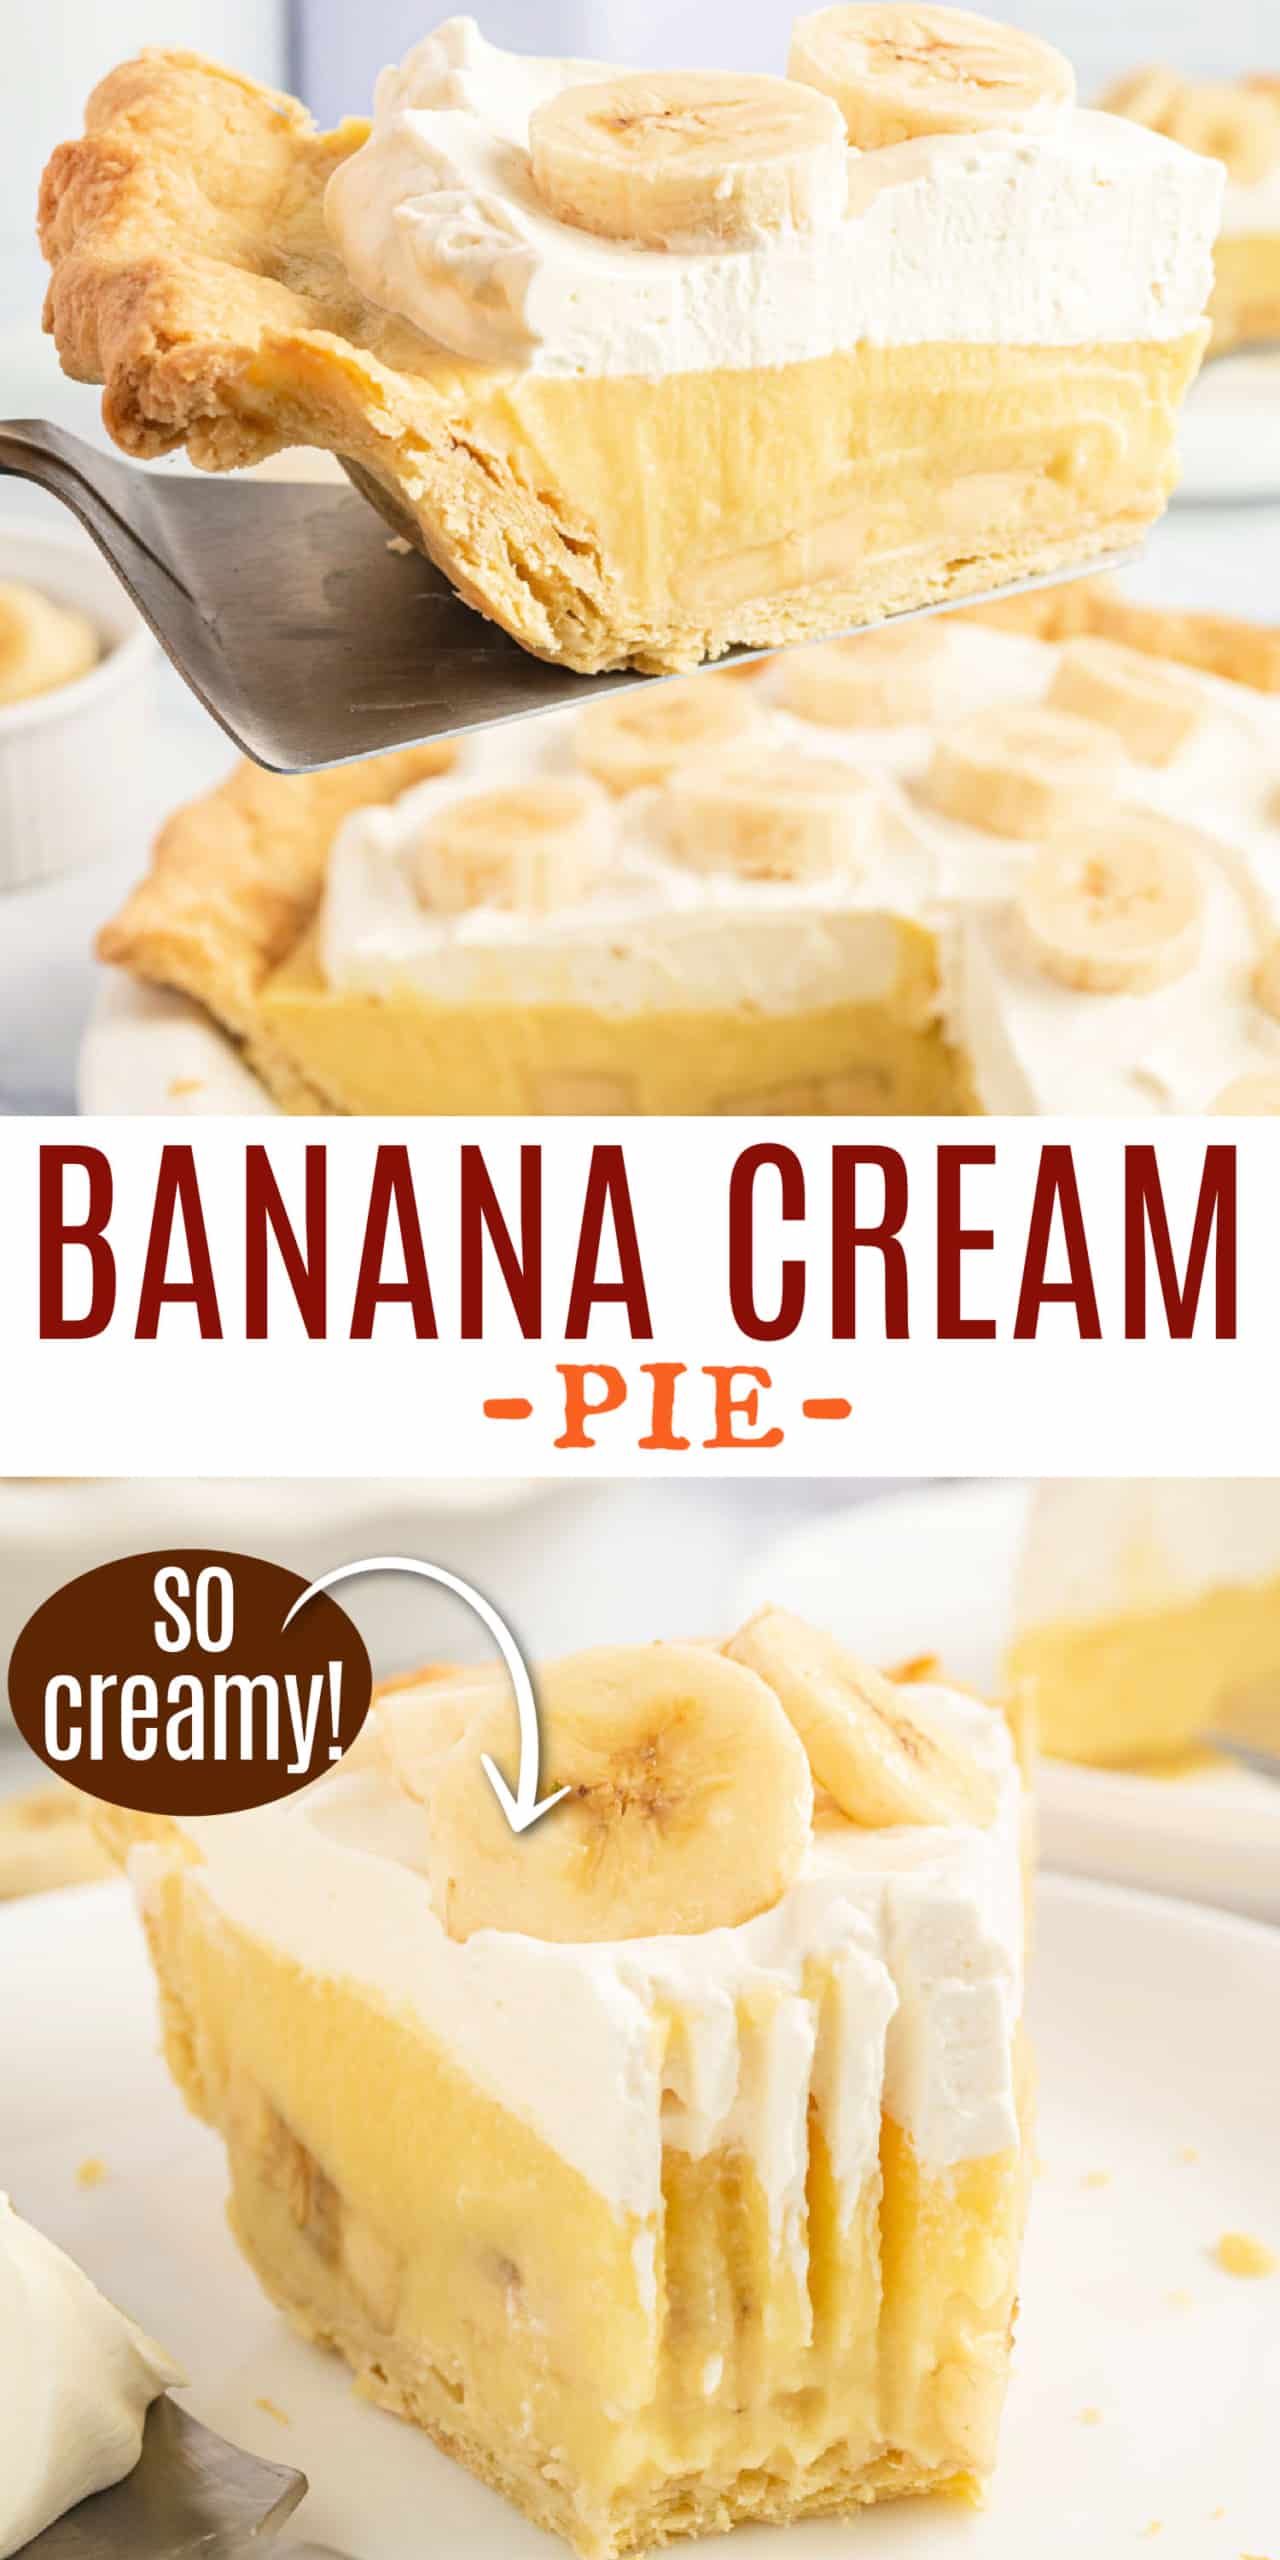
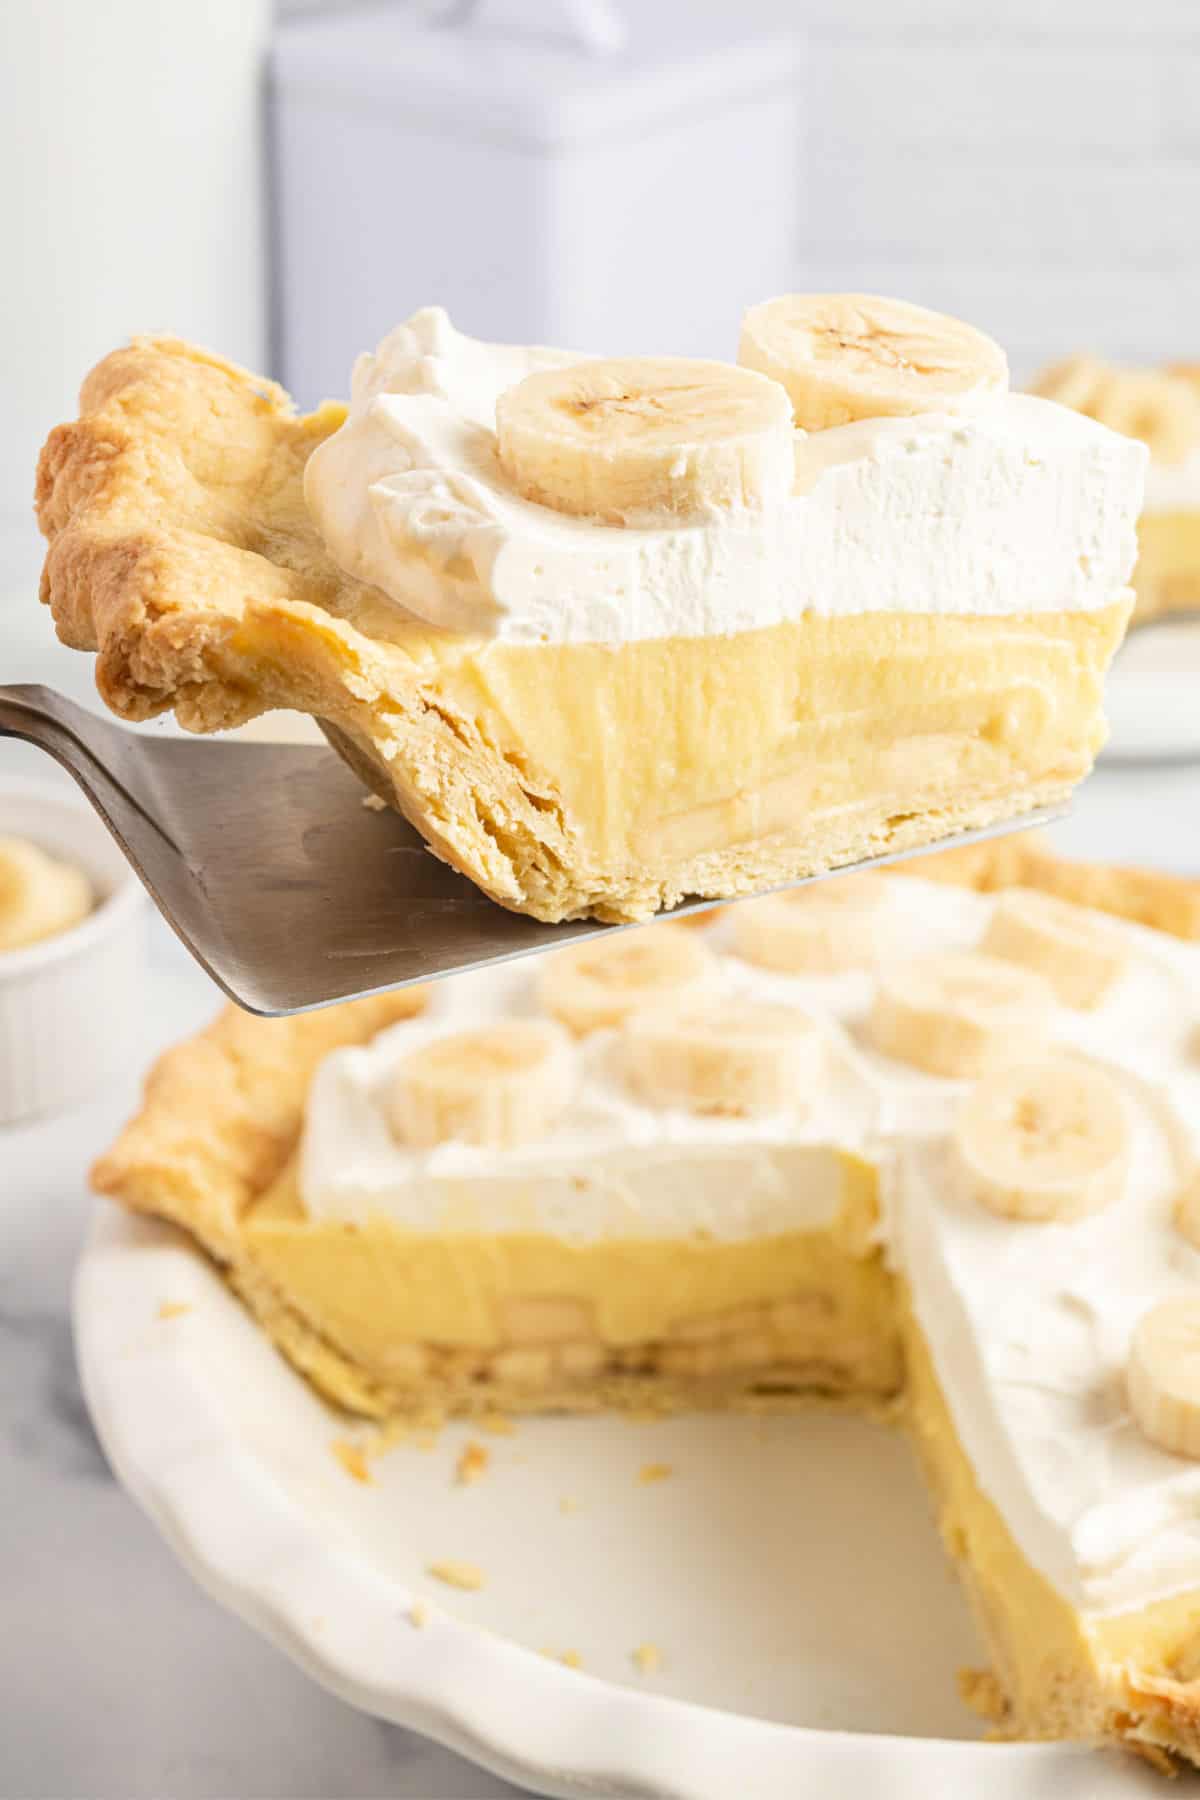
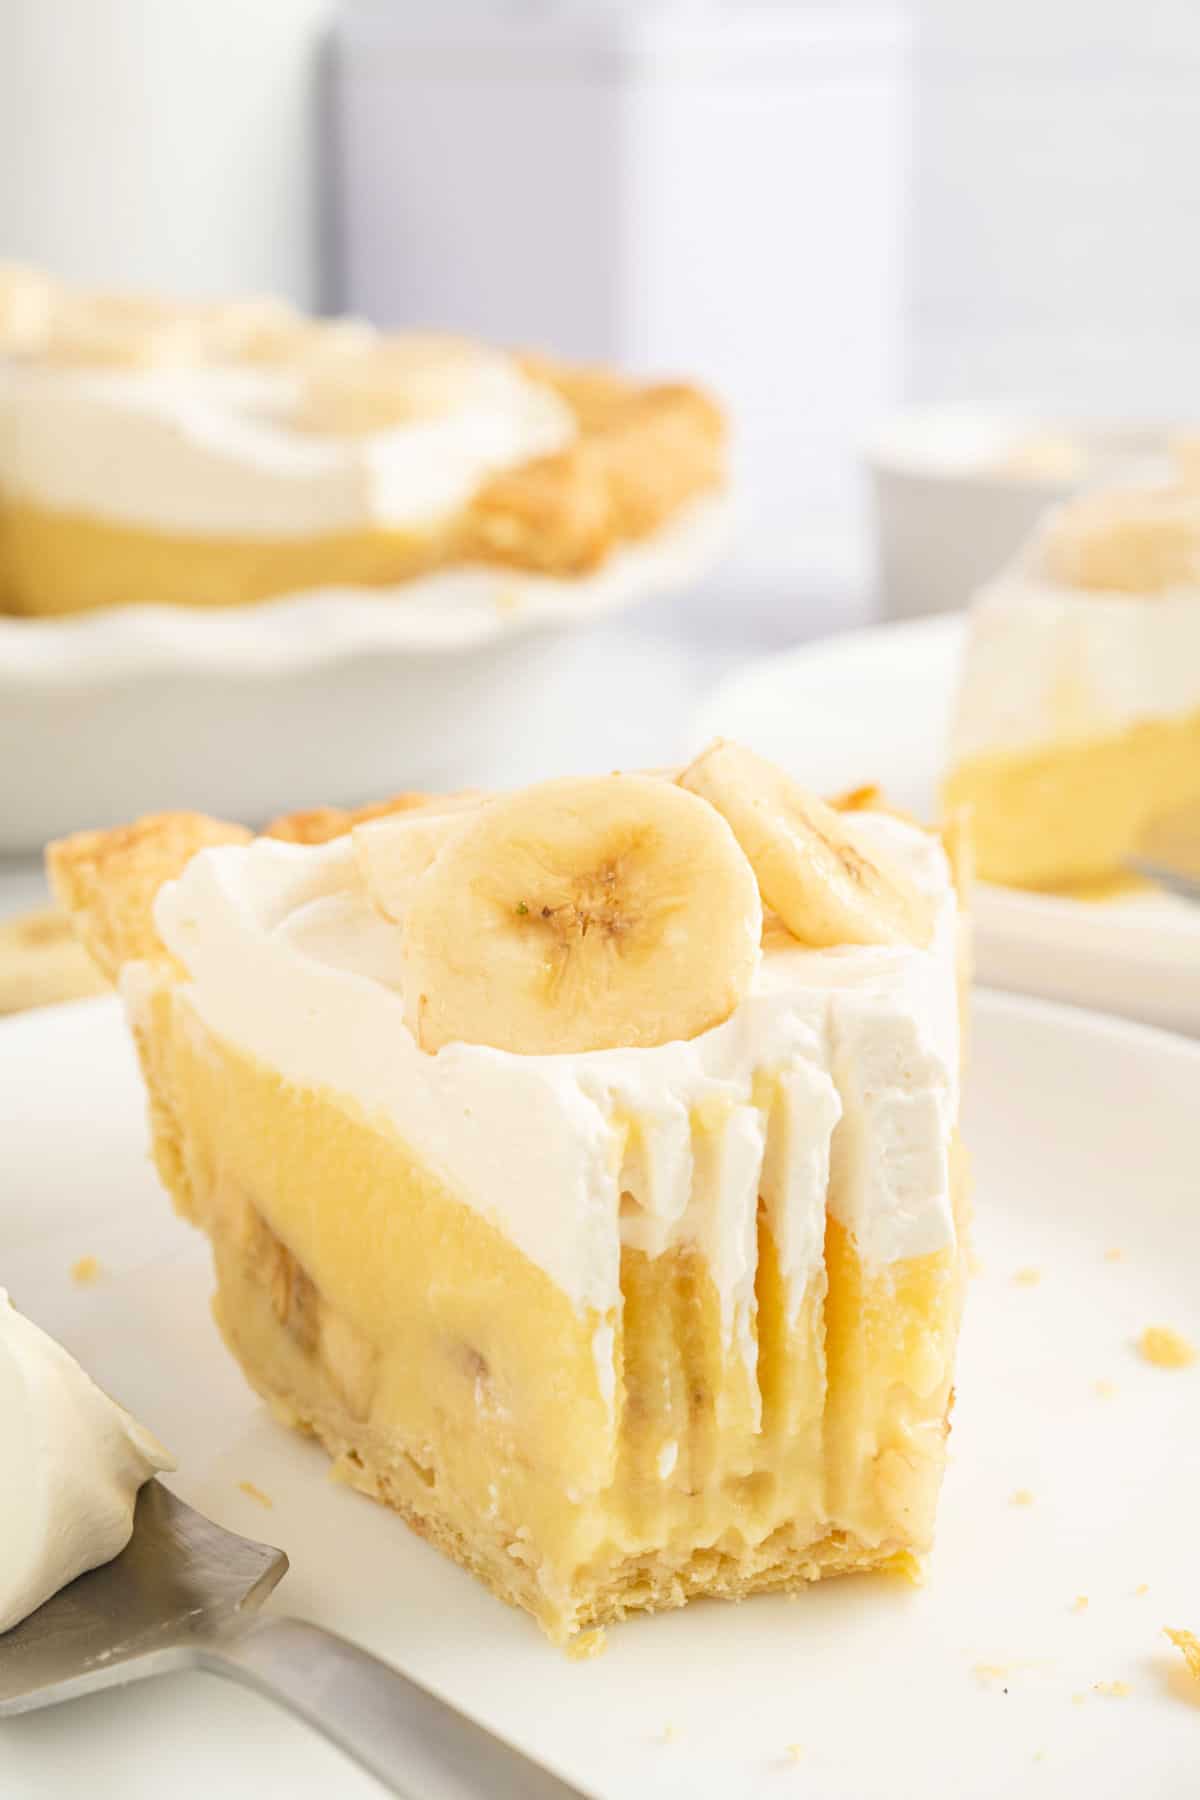
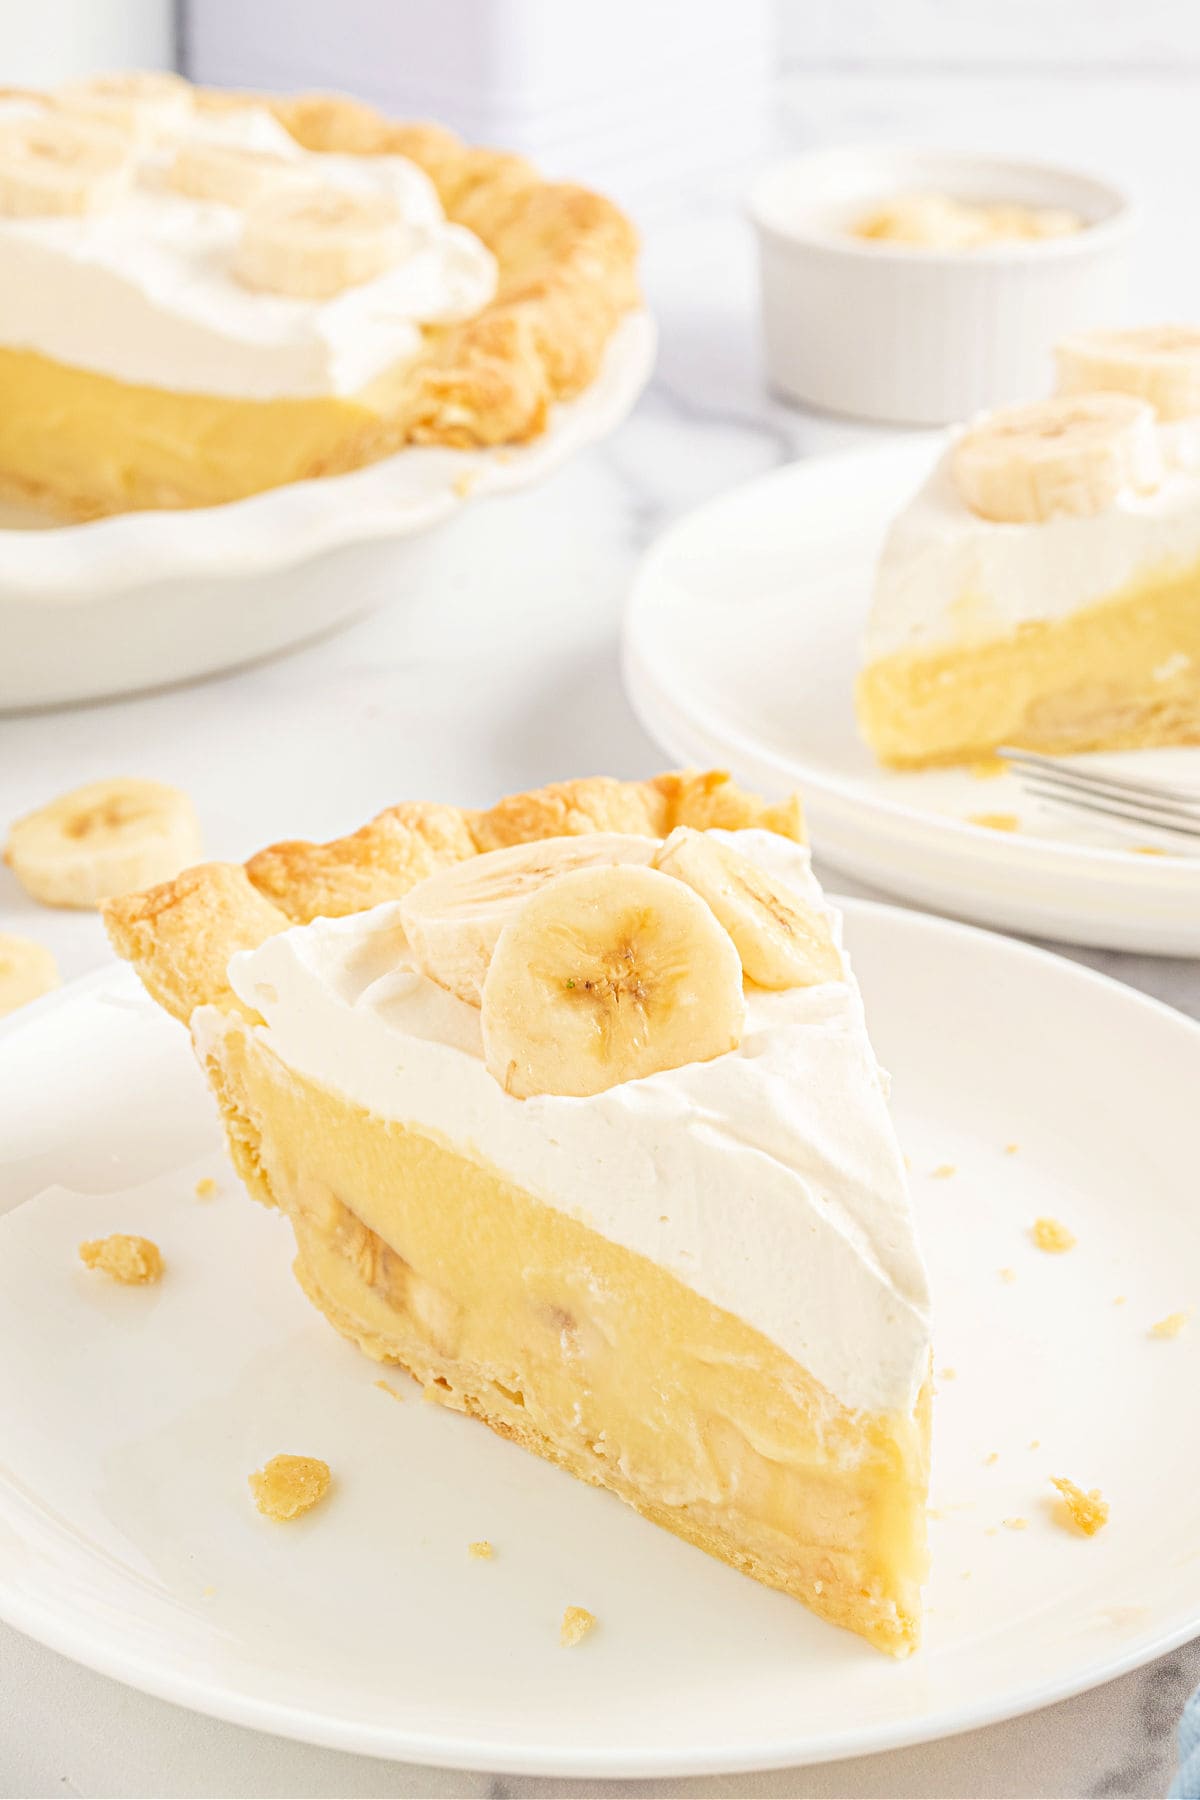
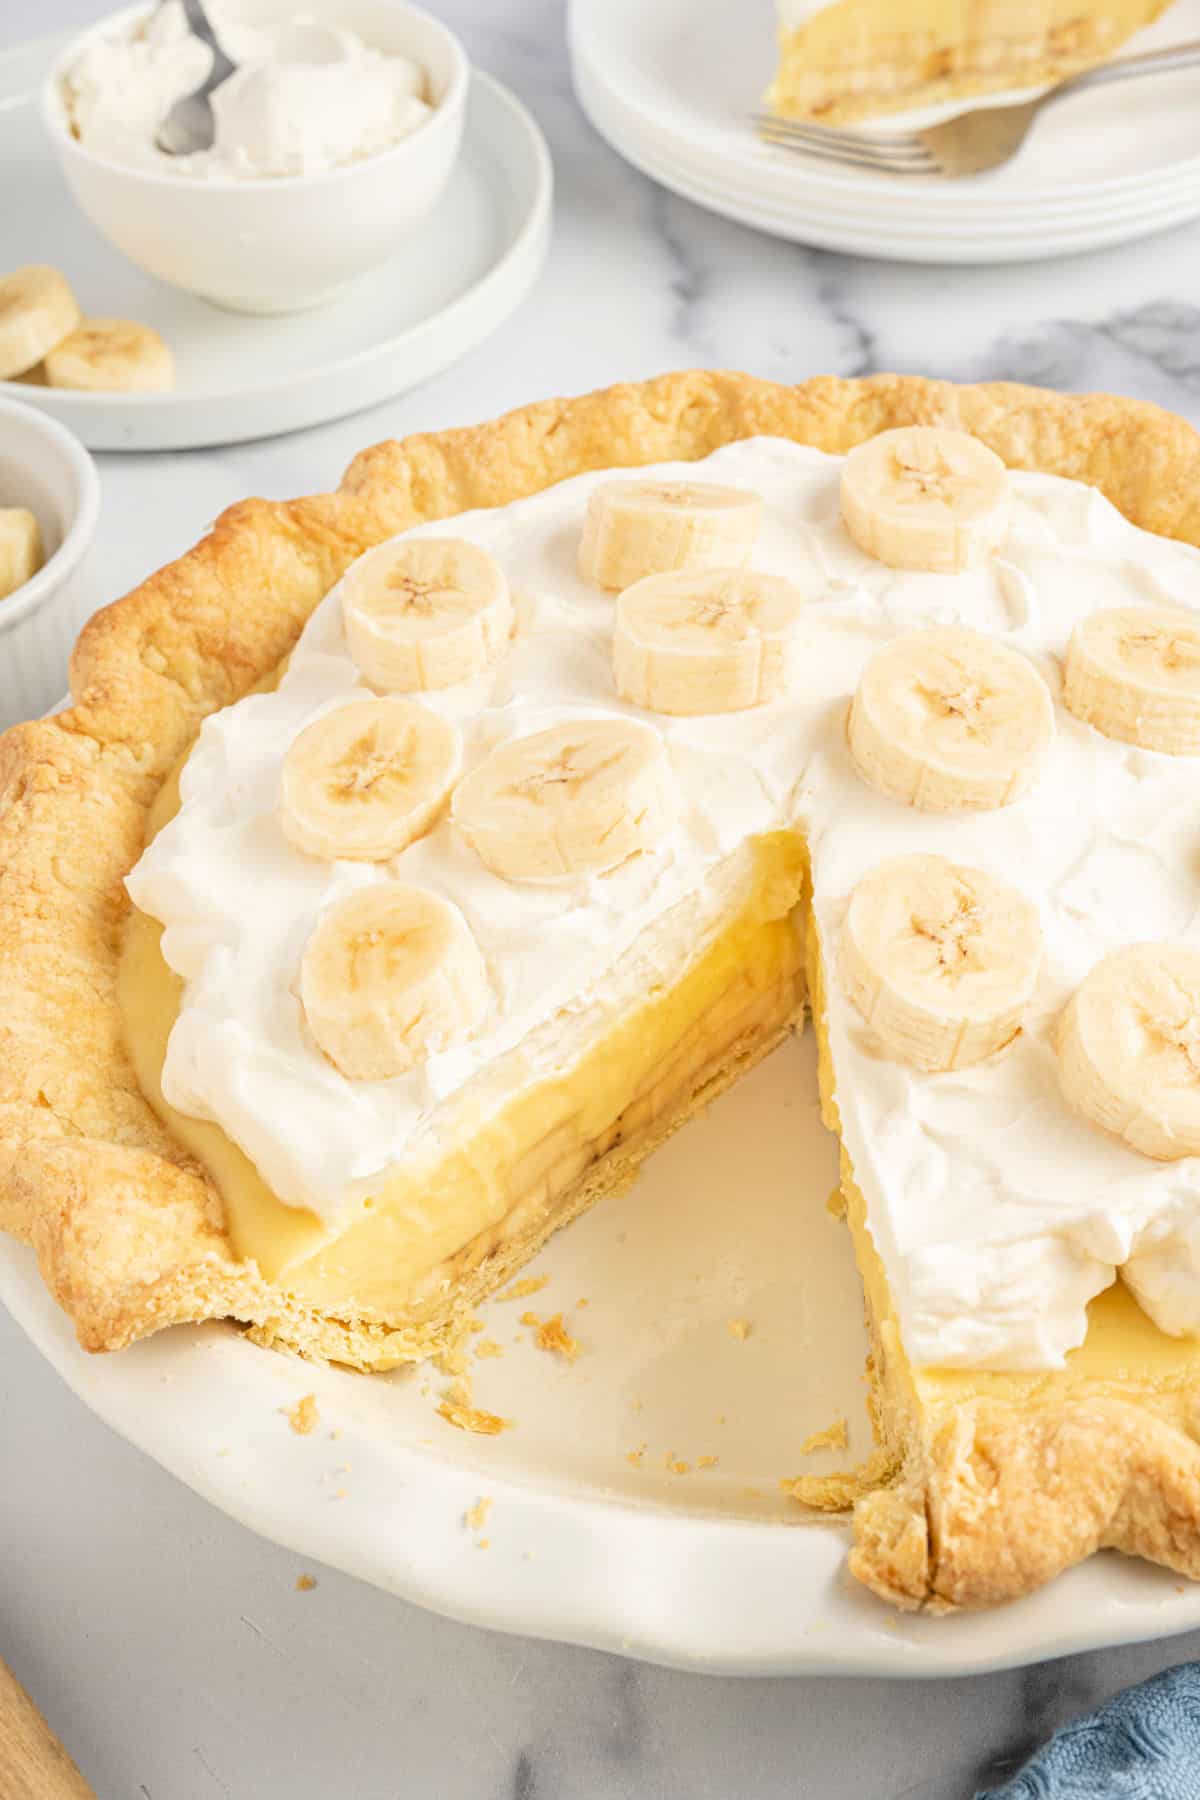
Banana Cream Pie is a classic dessert for a reason! The flaky pie crust, rich, creamy custard filling and the fluffy whipped topping make for a delicious chilled dessert that always hits the spot.
This cool and creamy dessert is a favorite in summertime but really anytime of year!
The flaky crust, layer of sliced bananas, creamy custard filling and the whipping topping – plus more bananas on top – make it an ultimate dessert to share with loved ones.
I remember my grandma taking me to Bakers Square for a slice of pie!
- Starts with a store-bought pie crust to keep things simple.
- Banana slices are layered into the bottom of the pie and also piled on top for a fun presentation.
- A great make-ahead dessert since it needs to be chilled.
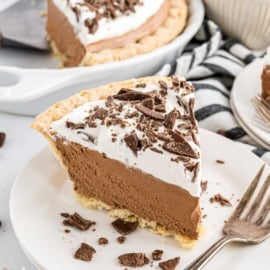
If you love today’s recipe, my coconut cream pie is equally delicious! Or give my pineapple pie a try for a no bake treat.
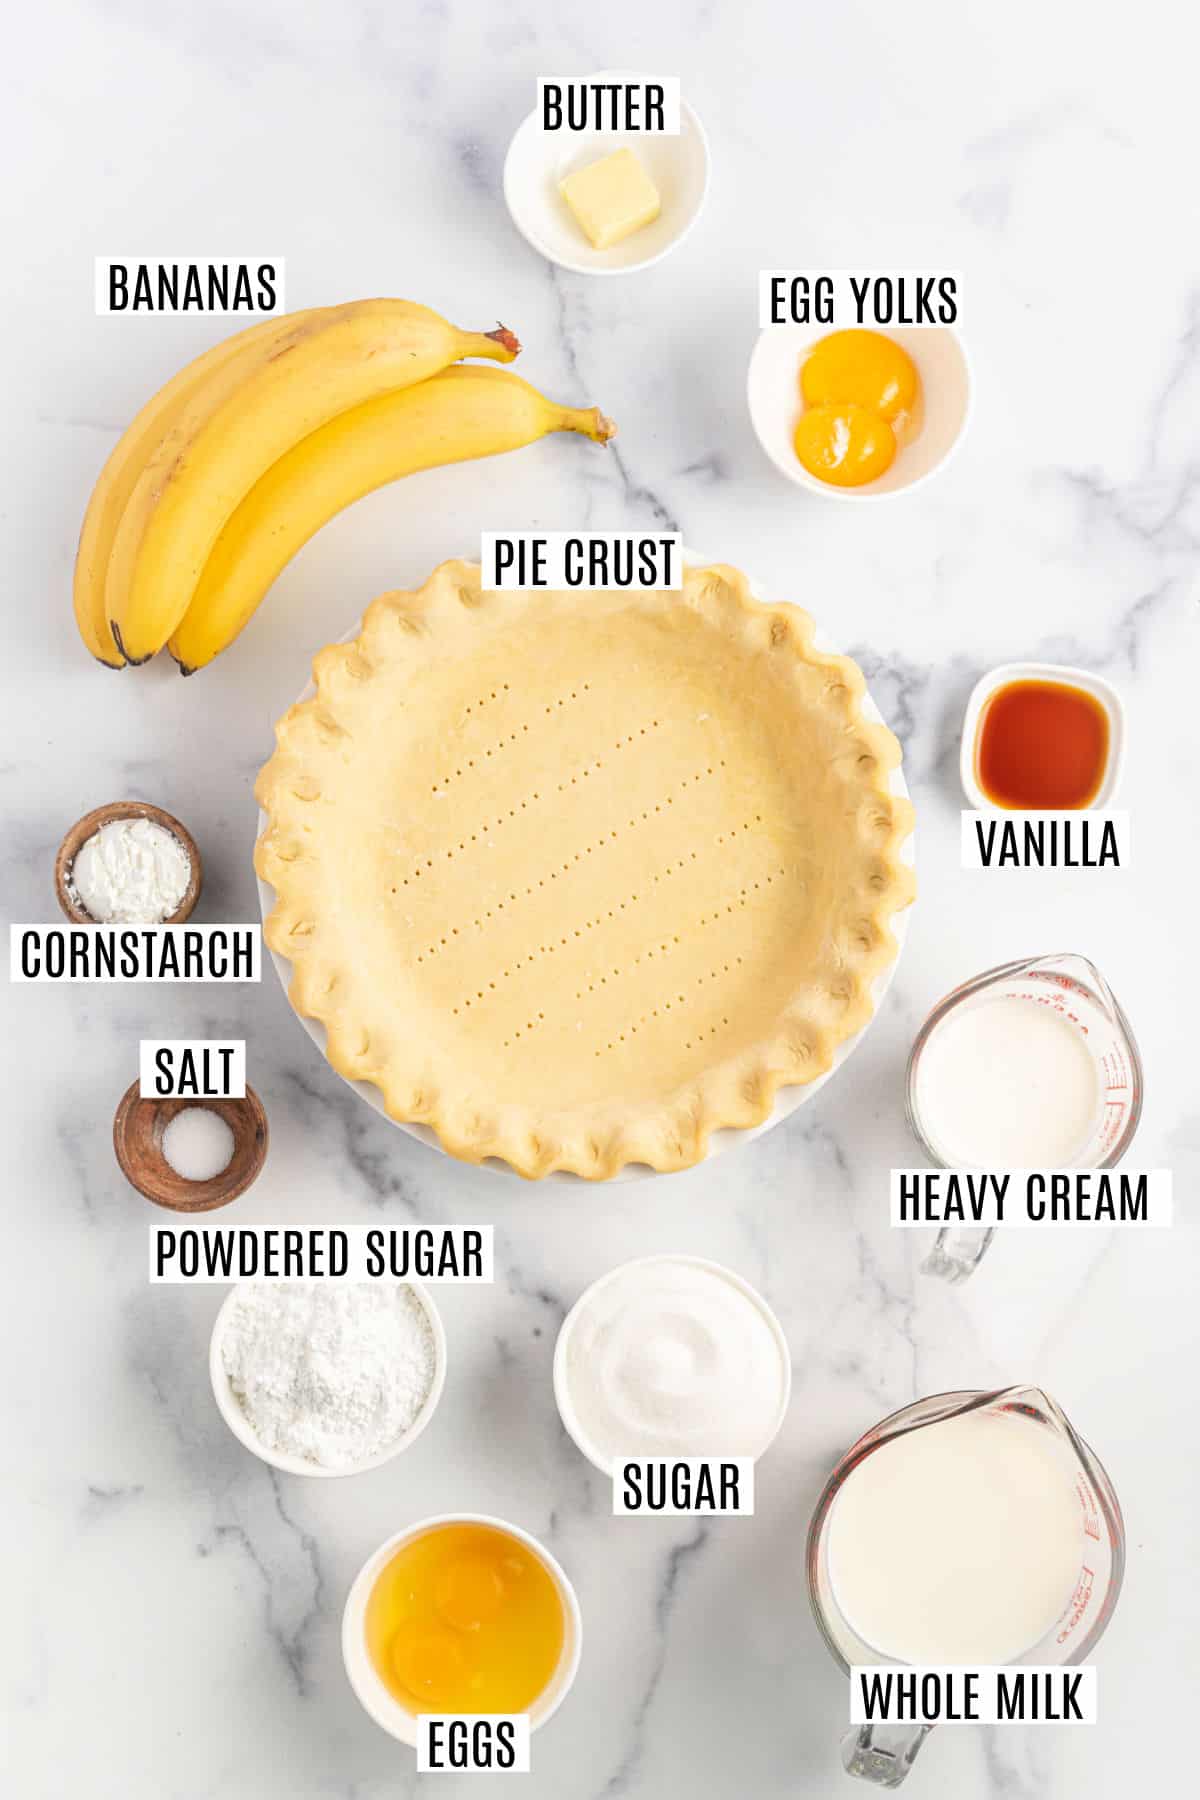
- Pie Crust – Today’s recipe calls for a refrigerated or frozen pie crust to keep things simple. Or you could make your own homemade pie crust!
- Whole Milk – This helps make a really rich and creamy custard. It’s OK to substitute 2% milk if needed.
- Heavy Whipping Cream – Make sure to use REAL heavy cream. Milk or half and half are not rich enough to work well in this pie recipe.
- Vanilla Extract – Be sure to use a pure vanilla extract (NOT imitation). You can also make homemade vanilla extract for the best flavor.
- Sugar- sweetens the custard. Swap it out for homemade vanilla sugar for a delicious, rich flavor.
- Bananas – You’ll want ripe bananas, but not brown. Save your overripe bananas for a batch of our favorite sour cream banana bread.
How to Make Banana Cream Pie
Step 1. Pie crust. Prick some holes in the bottom of the pie crust, then line the crust with parchment paper, fill it with pie weights or dry beans and bake for 15 minutes. Remove the weights, rotate the crust and bake for 10 more minutes. Let cool to room temperature.
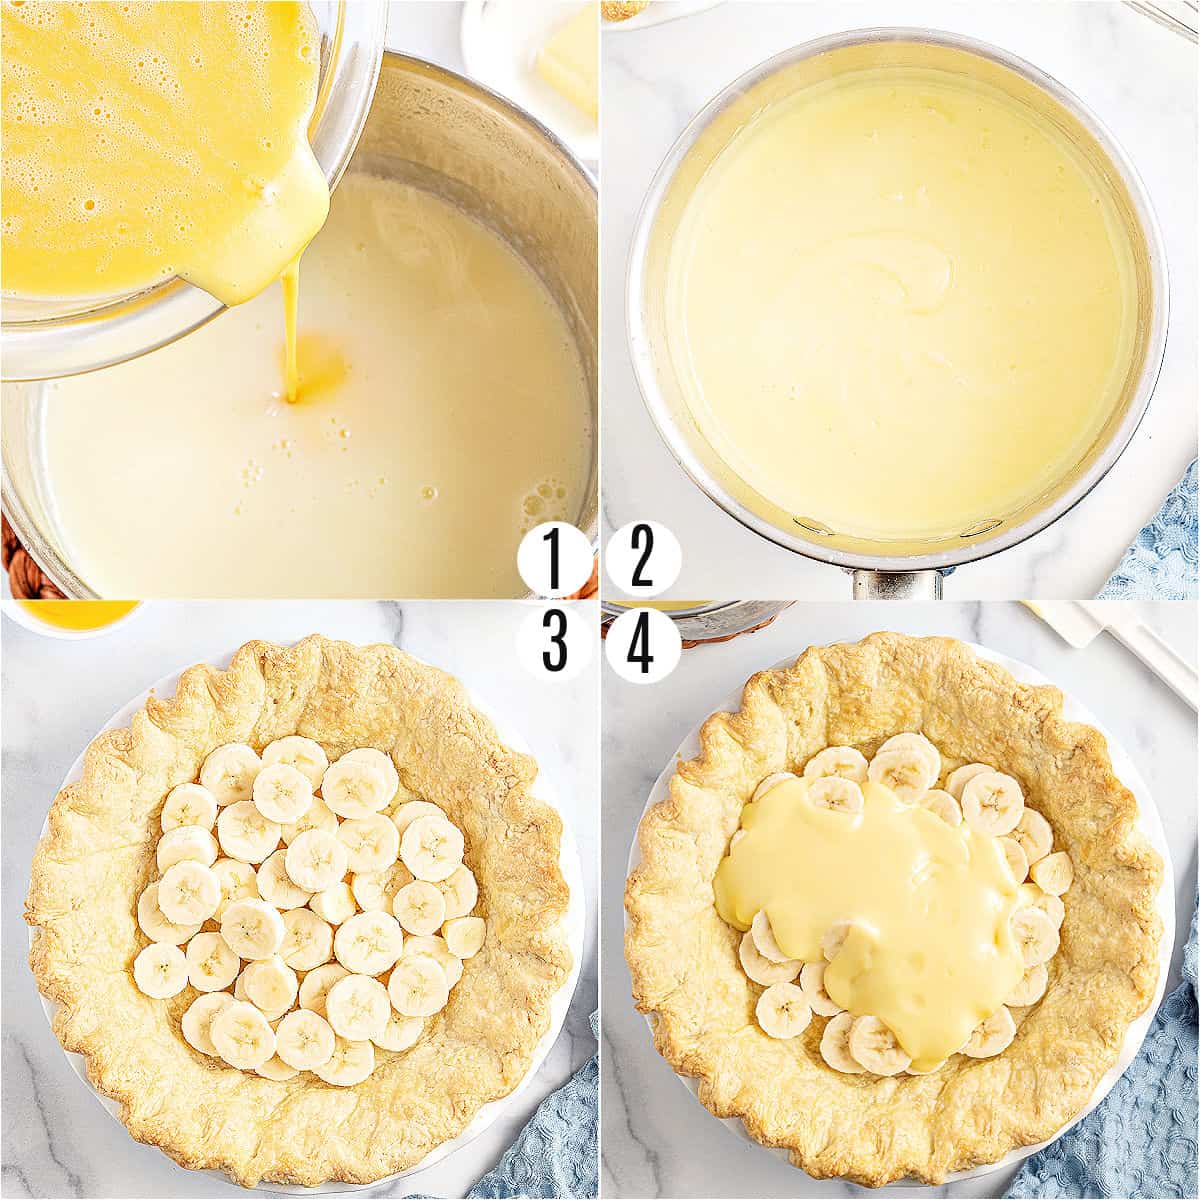
Step 2. Eggs. Whisk the eggs and egg yolks until they are combined (photo 1). Set aside.
Step 3. Custard prep. Add the whole milk, heavy cream, sugar and cornstarch into a medium saucepan over medium heat and whisk until the sugar has dissolved (photo 2). Simmer and thicken the mixture for about 7 minutes then remove from heat.
Step 4. Custard. Ladle 1/2 cup of the milk mixture into the bowl with the eggs and whisk to incorporate and to prevent the eggs from curdling. Place the saucepan back on medium heat, and slowly pour in the eggs, whisking to combine and to prevent scorching. Bring to a boil, cook for 1 minute and then remove from the heat. Stir in the salt, butter and vanilla extract.
Step 5. Pie layers. Layer the sliced bananas over the bottom of the pie crust and pour the custard over the bananas (photos 3 & 4). Smooth out the top and let cool. Cover the pie with plastic wrap and chill in the fridge for at least 6 hours.
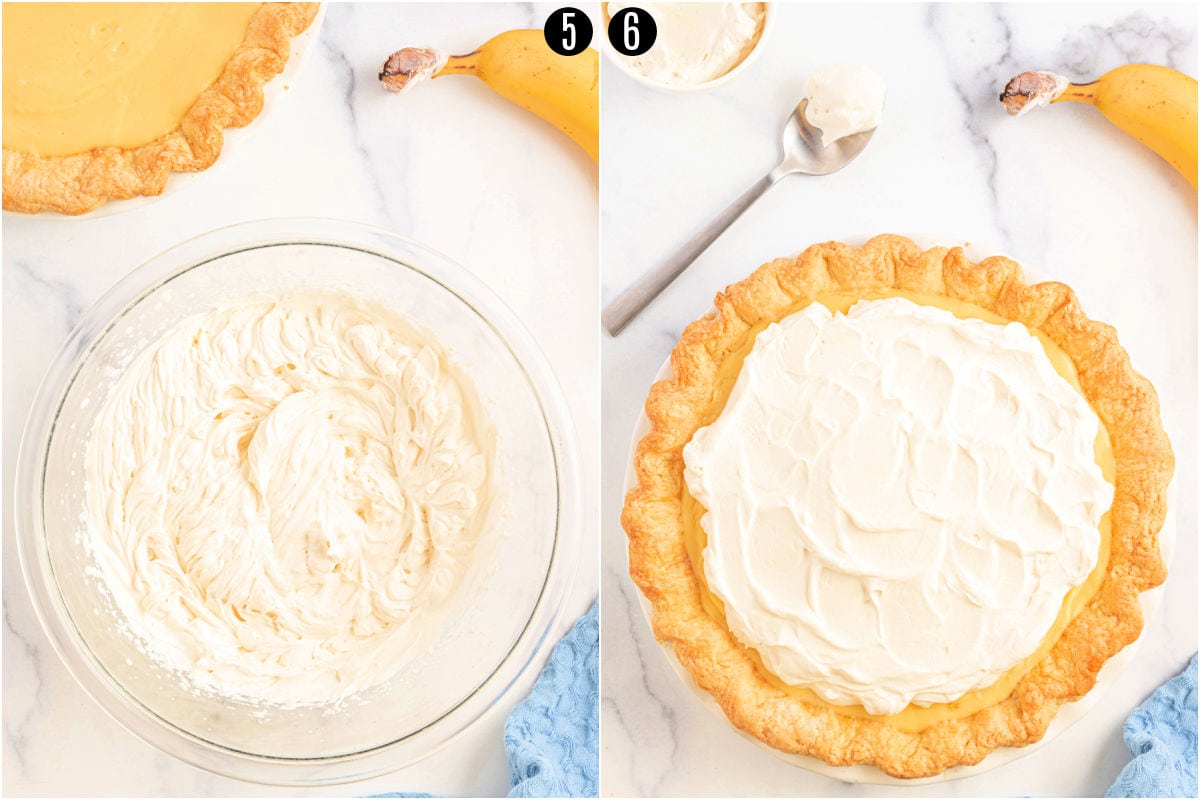
Step 6. Whipped topping. Pour the cold heavy whipping cream, powdered sugar and vanilla extract into a large mixing bowl, and use an electric mixer at high speed until it reaches your desired consistency (photo 5).
Spoon the whipped cream over the pie (photo 6) and finish with the banana slices. Enjoy!
Tips and Tricks
- Start with room temperature eggs for best results.
- You’ll want to keep whisking the custard anytime it is over heat to prevent it from scorching. If the custard does scorch, you can push the custard through a sieve to remove any dark brown chunks. The custard will have a slightly more caramel flavor but should be fine otherwise.
- Uh oh, did your eggs curdle? It’s OK. You can push them through a sieve to remove any cooked egg bits and then proceed.
- Make ahead: This is a great dessert to make ahead of time since it needs to be chilled. Just wait to add sliced bananas on the top when serving so they don’t brown and get yucky.
- Serve: Make a batch of homemade whipped cream to top this delicious pie. Or use our stabilized whipped cream, which mostly resembles Cool Whip. Of course a more decadent topping would be marshmallow frosting!
- Drizzle the top of your pie with a drizzle of homemade caramel sauce.
The creaminess of a banana cream pie will remind you of this copycat Magnolia Bakery banana pudding recipe!
Storage
Cover the pie with plastic wrap and store it in the refrigerator for up to 4 days. It’s best served chilled from the refrigerator. It also helps to add the banana slices on top when serving, so they don’t brown.
Freeze- Cover the pie with plastic wrap and foil (use both to avoid freezer burn) and store the pie in the freezer for up to 2 months. Thaw overnight in the fridge before serving. I recommend waiting until the pie is thawed and you’re ready to serve to add the banana slices on top.
More Easy Dessert Recipes
- I’m obsessed with banana desserts. From my easy banana pudding to these gooey banana rice krispie treats!
- Easy and delicious, these Apple Hand Pies are loaded with spiced apple filling in a flaky, buttery crust!
- Snickerdoodles are a classic soft and chewy cookie, packed with cinnamon flavor!
- An old fashioned dessert, Bread Pudding will never go out of style. A sweet custard texture, add a sweet lemon sauce for a zesty twist!
- Eclair Cake is a classic no bake, layered dessert! Delicious combination of graham crackers, creamy pudding, and chocolate frosting!
My Cookbook is Here!
- 5 categories of delicious treats!
- Full page photos for EVERY recipe.
- QR codes with every recipe to receive BONUS recipes!
- 35 mouth-watering, expert tested recipes!
Pin this now to find it later
Pin It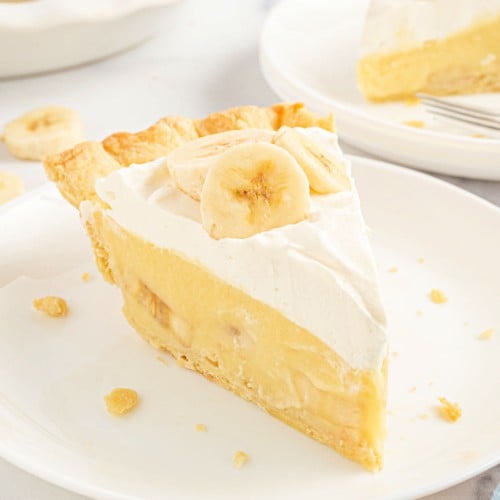
Banana Cream Pie Recipe
Ingredients
- 1 pie crust frozen or homemade
For the Filling
- 2 large eggs room temperature
- 2 large egg yolks room temperature
- 1 ½ cups whole milk
- ½ cup heavy whipping cream
- 3 Tablespoons cornstarch
- ⅔ cup granulated sugar
- ¼ teaspoon kosher salt
- 1 Tablespoon unsalted butter
- 2 teaspoons vanilla extract
- 2 medium ripe bananas sliced
For the Topping
- 1 cup heavy whipping cream cold
- ¼ cup powdered sugar
- 1 teaspoon vanilla extract
- 1 medium ripe banana sliced
Instructions
- Preheat the oven to 400 degrees F. Use a fork to prick holes in the bottom of the pie crust. Line the crust with parchment paper, and fille it with pie weights or dried beans.
- Bake the crust for 15 minutes, then remove the parchment paper and pie weights, rotate the crust halfway in the oven, and bake an additional 10 minutes until crust is golden brown. Let the pie crust cool to room temperature (see notes).
- For the pie filling, beat eggs and egg yolks until combined. (set aside)
- In a medium saucepan, add milk, heavy cream, cornstarch, and sugar. Heat over medium heat, whisking continuously until sugar is dissolved. Continue whisking over medium heat until the mixture begins to simmer (bubbles around the edges of pan). Lower heat to simmer at this point and continue simmering until mixture begins to thicken (about 7 minutes). Remove from heat.
- Ladle out 1/2 cup of the milk mixture and pour it slowly into the bowl with the eggs, whisking constantly to keep the eggs from curdling. Place the saucepan back on medium heat, and slowly pour in the egg mixture, whisking until combined. Keep whisking to prevent the custard from scorching on the bottom of the pan. Once it starts to boil (rolling bubbles), cook an additional minute, then remove from heat.
- Stir in the kosher salt, butter, and vanilla extract. Lay sliced bananas over the cooled pie crust. Pour the custard over the bananas. Cover with plastic wrap and chill in the refrigerator for at least 6 hours (overnight is great too)
- When ready to serve, make the whipped cream. In a large mixing bowl, beat cold whipping cream until stiff peaks form. Add in powdered sugar and vanilla extract and beat until the whipped cream is desired consistency. Spoon over the pie and top with additional banana slices. Serve cold.
Notes
- Pie crust- we love our homemade pie crust recipe. If you choose a frozen pie crust, bake according to package directions.
- Milk- whole milk creates a thick and creamy custard. You could also use 2% if desired.
- Cornstarch will help stabilize the custard.
- Storage- Keep pie covered with plastic wrap in the refrigerator for up to 4 days (bananas will be browning, so feel free to keep those off and only add upon serving).
- Freezer- Cover pie with plastic wrap, then wrap entire pie in foil. Store in freezer for up to 2 months. Thaw in refrigerator overnight, add fresh sliced bananas when serving.
- PRO Tip: You’ll want to keep whisking the custard anytime it is over heat to prevent it from scorching. If the custard does scorch, you can push the custard through a sieve to remove any dark brown chunks. The custard will have a slightly more caramel flavor but should be fine otherwise. If the eggs curdle, you can push them through a sieve to remove any cooked egg bits.
- See blog post for more recipe tips and tricks.