This Instant Pot Peanut Butter Cup Cheesecake recipe is all the rage in our home. Oreo crust, creamy peanut butter cheesecake filling, topped with dark chocolate ganache and Peanut Butter Cups!

Why this Cheesecake is Best
Making a cheesecake in the Instant Pot has become one of my favorite things to do on weekends.
This creamy peanut butter cheesecake recipe topped with Reese’s is seriously one of the best cheesecakes yet!
If you love the chocolate and peanut butter combo, today’s Instnat Pot Cheesecake recipe is for YOU!
It took me awhile to jump on the Instant Pot bandwagon, but I am all in you guys. Aside from making the best Fettuccine Alfredo and Instant Pot Pot Roast, the Instant Pot makes delicious desserts too (like this Instant Pot chocolate cake)!
- No need to turn on the oven
- No worries about cracks on top of the cheesecake…it just doesn’t happen
- Cheesecake turns out moist and perfect…every single time
- Easy. I promise.
- Oreo pie crust
- Topped with creamy chocolate ganache
If you love chocolate and peanut butter, our Reese’s peanut butter pie is incredible!
Tools Needed

I get it. If you haven’t made a cheesecake yet in your instant pot you may be nervous. You don’t want to waste ingredients. So here are my tools that I use for a perfect cheesecake every time!
As an Amazon Associate I earn from qualifying purchases.
- I use my Instant Pot 6qt Duo.
- This Fat Daddio’s 7-inch cheesecake pan is my favorite!
- Trivet. The trivet that came with my Instant Pot is the one I use…but you can also use a sling trivet if you prefer.
- Aluminum Foil. Wrapping the cheesecake keeps it moist and prevents cracking.
How to Make an Instant Pot Peanut Butter Cheesecake
STEP 1: The Crust.
I love using an Oreo cookie crust with today’s peanut butter cheesecake recipe. However, you could use graham crackers or Nutter Butters if you prefer!
Process cookies until a fine crumb (using a food processor works best, but you could use a rolling pin in a pinch if you need to).
Add melted butter to cookie crumbs and mix completely.
Press into bottom of a 7-inch springform pan or cheesecake pan, pressing the crumbs up the sides just a little bit.
Place crust in freezer until ready to fill with cheesecake.

STEP 2. Cheesecake Filling.
In a large bowl, combine cream cheese with sugar and peanut butter. Blend until smooth (this may take a few minutes, scraping down the sides of the bowl as needed).
Beat in heavy whipping cream, vanilla extract, and flour. Add eggs one at a time.
Pour cheesecake into prepared crust.
Cover top of cheesecake pan with foil. Then lay a long piece of foil on counter. Place cheesecake pan in the center and wrap up the sides.
Place cheesecake on trivet that came with the Instant Pot or use a sling if you prefer.
STEP 3. Pressure Cook.
Pour one cup of water into the bottom of the instant pot. Lower trivet with cheesecake into the pressure cooker.
Secure the lid and move valve to “SEALING.”
Select “HIGH PRESSURE” and cook time of 50 minutes.
Once time is complete, allow to release pressure naturally, for about 20 minutes. Remove the lid and allow cheesecake to cool to room temperature.
Place cooked cheesecake in refrigerator for at least 4 hours, or overnight.
STEP 4: Ganache.
For the ganache, add chocolate chips and heavy whipping cream to a microwave safe glass bowl.
Microwave for 30 seconds, stir until smooth.
Pour over cooled cheesecake and top with Reese’s peanut butter cups.
Allow to set or enjoy immediately.

Can you freeze Peanut Butter Cheesecake?
Yes!
Before adding the ganache, but after you have chilled the cheesecake, wrap it completely in plastic wrap, then a layer of foil.
Freeze for up to 30 days for best flavor.
Thaw in refrigerator overnight, then add ganache and Reese’s. ENJOY.
Tips and Tricks
- Allow cream cheese to soften to room temperature. This allows for a creamier result!
- Do NOT over beat when adding the eggs. The more air you add, the greater chance for cracking.
- I use Jif or Skippy for the peanut butter. Avoid “natural” peanut butters as they tend to contain too much oil.
- For a more chocolate flavor, add mini chocolate chips to the cheesecake filling.
- Serve this sweet chocolate cheesecake for Valentine’s Day or any weeknight dessert. It’s impressive enough for guests!
- Today’s recipe was tested in a 6qt Instant Pot. Prep time does not include time it takes to come to pressure (about 12 minutes).
More Easy Desserts
- Instant Pot Pumpkin Cheesecake is the perfect fall flavored dessert to make this year!
- This Cheesecake Recipe in the oven is exactly what you need for your family dessert! Try this Chocolate Cheesecake recipe for a rich twist!
- Try this Red Velvet Cheesecake Cake to impress your family and friends at the next event! Top it with this tangy Cream Cheese Frosting!
- Mini Cherry Cheesecakes are always a staple at my family functions!
- This No Bake Cheesecake could not be any easier! Just as easy as this delicious and chocolatey Easter Puppy Chow!
Pin this now to find it later
Pin It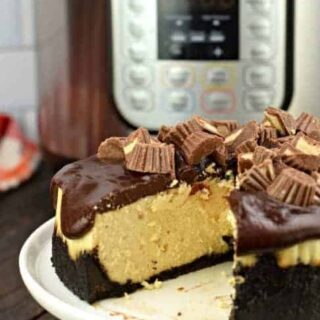
Instant Pot Peanut Butter Cheesecake
Equipment
Ingredients
For the crust
- 1 ½ cups Oreo cookie crumbs about 18 Oreos
- 5 Tablespoons unsalted butter melted
For the Filling
- 2 packages Cream cheese, softened 8 ounce each
- ½ cup granulated sugar
- ⅓ cup creamy peanut butter
- ¼ cup heavy whipping cream
- 1 teaspoon vanilla extract
- 1 Tablespoon all-purpose flour
- 2 large eggs
For the ganache
- ¾ cup milk chocolate chips
- ½ cup heavy whipping cream
- ½ cup Reese’s peanut butter cups chopped
Instructions
- Process Oreo cookies until a fine crumb (using a food processor works best, but you could use a rolling pin in a pinch if you need to). Add melted butter to cookie crumbs and mix completely.
- Press into bottom of a 7-inch springform pan or cheesecake pan, until the crumbs come up the sides just a little bit.
- Place crust in freezer until ready to fill with cheesecake.
- In a large mixing bowl, beat cream cheese with sugar and peanut butter. Blend until smooth (this may take a few minutes, scraping down the sides of the bowl as needed).
- Beat in heavy whipping cream, vanilla extract, and flour. Add eggs one at a time.
- Pour cheesecake into prepared crust.
- Cover top of cheesecake pan with foil. Then lay a long piece of foil on counter. Place cheesecake pan in the center and wrap up the sides.
- Place cheesecake on trivet that came with the Instant Pot or use a sling if you prefer.
- Pour one cup of water into the bottom of the instant pot. Lower trivet with cheesecake into the pressure cooker.
- Secure the lid and move valve to "SEALING."
- Select "HIGH PRESSURE" and cook time of 50 minutes.
- Once time is complete, allow to release pressure naturally, for about 20 minutes. Remove the lid and allow cheesecake to cool to room temperature.
- Place cooked cheesecake in refrigerator for at least 4 hours, or overnight.
- For the ganache, add chocolate chips and heavy whipping cream to a microwave safe glass bowl.
- Microwave for 30 seconds, stir until smooth. Pour over cooled cheesecake and top with Reese’s peanut butter cups.
- Allow to set or enjoy immediately.
Notes
- Allow cream cheese to soften to room temperature. This allows for a creamier result!
- Do NOT over beat when adding the eggs. The more air you add, the greater chance for cracking.
- For a more chocolate flavor, add mini chocolate chips to the cheesecake filling.
- I use Jiff or Skippy. Avoid natural peanut butter as they tend to contain too much oil.
- Today’s recipe was tested in a 6qt Instant Pot. Prep time does not include time it takes to come to pressure (about 12 minutes).
Nutrition
Perfect Instant Pot Peanut Butter Cup Cheesecake Recipe for any time of year. This easy dessert is impressive enough for guests for a holiday or simple enough for a weeknight treat.


Could sour cream be used as a substitute for the whipping cream
I haven’t tested this with sour cream. If you try it, let us know how it works out.
I made my first cheesecake in the instant pot the other day. It was an Oreo cheesecake and the recipe called for only 30 to 35 mins on high pressure. I did 35 and it was perfect! Is there a reason this recipe calls for 50 mins? Thanks!
Without knowing the recipe you’re referring to, I can’t answer to why it was only 35 minutes. I can only tell you that with my personal recipe and testing, this is how long it takes for these ingredients to cook in the Instant Pot to create a soft and creamy cheesecake 🙂
I set my insta pot to manual… not high pressure for 50 min. What can I do to make sure it is cooked all the way?
It doesn’t look done. Are they pretty jiggly until they are complete cold?
They do jiggle quite a bit. They have to cool completely before refrigerating.
I’m getting a burn message and I’m confused because the cake is in the springform wrapped in foil and on the trivet. I put two cups of water in the IP but keep getting the burn message and now I’m worried I’m going to over cook the cheesecake
I would make sure the bottom of your instant pot is completely clean with no meat or anything dried and stuck. You shouldn’t be getting a burn issue with water, sounds like something might be stuck on it, or an issue with your pot.
How long would you say this lasts in the refrigerator? I mean at our house I’m doing good to get 2 days before its gone, but curious for around the holidays and early prep without freezing. Thank you for an EXCELLENT recipe!
This looks so tasty. If I were to make in small mason jars for individual desserts, what do you think the cooking time would be?
do u need a preset cooker
Yes this is a pressure cooker recipe 🙂
In the notes section you suggest adding mini chocolate chips to the filling. What quantity do you think would give a good chocolate flavour but not impact the ratio of other ingredients? Thanks!
I ended up with either oil or butter sitting on top of my cheesecake … I tried to pour off the excess, 🤞🏻
I have a question. I ordered the wrong size springform pan, a 6 inch instead of a 7 inch. I’m still going to attempt this because I don’t want to return the pan. Will the cook time still be the same, or should I cook it a few less minutes? Thanks for your help.
It may take a little bit longer since it will be thicker.
Do you have instructions on how to bake this in the oven? I don’t have a 7-in pan
I only have self-rising flour. Will that make a big difference in the cheesecake?
You cook this in insta pot covered with foil?
For the oreo crust is it just the cookie part or you process with cream filling?
I do the whole cookie!
Does the pan need to be coated with baking spray?
Not with a silicone pan 🙂
I have been wanting to make a cheesecake in my IP for the longest time, but all the recipes I have seen are so complicated! This one was super simple and it tasted AMAZING.