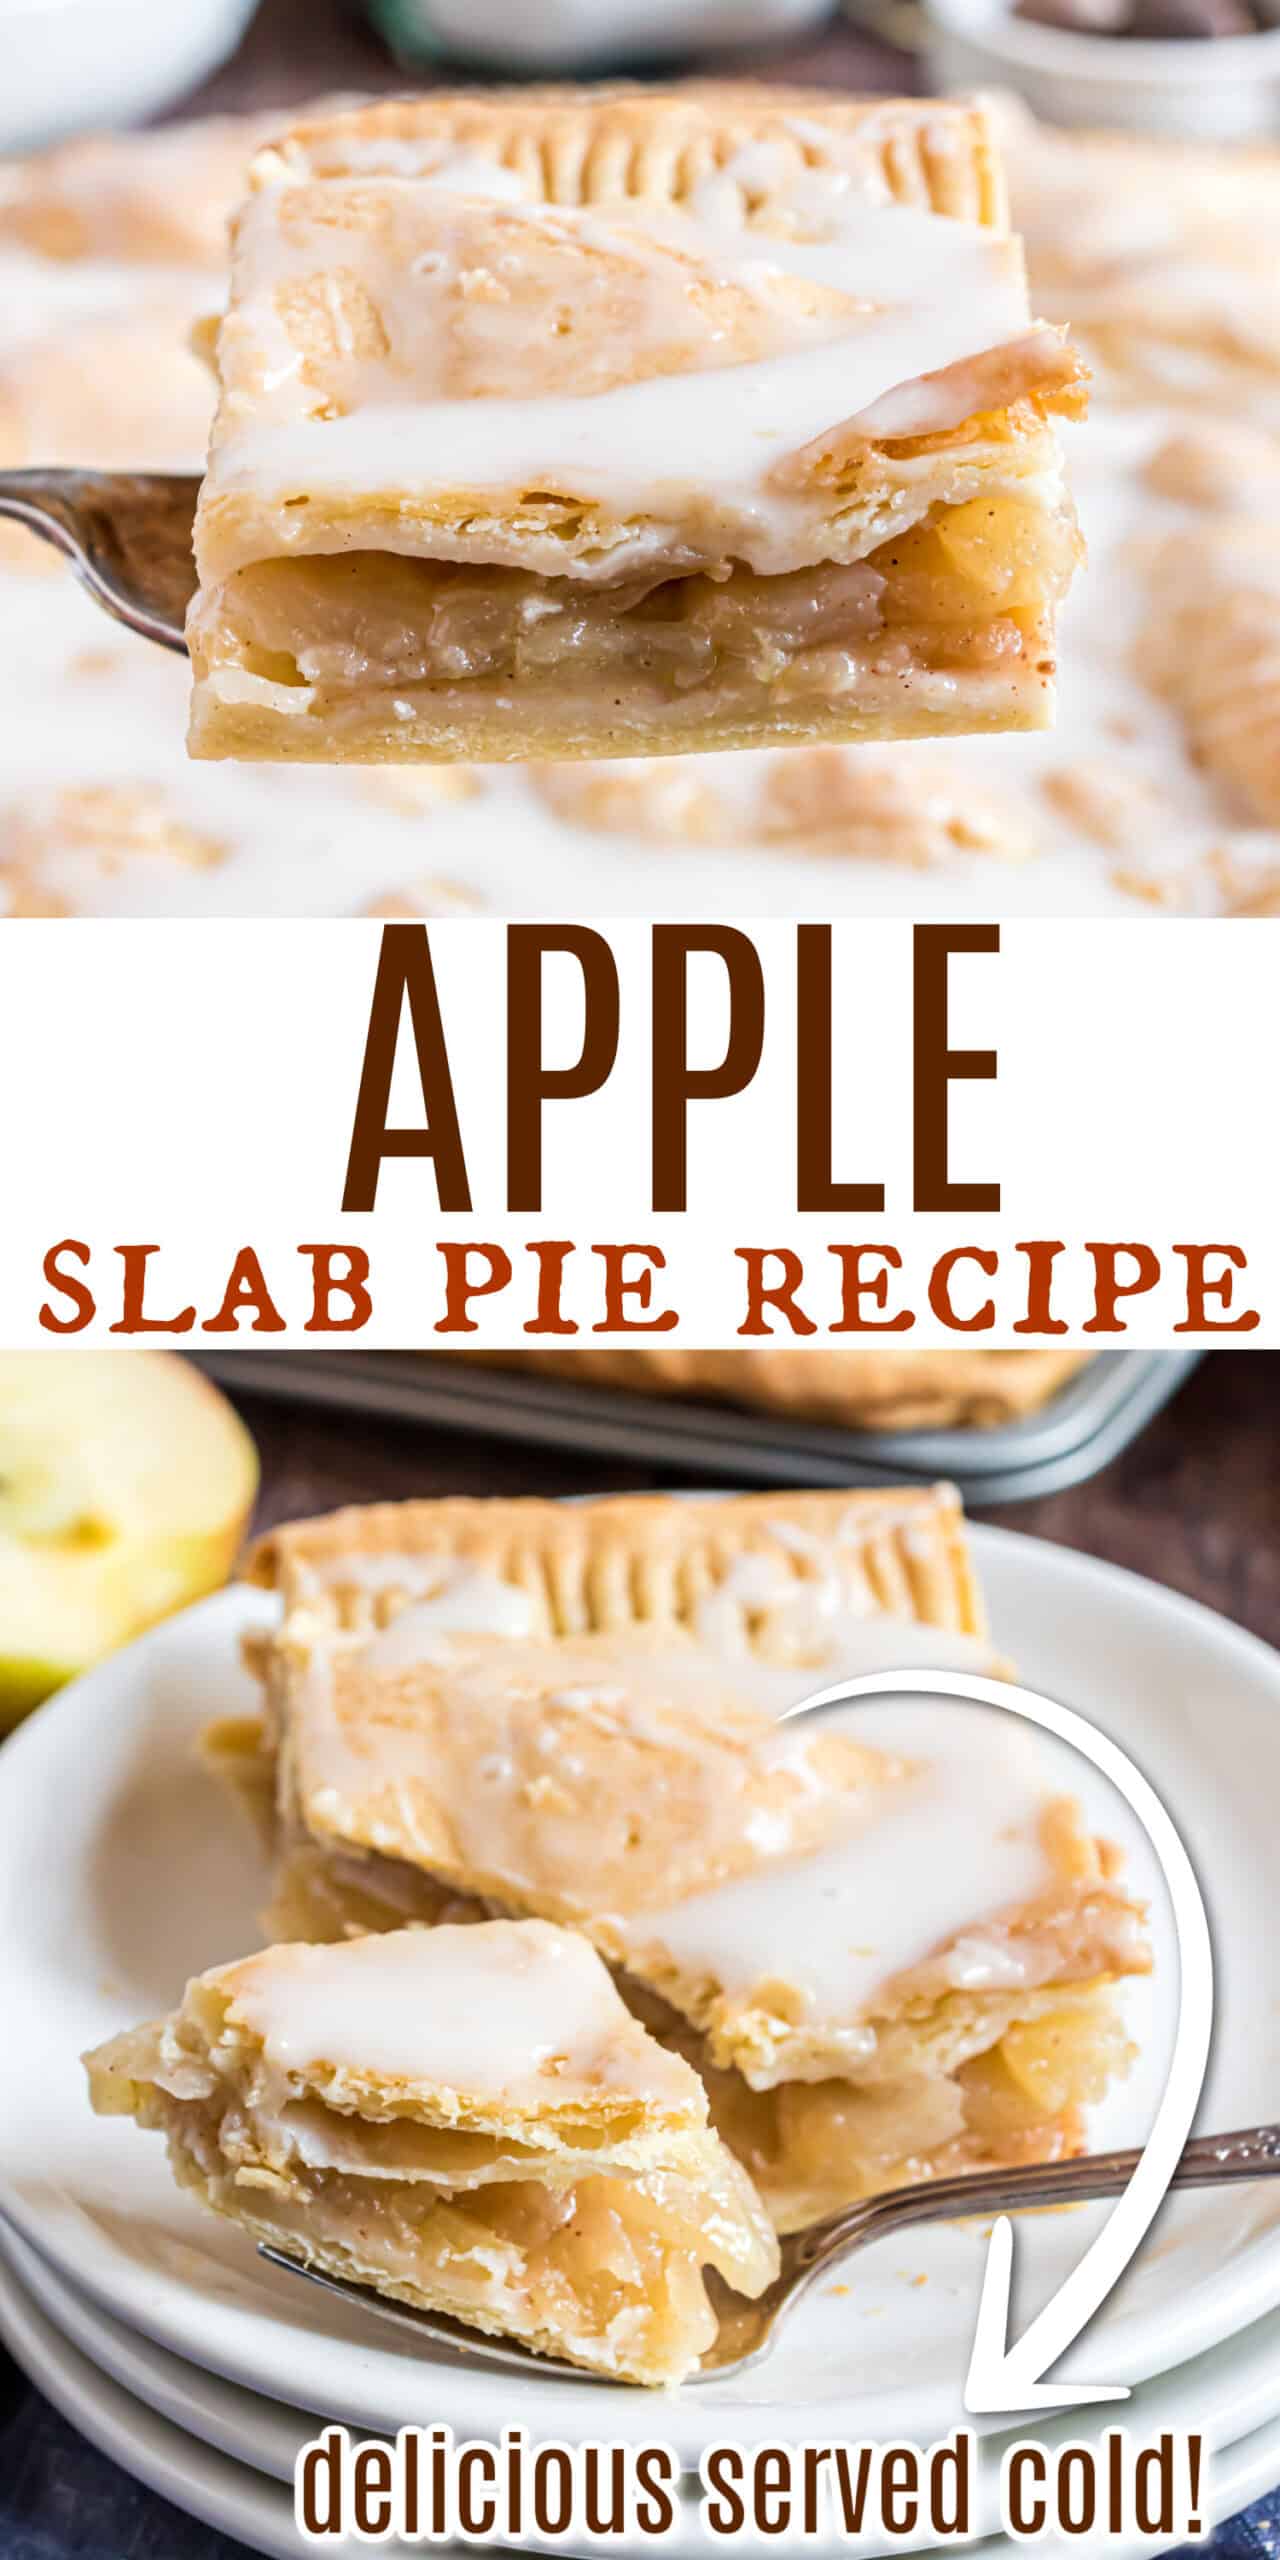
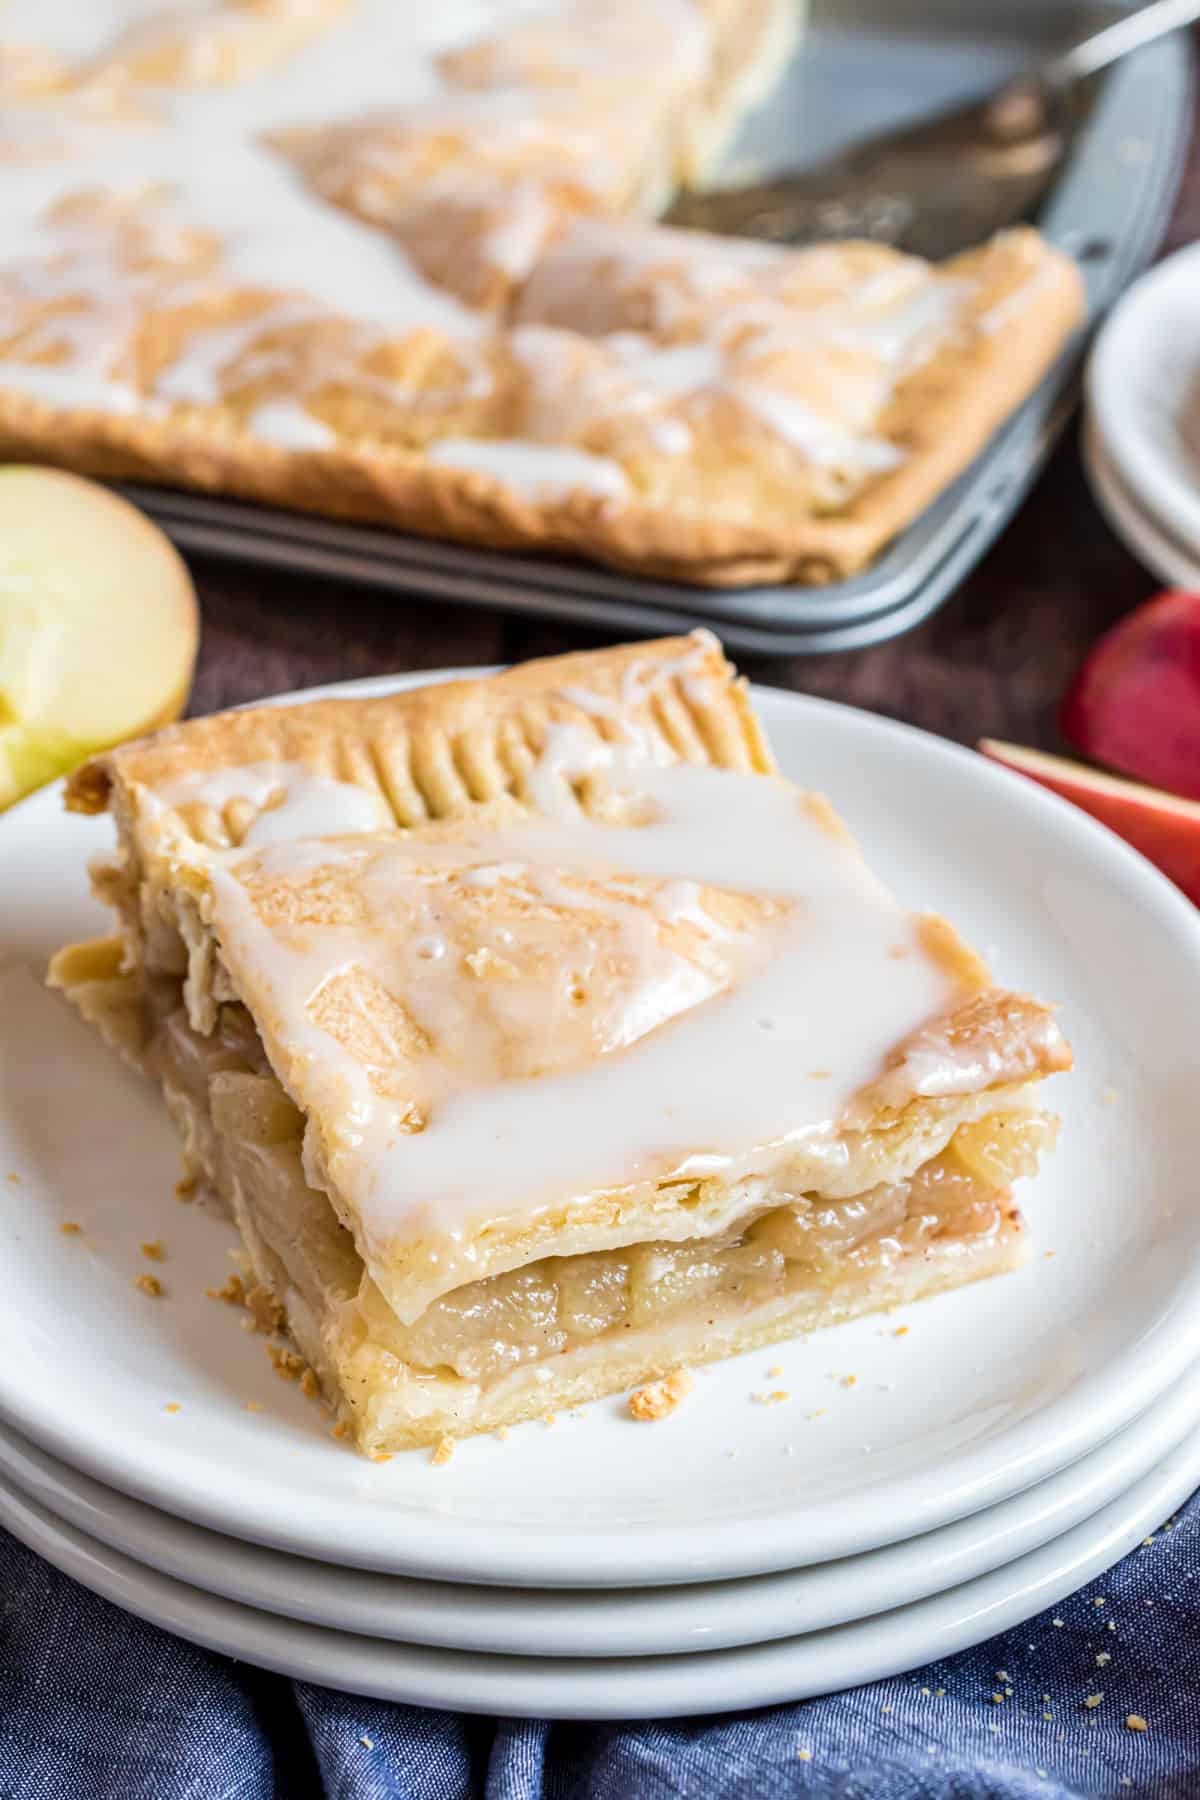
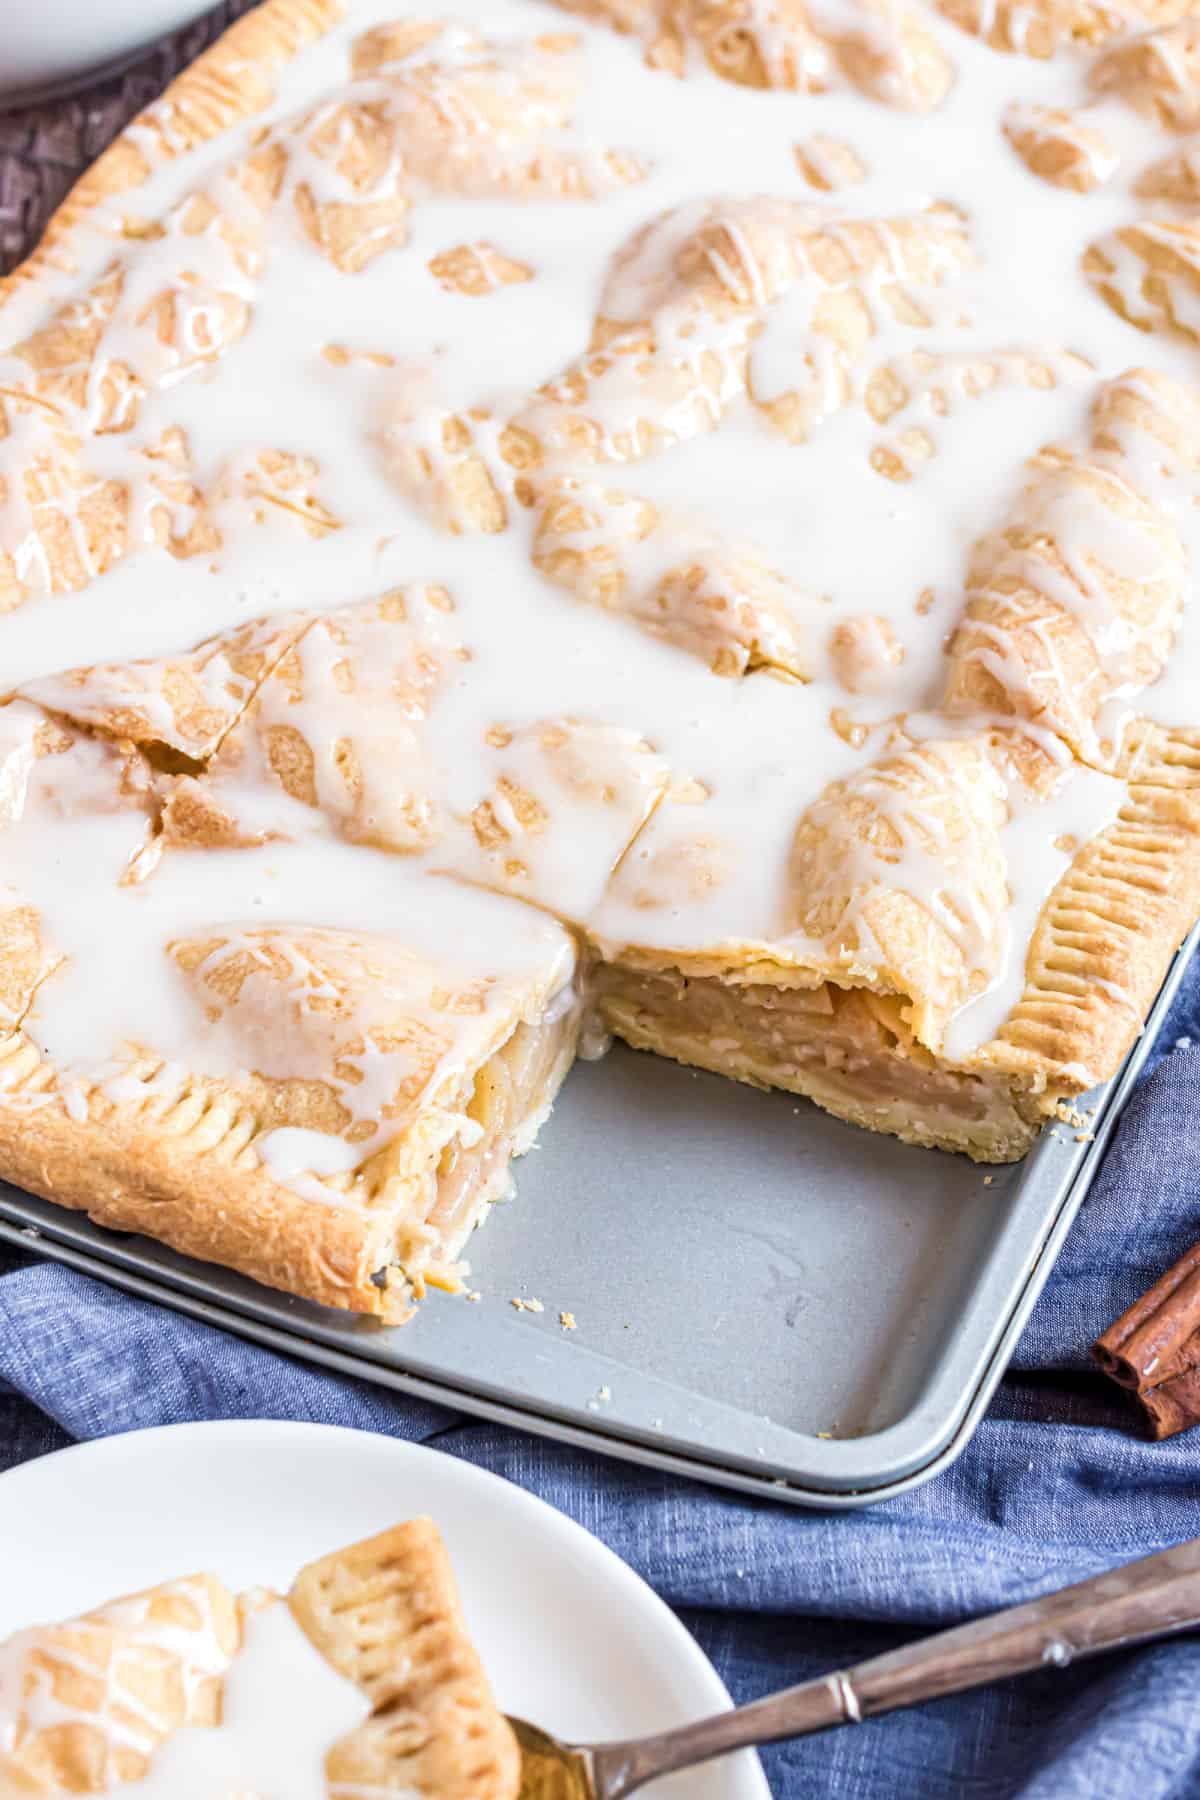
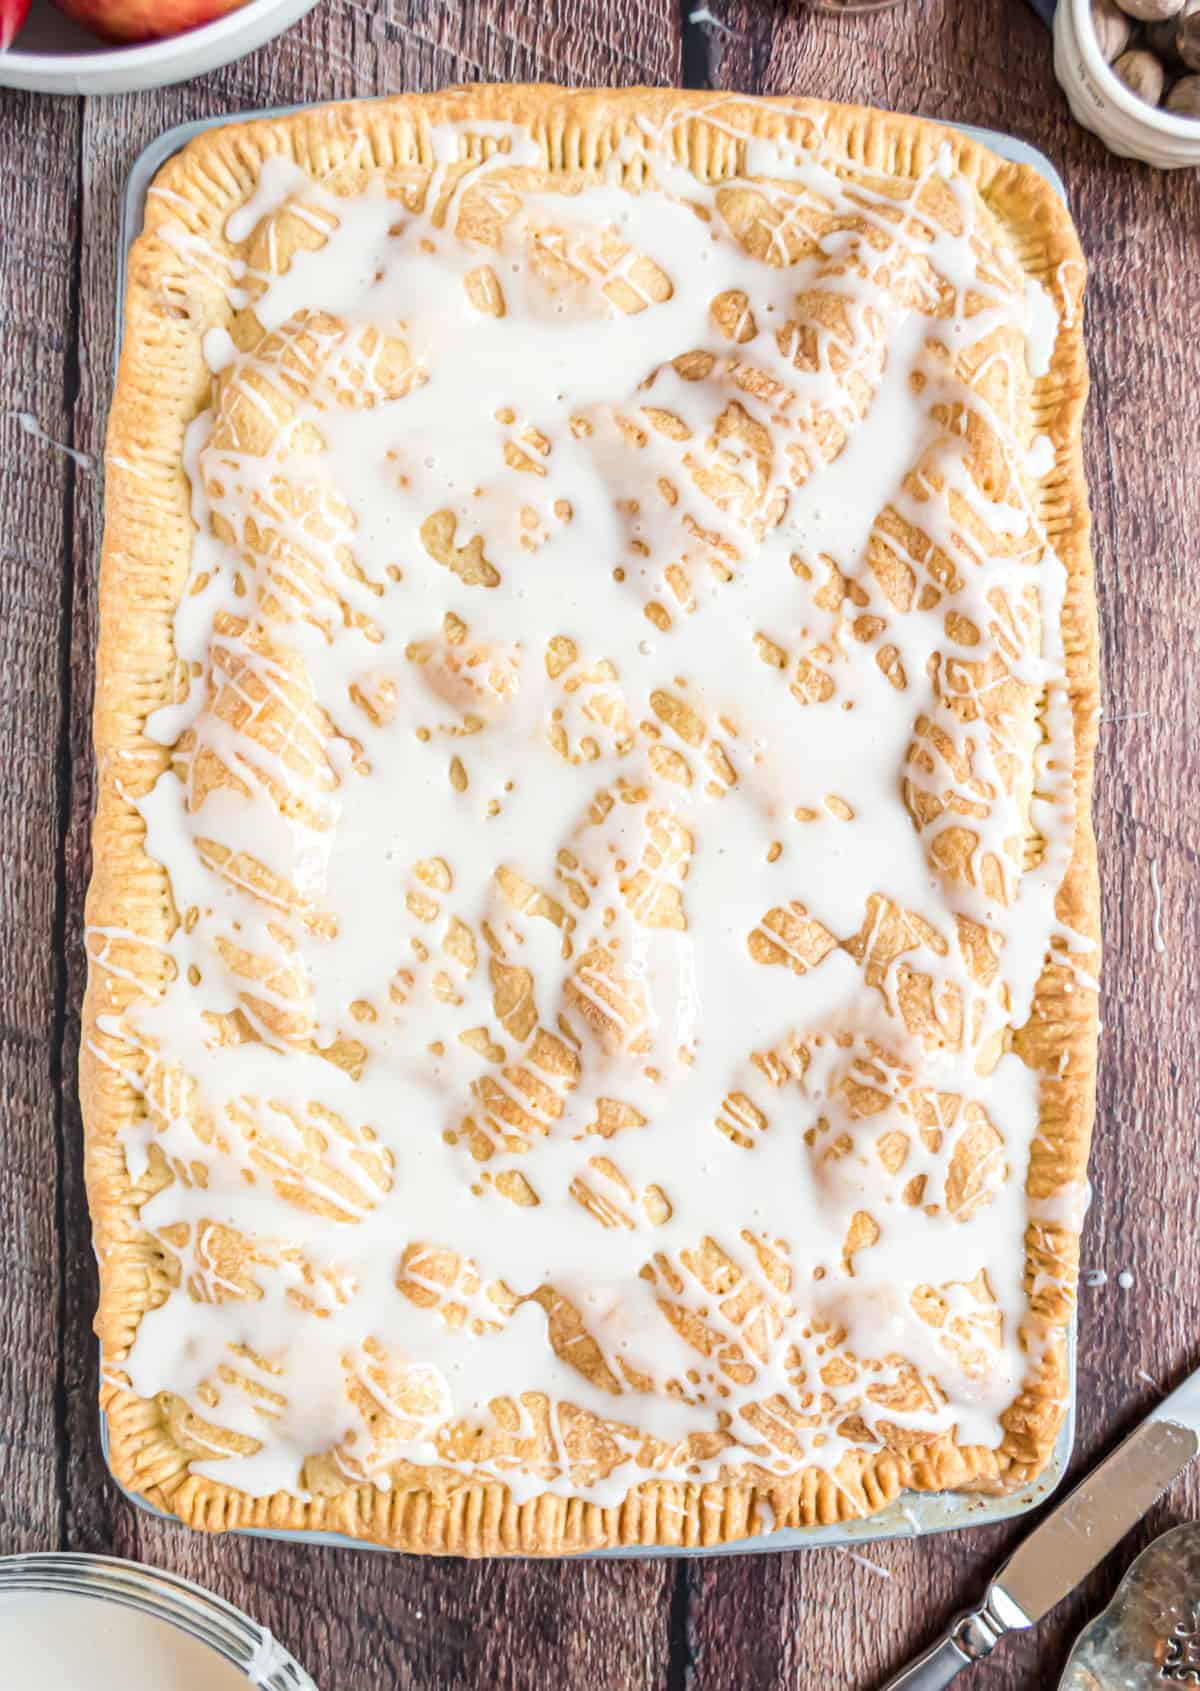
Apple Slab Pie is a pie that’s ready to party. This pie recipe has a cinnamon-spiced apple filling topped with a flaky crust and vanilla icing. Made in a jelly roll pan, it’s so easy to cut and serve!
Our readers can’t get enough easy pies–and who can blame them? For apple pie purists it doesn’t get better than this Classic Apple Pie! Want another flavor? Our pecan pie is delicious and perfect for holidays.
Why this Recipe is Best
Have you ever made a slab pie before? (Our key lime pie bars and blueberry slab pie recipes are a perfect example).
It’s perfect for the holidays when you have a house full of hungry guests.
- Slab pie yields 24 slices–enough to feed a crowd!
- Cut into squares for easier serving than traditional pie shapes.
- Vanilla icing adds a sweet finishing touch to the buttery crust and flavorful apple.
Instead of making multiple regular round pies, you just bake one big rectangular pie then cut it into bars. I’m working on a pumpkin pie version too!
Of course, I couldn’t resist drizzling a little icing over my Apple Slab Pie too. I’ll never pass up an opportunity to have a little more icing in my life!
Try our apple pie bars next. They’re similar to today’s recipe, but they have a streusel topping like dutch apple pie!
Ingredient Notes
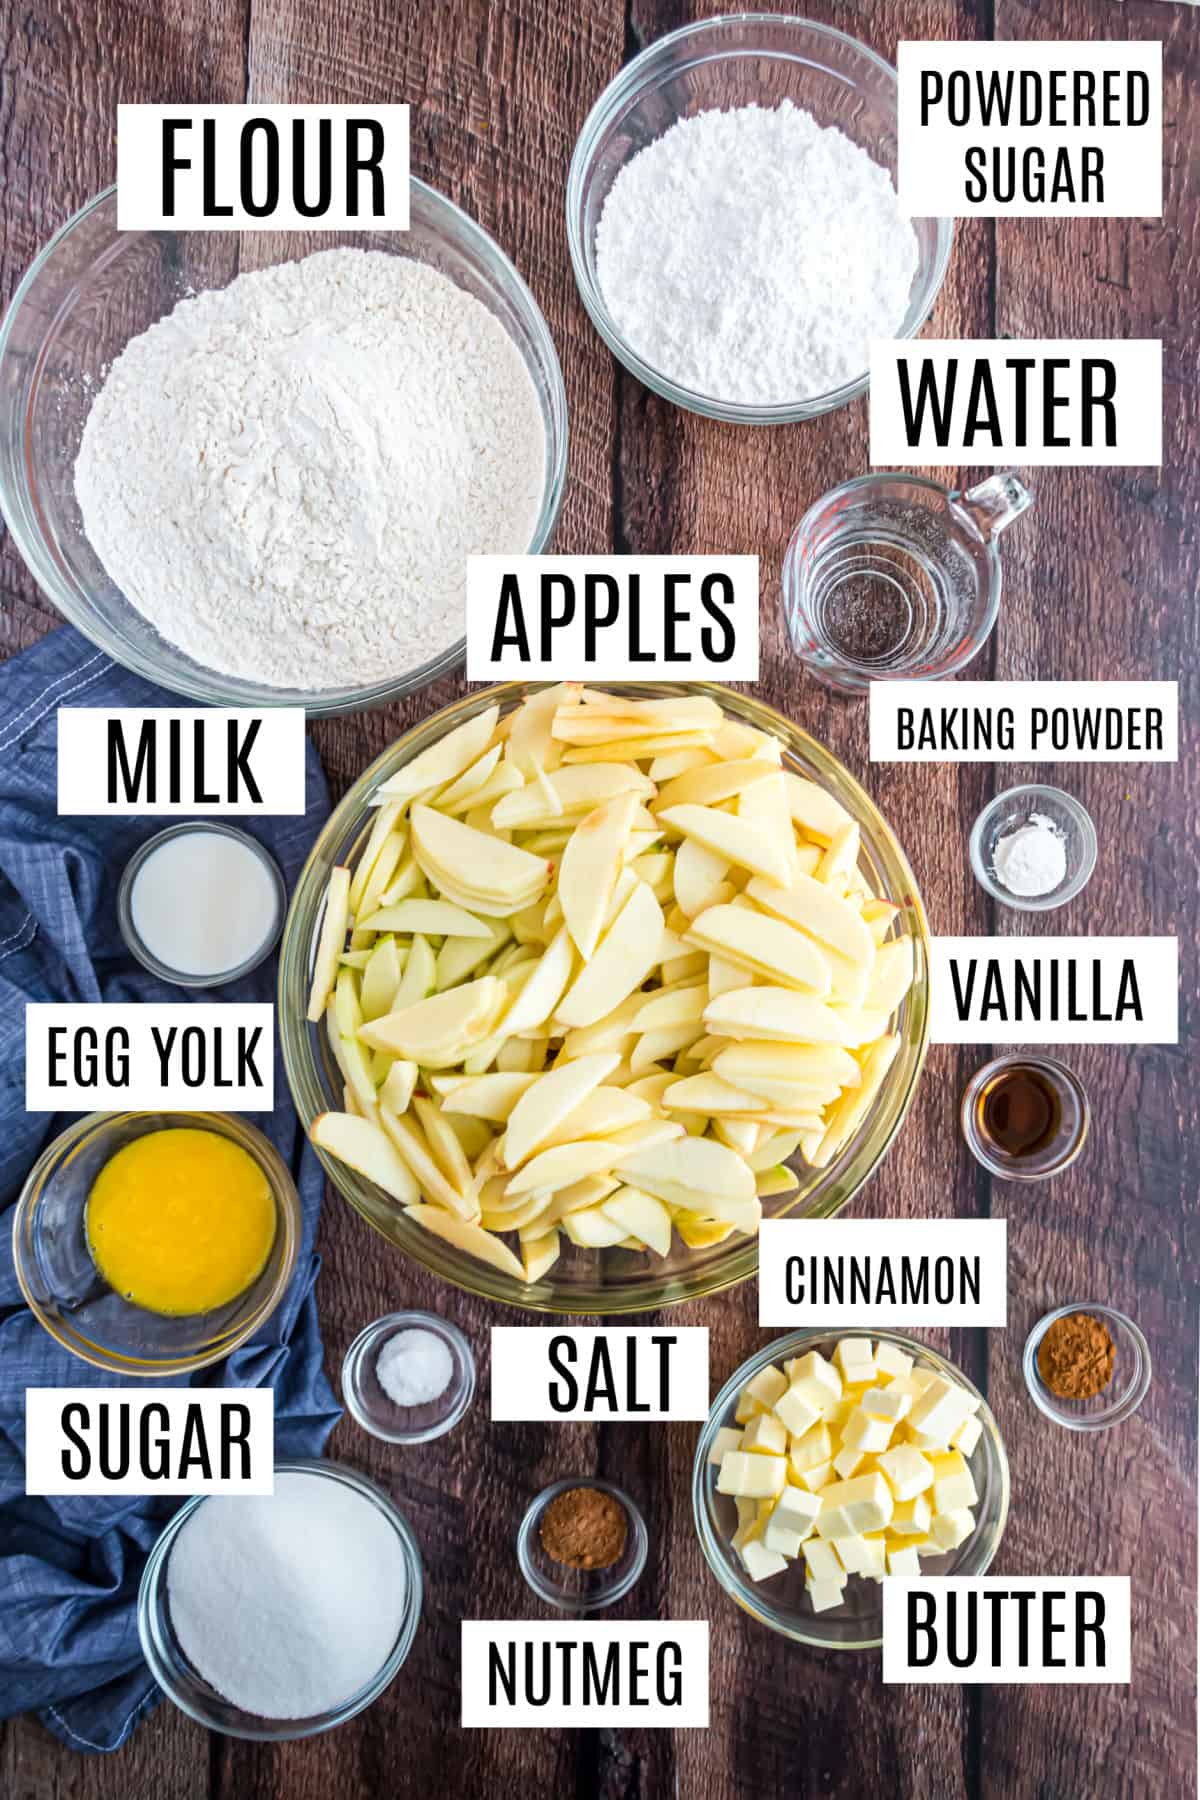
- Cold unsalted butter – Using very cold butter is the secret to tender, flaky homemade pie crust.
- Egg yolks – Incorporating eggs into pastry makes it easier to shape without cracking and gives the crust a lovely golden brown color as it bakes.
- Baking powder – Just a smidge of this helps leaven the pie crust making it even flakier.
- Apples -Use a combination of sweet and tart apples in the filling for best flavor.
PRO TIP- We love making our own homemade vanilla extract, but if using store bought, be sure it’s pure extract, not imitation (for best flavor).
How to Make Slab Pie Crust
The pie crust for this slab pie is easier to make than you might expect. And the delicious results are well worth it!
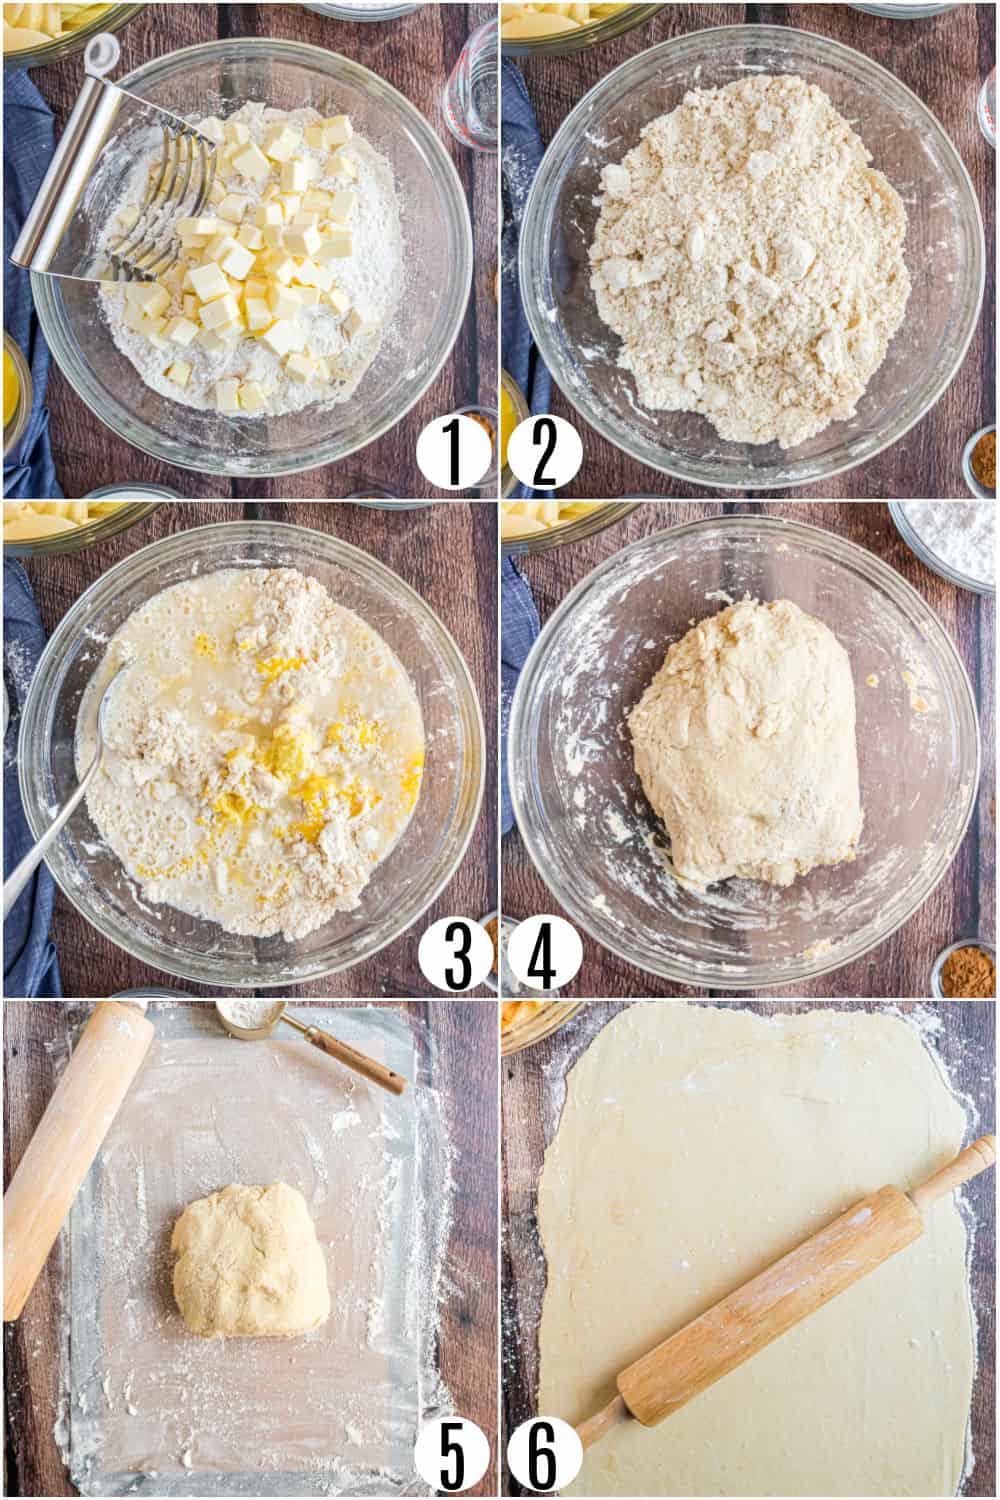
Combine butter and flour:
Mix together flour, kosher salt and baking powder. Use a pastry cutter to incorporate cold butter into the flour mixture.
Once the dough looks crumbly, work it with your hands until it holds together when squeezed.
Add eggs and chill:
Use a spatula or strong spoon to mix beaten eggs into the dough. Place the ball of dough in the refrigerator for 30 minutes.
While the dough is chilling you can prep the apple filling.
Roll the crust:
Divide the dough into two equal portions.
Roll out each portion of dough onto a floured surface. Try to roll them a little larger than the size of the jelly roll pan.
Place one portion of dough on the bottom of the pan. Now, add the pie filling and top with the second portion of crust.
Pinch the edges of the crust together and seal them with the tines of a fork. Pierce the top of the crust with a fork before baking.

Tips and Tricks
- Use your rolling pin to easily transfer the crusts to the pan. Roll the crust around the rolling pin, then unroll it into the pan.
- You’ll need a slotted spoon for adding the apple filling to the slab pie crust. The apples release a lot of juice in the bowl and adding all of that to the pie would make it soggy.
- I love these bars best served cold! Store them covered in the fridge for up to 4 days.
- Crumble topping- swap out the second layer of pie crust for a crumble topping (like on our dutch apple pie recipe). You’ll want to at least double the crumble recipe.
- Love warm pie? Serve with homemade vanilla ice cream or whipped cream.
Recipe FAQs
Apple Slab Pie bars can be frozen for longer storage! Stash them in an airtight container in the freezer for up to 3 months.
I recommend a mixture of apples to get the best flavor here. We like a blend of Honeycrisp, Gala and Granny Smith.
For apple pie, I slice my apples about 1/4 inch thick. But don’t stress on getting them all exactly the same size. A little variety of texture and thickness is perfectly fine!
Yes, apples should be peeled and cored before using in this recipe.
More Fall Recipes
For a complete holiday meal…
- This Green Bean Casserole is topped with crispy fried onions and tastes like hearty love!
- Try out this Sweet Potato Casserole or this Hashbrown Casserole to complete your Thanksgiving dinner table!
- This Apple Crumble tastes like this Apple Pie, but has none of the hassle attached!
- This sweet and easy Cherry Slab Pie is perfect for a quick weeknight dessert!
- This French Silk Pie is a chocolate lovers delight! Rich, decadent silky smooth chocolate pie!
Pin this now to find it later
Pin It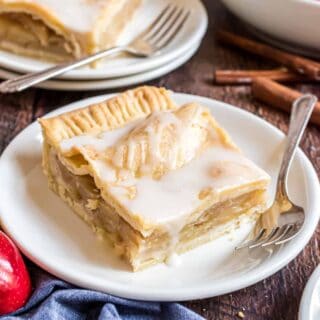
Apple Slab Pie
Ingredients
For the Pastry:
- 5 cups all-purpose flour sifted
- 1 teaspoon baking powder
- 1 teaspoon kosher salt
- 1 ½ cups cold unsalted butter cubed
- 3 large egg yolks beaten
- 1 ¼ cup water
For the Filling:
- 12-14 apples 14 cups peeled, cored and sliced
- 1 cup granulated sugar
- ⅓ cup all-purpose flour
- Dash of kosher salt
- 2 teaspoons nutmeg divided
- 2 teaspoons cinnamon divided
- 4 Tablespoons unsalted butter cubed
For the Icing:
- 1 cup powdered sugar
- 1 ½ Tablespoons milk more to thin if necessary
- Dash kosher salt
- ½ teaspoon vanilla
Instructions
- In a large mixing bowl, combine flour, baking powder and salt. Add cubed butter and combine with a pastry blender until dough begins to form crumbs. Using your hands, continue to work the dough until it begins to hold together when squeezed.
- Add beaten egg yolks and water and combine with a spoon or spatula until dough comes together in a ball. Cover and refrigerate for 30 minutes.
- While the pastry dough is chilling, make the filling by peeling, coring and thinly slicing apples into an extra large mixing bowl.
- Combine the sugar, flour, 1 teaspoon cinnamon, 1 teaspoon nutmeg and salt in a small bowl and sprinkle over the sliced apples, tossing to coat.
- Combine remaining 1 teaspoon cinnamon and 1 teaspoon nutmeg in a small dish and set aside.
- After dough is done chilling, preheat oven to 425 degrees F.
- Divide the dough in 2 equal halves, one for the bottom crust and one for the top. Roll out the dough for the bottom crust on a lightly floured surface or silpat so that it’s just slightly larger than the jelly roll pan (10-inch x 15-inch x 1-inch pan). This will allow for the extra that you will need to crimp the crust edge closed.
- To easily transfer the crust to the jelly roll pan, use the rolling pin and roll the crust back onto it.
- Unroll the crust off the rolling pin and onto the jelly roll pan, allowing the extra to drape over the sides and ends. If needed, press the crust into the corners.
- Using a slotted spoon, add and evenly spread the apple filling into the crust. There will be a lot of filling and the apples will seem like they’re piled quite high, but they will cook down during baking.
- Sprinkle the additional cinnamon nutmeg mixture over the apple filling. Dot the top of the filling with butter.
- Roll out the second half of the dough in the same manner as the first half, making sure to make the top crust big enough to cover the piled apple filling. Transfer the top crust using the rolling pin method.
- Pinch the edges of the crust together by rolling it and tucking it so that it is on the inside edge of the jelly roll pan. Using the tines of a fork, press the 2 crusts together and seal the edge all the way around. Prick the top of the crust with a fork to allow the filling to vent during baking.
- Place foil or a larger cookie sheet on the rack underneath the jelly roll pan to catch any drips that may occur during baking.
- Bake at 425℉ for 20 minutes and then reduce the oven temperature to 350℉ and bake an additional 30 minutes. Cool completely before adding the icing.
- For the icing, stir all ingredients together in a small bowl until smooth. Drizzle over the top.
Notes
- A variety of apples provides the best flavor. Mixing tart with sweet. We love honeycrisp, gala, and granny smith. Apples can be sliced up to ¼” thick – mine were varying thicknesses.
- A slotted spoon is needed when adding the apples to the crust. There is A LOT of juice coming from the apple filling, even when they sit for a short while. Adding that would make the crust super soggy.
- Store apple pie at room temperature for up to 2 days, then you can store refrigerated for an additional 2 days if desired. I prefer my apple slab pie bars COLD, but you choose. After 4 days total, you can freeze pie for up to 3 months in airtight container in the freezer.
Nutrition
Apple Slab Pie is the perfect dessert for this year’s Thanksgiving feast. All the fall flavors of traditional pie but even easier to share!

These look yummy and I’d like to make ahead of time for Thanksgiving. How long do they keep in the fridge? Thank you!
The 4 tbs of butter for filling?? Instructions lacking clarity…
In step 11, you add the butter to the top of the apple filling (for clarity, you can see how we did it in the photos above). ENJOY.
Cinnamon & apples remind me of everything fall & happiness!! It’s the best & this can feed a lot!
My family loves crumb topping, so I tried your suggestion and swapped out the top pie crust for buttery crumbs. Oh my gosh, so good! It didn’t even need the icing. A perfect way to serve apple pie to a crowd!
Ingredients for crumb topping? Yummmy😊
The apple layers are delicious!! Love the cinnamon-y flavor & the icing makes it sweet!
Can I use ready made pie crust? Frozen
I haven’t tried that, but I don’t see why not!
About how many lbs. of apples did you use?
I didn’t weigh them, but it’s roughly 12 apples (12-14 cups sliced).